# Welcome
Welcome to Oktopus Controller official documentation site.
Here you'll find helpfull content, tutorials and insights about the Oktopus Controller, along with that we also want to dive deep into the details of the [USP](/usp-tr-369/introduction) and [CWMP](/cwmp-tr-069/introduction) protocols.
The main goal is to provide one platform to manage multiple devices of different vendors. If they support USP or CWMP protocol, than Oktopus is the right choice.
{% hint style="info" %}
This site is a document always in construction. Your help is very appreciated to improve it and help us to provide high quality content about USP, CWMP and Oktopus Controller. If you wish to contribute, relate to the next section.
{% endhint %}
## Contribute
Oktopus Controller is Open Source as is this documentation. Fell free to make contributions to the [project](https://github.com/OktopUSP/oktopus) and this [docs](https://github.com/OktopUSP/docs).
## Support
Our team is available to support Enterprise Edition clients through [email](mailto:support@oktopus.app.br). If you have further questions about the Community Edition **we are available at** [**Slack**](https://join.slack.com/t/oktopustr-369/shared_invite/zt-1znmrbr52-3AXgOlSeQTPQW8_Qhn3C4g)**, along with other members of the community**.
# About
Oktopus is an open-source USP Controller and CWMP-compatible multi-vendor management platform for CPEs and IoTs. Any device that follows the TR-369 or TR-069 protocol can be managed. Our main objective is to unify device management into a single software solution with rich insights and configuration capabilities, improving the quality of experience and services provided by a CSP or ISP while reducing the costs of technical support, operations, and maintenance.
Learn about the [architecture](/getting-started/community-edition/architecture) first, get familiar with the [installation prerequisites](/getting-started/community-edition/installation), and then finally, step through how to [install the software](/getting-started/community-edition/installation) in your environment.
### Community vs Enterprise
This table compares the features available in Oktopus Community Edition versus Enterprise Edition.
| Feature | Community | Enterprise |
| --------------------------------------------- | --------- | ------------------ |
| **Core Device Management** | | |
| USP (TR-369) & CWMP (TR-069) Protocols | ✅ | ✅ |
| Multiple Transports (MQTT, STOMP, WebSockets) | ✅ | ✅ |
| Device Discovery & Configuration | ✅ | ✅ |
| Custom Message Templates | ✅ | ✅ |
| Overview Dashboard | ✅ | ✅ (with more data) |
| Basic User Management | ✅ | ✅ |
| REST API | ✅ | ✅ |
| **Enterprise Features** | | |
| Audit Trail | ❌ | ✅ |
| Granular Permissions (RBAC) | ❌ | ✅ |
| Multi-Tenancy | ❌ | ✅ |
| Abstracted Device Management UI | ❌ | ✅ |
| Zero Touch Provisioning | ❌ | ✅ |
| Network Automation | ❌ | ✅ |
| Mass Actions | ❌ | ✅ |
| Devices Geolocation | ❌ | ✅ |
| QoE Analysis | ❌ | ✅ |
| AI Assistant | ❌ | ✅ |
| **Support & Services** | | |
| Community Support (Slack) | ✅ | ✅ |
| Email Support | ❌ | ✅ |
| Device Homologation | ❌ | ✅ |
| Professional Services | ❌ | ✅ |
| **License** | | |
| Open Source | ✅ | ❌ |
| Cost | Free | Paid |
# Community Edition
Suited for DIY people, developers and enthusiasts
## Dashboard
Check the overall performance of the system, and get insights about the devices as their type, total quantity and status.
Overview Section
## Devices
Table list with all the devices connected to Oktopus, independent of the protocol used for management, all of them will appear in this list, with options to filter for specific devices characteristics, and remove or add table fields to view.
Devices Section
### Parameters Discovery
Access the device you wish and discover the data model dinamically.
Data Model Discovery
### Custom Messages
Send custom USP or CWMP native packets, It is possible to create and save messages templates to be used later, according to each protocol specification.
Message Template Saved
Create Message Template
### Credentials
This section defines credentials to be used by the devices to connect to Oktopus Controller, those credentials are going to be attached to the ACS, MQTT, STOMP and Websockets instances that will now check if the device has the correct keys.
For this to work you need to enable this feature through environment variables in each server/broker protocol you want to have authentication enabled.
Credentials Section
## Users
There are two levels of users availables in the Community Edition:
* *Admin*: Have access to the whole software platform, including the rights to remove/add users and devices credentials.
* *User*: Can access devices and configure the same, view users, dashboard information and credentials, but is not allowed to remove/add other users and devices credentials.
Users Management Page
# Installation
> The following tutorials don't cover all possible configurations and deployment modes of Oktopus Controller, many adjusts as TLS encryption of MTPs and NATS are not documented yet, although the software already supports it. Your help is welcome to help us cover this topics, and soon we hope to be launching content related to encryption, USP and CWMP best practices and different possibilites to install Oktopus as in a cloud provider, on-premises, or hybrid.
## Quick Start
If you're a developer or someone who just wants to try Oktopus and get a better understanding of CWMP and/or USP standards, don't waste time. Have the software running with one command:
```
wget https://github.com/OktopUSP/oktopus/archive/refs/heads/main.zip && unzip main && cd oktopus-main/deploy/compose && COMPOSE_PROFILES=nats,controller,cwmp,mqtt,stomp,ws,adapter,frontend docker compose up -d
```
The web interface will become accessible at **port 80**:
Oktopus web first acces
# Standalone
The standalone mode installs all the software components into one server. It's pretty straighforward, but becomes a single point of failure. Anyway, it should be enough for small-medium sized workloads.
## Requirements
* docker
* docker compose
* wget
* unzip
Have the services ports available internally or public accordingly to Oktopus [network requirement section](/getting-started/community-edition/network). Keep in mind it's always advisable to have a firewall in front of your server and have controll of the traffic policies.
This tutorial was tested against OS Ubuntu 24.04, but it must work for other linux systems too.
## Installation
First of all, let's download Oktopus codebase:
```
wget https://github.com/OktopUSP/oktopus/archive/refs/heads/main.zip && unzip main
```
Then go into the deploy/compose folder:
```
cd oktopus-main/deploy/compose
```
Edit ".env.controller" file last line with a secret value, this key will be used to sign JWTs used in Oktopus users authentication process.
```
nano .env.controller
```
{% code title=".env.controller" %}
```
MONGO_URI=mongodb://mongo_usp:27017
NATS_URL=nats://oktopususer:oktopuspw@msg_broker:4222
NATS_ENABLE_TLS="true"
CLIENT_CRT=/tmp/nats/config/cert.pem
CLIENT_KEY=/tmp/nats/config/key.pem
SERVER_CA=/tmp/nats/config/rootCA.pem
SECRET_API_KEY=
```
{% endcode %}
Once you've done the steps above, still inside "oktopus-main/deploy/compose" folder, run:
```
COMPOSE_PROFILES=nats,controller,cwmp,mqtt,stomp,ws,adapter,frontend,portainer docker compose up -d
```
Congratulations! Oktopus Web interface will be available at **port 80**.
# High Availability
For deployments with failover and advanced container management/orchestration, Kubernetes and it's flavors are the go-to option. This section aims to provide a example deployment that may need to be changed according to your environment specifics, as hardware/software Load Balancers, cluster nodes, firewall, bare-metal or cloud environment.
## Installation
### Download Files
```
git clone https://github.com/OktopUSP/oktopus
export DEPLOYMENT_PATH=oktopus/deploy/kubernetes
```
### HAProxy Ingress Controller
```
helm install haproxy-kubernetes-ingress haproxytech/kubernetes-ingress \
--create-namespace \
--namespace haproxy-controller \
--set controller.kind=DaemonSet \
--set controller.daemonset.useHostPort=true
```
### MongoBD
```
# Mongo DB Operator at mongodb namespace
helm repo add mongodb https://mongodb.github.io/helm-charts
helm install community-operator mongodb/community-operator --namespace mongodb --create-namespace
# Mongo DB ReplicaSet
export DEPLOYMENT_PATH=oktopus/deploy/kubernetes
kubectl apply -f $DEPLOYMENT_PATH/mongodb.yaml -n mongodb
# Check Installation
kubectl get pods -n mongodb
```
### NATS Server
```
# Download the NATS charts
helm repo add nats https://nats-io.github.io/k8s/helm/charts/
# Install NATS with Jetstream Enabled
helm install nats nats/nats --set config.jetstream.enabled=true
```
### Oktopus
```
kubectl apply -f $DEPLOYMENT_PATH/mqtt.yaml
kubectl apply -f $DEPLOYMENT_PATH/mqtt-adapter.yaml
kubectl apply -f $DEPLOYMENT_PATH/adapter.yaml
kubectl apply -f $DEPLOYMENT_PATH/controller.yaml
kubectl apply -f $DEPLOYMENT_PATH/socketio.yaml
kubectl apply -f $DEPLOYMENT_PATH/frontend.yaml
kubectl apply -f $DEPLOYMENT_PATH/ws.yaml
kubectl apply -f $DEPLOYMENT_PATH/ws-adapter.yaml
```
### Checking cluster status:
```bash
kubectl get pods
kubectl get svc
```
# FAQ
Frequently asked questions about installation.
#### Followed the installation guide but user register page does not appear?
Check if you're connected to Oktopus through the port 80 instead of 300, then make sure tha MongoDB is running, it has some issues depending on the CPU architecture which makes it crash, so if that's the case with you, change the [docker-compose file](https://github.com/OktopUSP/oktopus/blob/main/deploy/compose/docker-compose.yaml#L41) to a different MongoDB version compatible with the server hardware.
#### What is Oktopus default user and password?
Oktopus has no default user and password, in the first run of the software it should appear a user register page, if it didn't appear, follow the instructions mentioned in the question above.
# Architecture
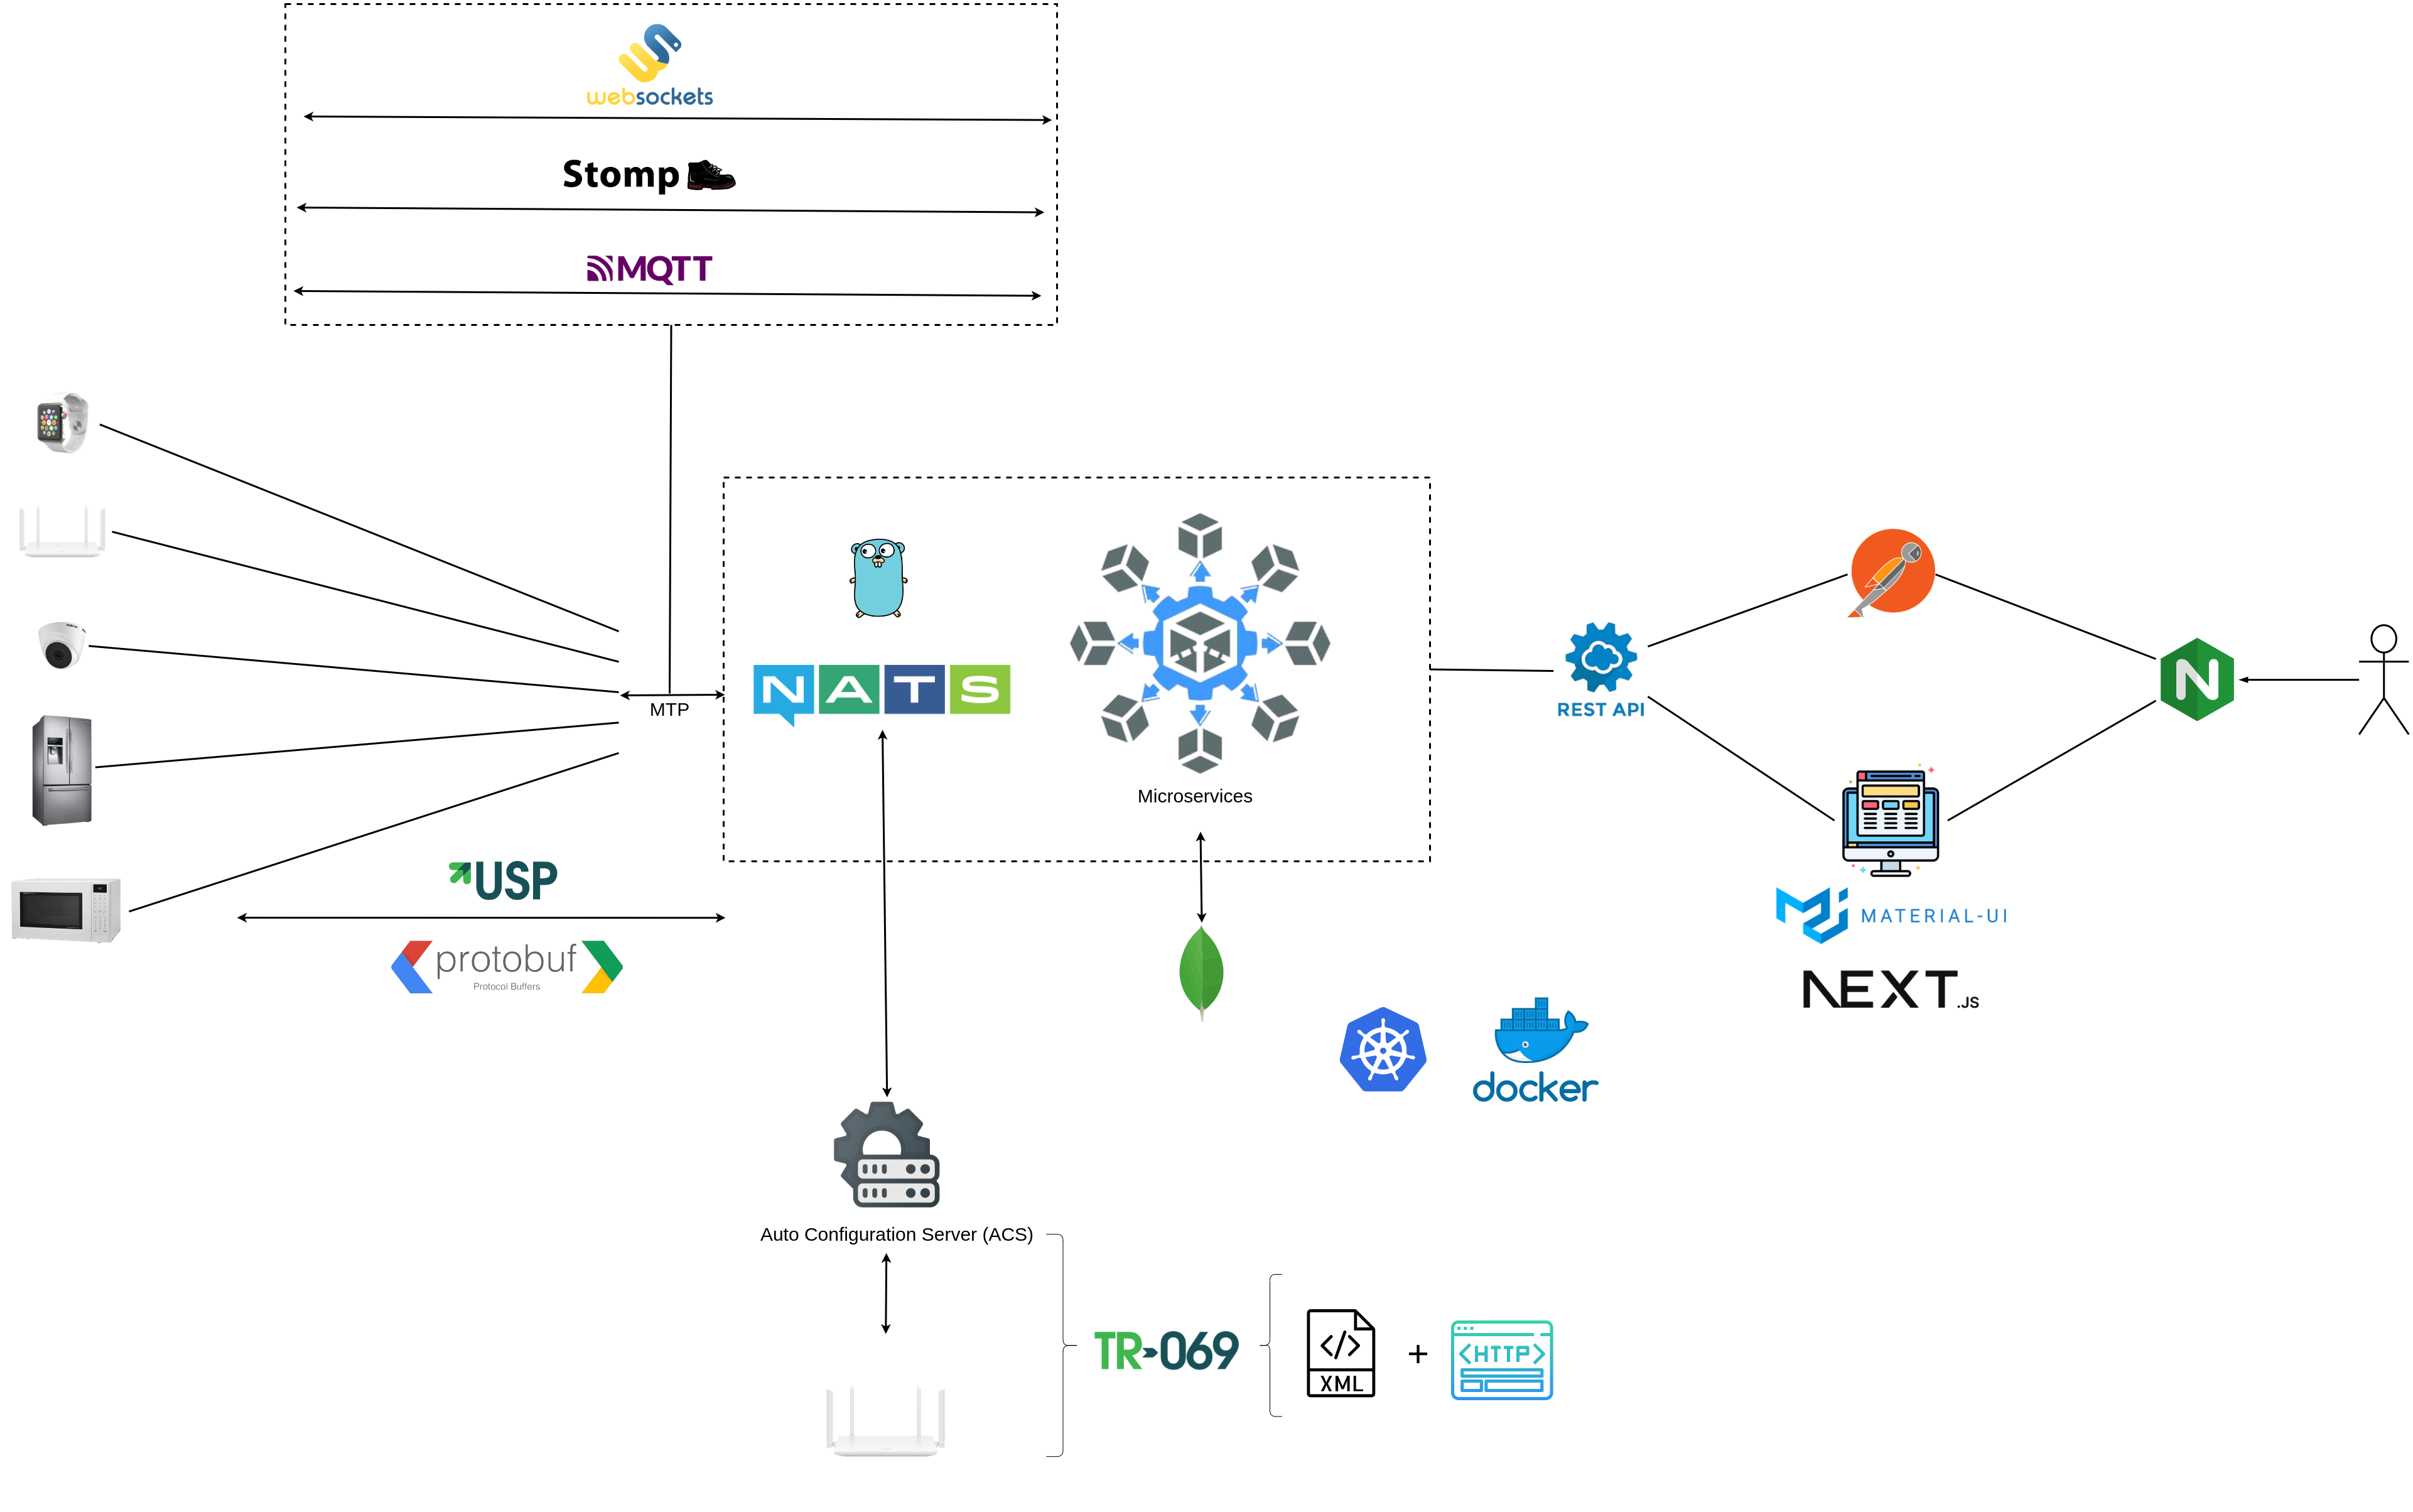
Oktopus Controller backend is made up of some microservices written in [Go](https://go.dev/) because of the language versatility, speed, and small resource usage footprint. All the microservices communicate with each other through [NATS](https://nats.io/), which is a robust message system, really fast, built for IoT and edge applications. The database picked is [MongoDB](https://www.mongodb.com/), which makes possible to have flexible data, saved in the right manner based on our needs.
The frontend is made with the most modern frameworks and design system available in the market. It has the [Material UI ](https://mui.com/material-ui/getting-started/)components lib integrated with [NextJS](https://nextjs.org/), which ensures a smooth single page app experience.
High-Level Components
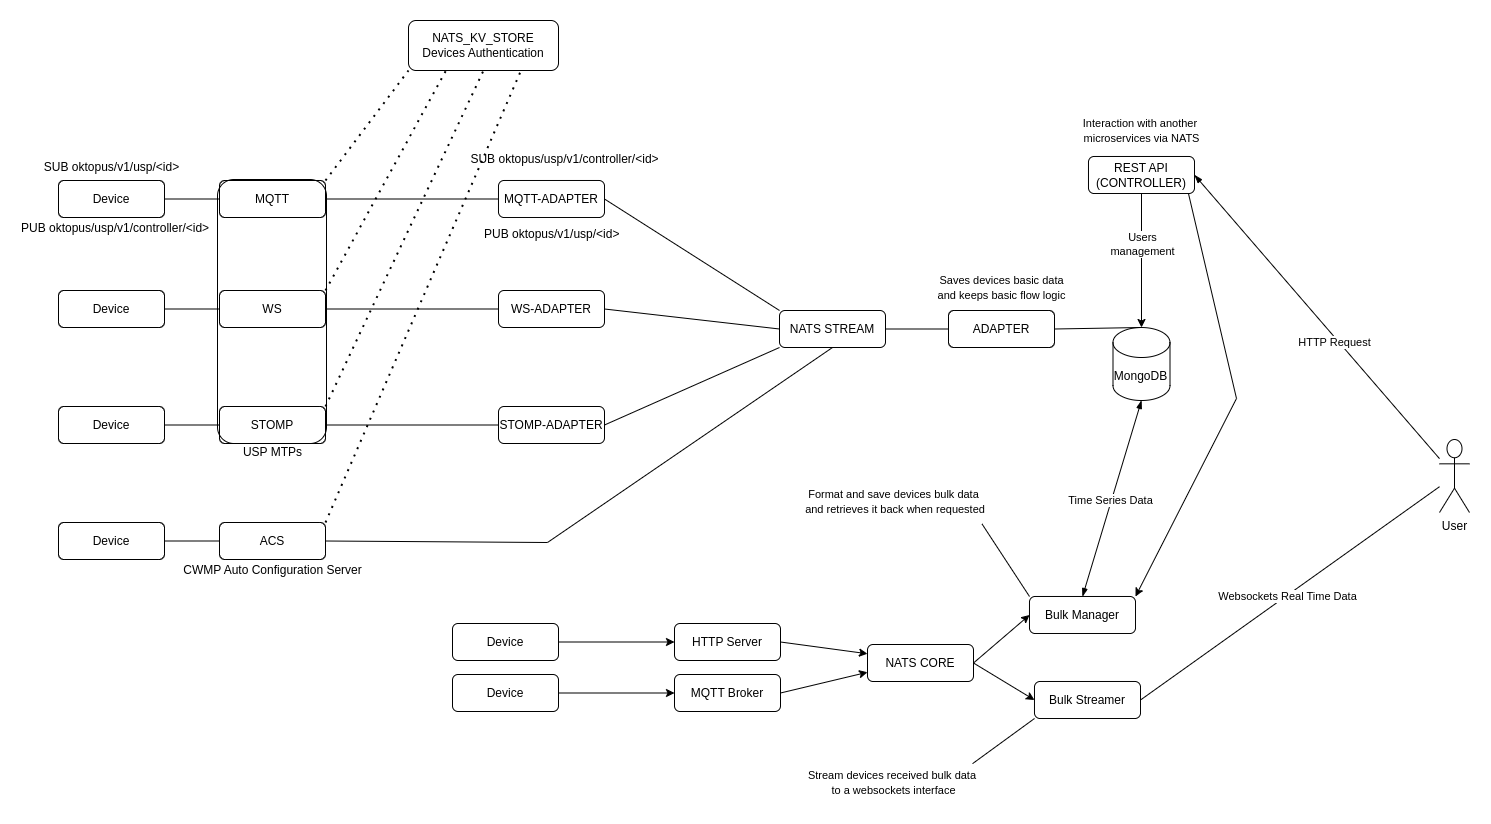
All the different protocols used to manage the devices are abstracted to NATS message system, this allow us to have different components/services deployed in different servers, and locations, as long as the connection to NATS cluster is maintained.
Software components are deployed within [Docker](https://www.docker.com/) containers. The most straigthforward way to install Oktopus Controller is using docker compose. For high availability production environments we suggest to use Kubernetes.
Microservices Overview
# Network
Oktopus Controller ports and routes:
Endpoint
Network Protocol
Application
Expose
:9292/acs
HTTP
Auto Configuration Server (ACS)
Public
:8883
MQTTS
MQTT MTP with TLS
Public
:1883
MQTT
MQTT MTP without TLS
Public
:61613
STOMP
STOMP MTP
Public
:8080
Websockets
Websockets MTP
Public
:9443
HTTP
Portainer
Internal
:8004
HTTP
File Server
Internal
:80
HTTP
Nginx
Public
:3000
HTTP
Frontend
Internal
:8000
HTTP
Controller REST API
Public
:27017
MongoDB
Internal
:4222
NATS
NATS Message System
Internal
Make sure that you have all the ports above available.
# Developer Guide
### Project Architecture
#### High-Level Structure
```
oktopus/
├── agent/ # USP Agent configuration and examples
├── backend/ # Core backend services
│ └── services/
│ ├── controller/ # Main controller service
│ └── mtp/ # Message Transfer Protocol adapters
├── frontend/ # Next.js web application
├── deploy/ # Deployment configurations
└── docs/ # GitBook documentation
```
#### Backend Architecture
The backend is built with Go and follows a modular service architecture:
**Controller Service**
Located in `backend/services/controller/`, this is the core service that manages devices and handles protocol communications.
**Key Components:**
* **API Layer** (`internal/api/`): REST API endpoints for device management
* `api.go`: Main API router and middleware setup
* Device message handlers (GET, SET, ADD, DELETE operations)
* **CWMP Support** (`internal/cwmp/`): TR-069 protocol implementation
* Handles CWMP-specific operations like GetParameterNames, SetParameterValues
* **Entity Layer** (`internal/entity/`): Core business entities and data models
* **Database Layer** (`internal/db/`): Database abstraction and persistence
* **Bridge** (`internal/bridge/`): Communication bridge between services
**MTP Adapters**
The Message Transfer Protocol adapters handle different communication protocols:
* **WebSocket Adapter** (`backend/services/mtp/ws-adapter/`): Implements WebSocket MTP for USP
* **MQTT Adapter**: Handles MQTT-based communication
* **STOMP Adapter**: Handles STOMP protocol
As mentioned in the USP MTP documentation, USP supports multiple MTPs including WebSockets, MQTT, and STOMP.
#### Frontend Architecture
The frontend is built with Next.js and located in `frontend/`. It provides a web interface for managing devices.
### Development Setup
#### Prerequisites
* **Go**: Version 1.23+
* **Node.js**: Version 18+
* **NATS**: Message broker for inter-service communication
* **Docker**: For containerized development (optional)
#### Building the Services
**Docker Development**
From the root `build/` directory, you can build all services at once:
```bash
cd build/
make build # Build all services (backend + frontend)
make build-backend # Build only backend services
make build-frontend # Build only frontend
```
**Building Individual Microservices**
Each microservice has its own build directory with a Makefile and Dockerfile. The general pattern is:
```bash
cd backend/services//build/
make build
```
**Available Backend Services:**
1. **Controller Service** - Core device management
```bash
cd backend/services/controller/build/
make build
```
* Built from: `cmd/controller/main.go`
* Binary: `controller`
* Base image: Alpine Linux
2. **ACS Service** - Auto Configuration Server (CWMP)
```bash
cd backend/services/acs/build/
make build
```
* Built from: `cmd/acs/main.go`
* Binary: `acs`
* Base image: Alpine Linux
3. **MTP Adapters** - Message Transfer Protocol handlers
**WebSocket Adapter:**
```bash
cd backend/services/mtp/ws-adapter/build/
make build
```
* Built from: `cmd/ws-adapter/main.go`
* Handles WebSocket connections for USP
**WebSocket Service:**
```bash
cd backend/services/mtp/ws/build/
make build
```
* Built from: `cmd/ws/main.go`
**MQTT Adapter:**
```bash
cd backend/services/mtp/mqtt-adapter/build/
make build
```
* Built from: `cmd/mqtt-adapter/main.go`
* Handles MQTT connections for USP
**MQTT Service:**
```bash
cd backend/services/mtp/mqtt/build/
make build
```
* Built from: `cmd/mqtt/main.go`
**STOMP Adapter:**
```bash
cd backend/services/mtp/stomp-adapter/build/
make build
```
* Built from: `cmd/stomp-adapter/main.go`
* Handles STOMP connections for USP
**STOMP Service:**
```bash
cd backend/services/mtp/stomp/build/
make build
```
* Built from: `cmd/stomp/main.go`
**Generic Adapter:**
```bash
cd backend/services/mtp/adapter/build/
make build
```
* Built from: `cmd/adapter/main.go`
4. **Utility Services**
**Socket.IO Service:**
```bash
cd backend/services/utils/socketio/build/
make build
```
* Node.js service for real-time communication
* Base image: Node 16.20.2-alpine
**File Server:**
```bash
cd backend/services/utils/file-server/build/
make build
```
* Serves firmware files and other static content
5. **Bulk Data Collector**
```bash
cd backend/services/bulkdata/http/build/
make build
```
* Built from: `cmd/http-bulk-collector/main.go`
* Collects bulk data from devices \[WIP]
**Building the Frontend**
```bash
cd frontend/build/
make build
```
* Next.js application
* Node.js 18.18.0-alpine base image
* Production build with optimizations
### **Local Development**
**Backend Services (Go):**
```bash
# Navigate to the service directory
cd backend/services/controller # or any other service
# Install dependencies
go mod download
# Run locally
go run cmd/controller/main.go # adjust path for the specific service cmd/{service}/main.go
# Build binary
go build -o controller cmd/controller/main.go
# Run binary
./controller
# Run without build (for development purposes)
go run cmd/controller/main.go
```
**Frontend (Next.js):**
```bash
cd frontend
# Install dependencies
npm install
# Development server
npm run dev
# Production build
npm run build
npm run start
```
**Makefile Commands**
Each service's Makefile supports these commands:
* `make build` - Build Docker image
* `make push` - Push image to registry
* `make run` - Create and start container
* `make stop` - Stop running container
* `make remove` - Remove container
* `make delete` - Delete Docker image
* `make logs` - Show container logs
* `make bash` - Access container shell
* `make release` - Tag as latest and push
**Customization:**
```bash
# Build with custom Docker user
make build DOCKER_USER=myuser
# Build with specific tag
make build DOCKER_TAG=v1.0.0
# Use different shell for container access
make bash CONTAINER_SHELL=/bin/bash
```
#### Running the Services
The project includes:
* Build configurations in `build/Makefile`
* Docker Compose deployment in `deploy/compose/`
* Kubernetes deployment in `deploy/kubernetes/`
### Code Organization
#### Backend Service Structure
The controller service follows a clean architecture pattern:
```
backend/services/controller/
├── cmd/ # Application entry points
├── internal/
│ ├── api/ # HTTP API handlers
│ ├── bridge/ # Service communication bridge
│ ├── config/ # Configuration management
│ ├── cwmp/ # CWMP protocol implementation
│ ├── db/ # Database layer
│ ├── entity/ # Domain entities
│ └── utils/ # Utility functions
└── main.go
```
#### Pull Request Process
1. Fork the repository and create a feature branch
2. Make your changes following the code style guidelines
3. Write clear commit messages describing what and why
4. Test thoroughly with both protocols if applicable
5. Update documentation if you're adding new features
6. Submit a pull request to the main repository
Include in your PR description:
* What problem does it solve?
* How was it tested?
* Any breaking changes?
* Screenshots (for UI changes)
### Understanding Key Concepts
#### Device Communication Flow
1. Device connects via MTP adapter (WebSocket/MQTT/STOMP for USP, or ACS connection for CWMP)
2. Adapter ingest and digest messages through NATS message broker
3. API endpoint at Controller processes the user requests
4. Message is queued and sent to the device
5. Response is awaited with timeout
6. Result is returned to the client
#### CWMP vs USP Implementation
The codebase supports both protocols:
**CWMP (TR-069)**:
* Synchronous request/response model
* XML-based RPC
* Direct parameter paths (e.g., `InternetGatewayDevice.LANDevice.*.WLANConfiguration.*`)
* See `internal/cwmp/` for implementation
**USP (TR-369)**:
* Supports multiple MTPs (MQTT, WebSocket, STOMP)
* Protocol Buffers encoding
* More flexible messaging model
### Documentation
When adding features, update:
1. **Code comments**: Especially for exported functions
2. **GitBook docs** in `docs/`: Add user-facing documentation
3. **README files**: Update relevant README files
4. **API documentation**: If adding new endpoints
### Resources
* **Main Repository**: [github.com/OktopUSP/oktopus](https://github.com/OktopUSP/oktopus)
* **Documentation**: [github.com/OktopUSP/docs](https://github.com/OktopUSP/docs)
* **Community Slack**: Join the [Oktopus Slack](https://join.slack.com/t/oktopustr-369/shared_invite/zt-1znmrbr52-3AXgOlSeQTPQW8_Qhn3C4g)
* **Rest API Spec**: [Oktopus REST API Documentation](https://api.oktopus.app.br)
* **USP Specification**: Broadband Forum TR-369
* **CWMP Specification**: Broadband Forum TR-069
### Getting Help
* **Community Support**: Available on [Slack](https://join.slack.com/t/oktopustr-369/shared_invite/zt-1znmrbr52-3AXgOlSeQTPQW8_Qhn3C4g)
* **Enterprise Support**:
* **Issues**: Report bugs on [GitHub Issues](https://github.com/OktopUSP/oktopus/issues)
### License
Oktopus is released under the license specified in the `LICENSE` file. Make sure your contributions comply with this license.
# Enterprise Edition
Oktopus empowers ISPs to take control of multi-vendor CPE and IoT fleet to deliver the best customer experience.
Whether you're a regional ISP or a big operator. We have your back covered with the latest technology to unlock the full potential of your devices, delivering the highest level of service quality.
Create an account today, for free: .
{% embed url="" %}
# Services
A set of parameters to define the CPE configuration.
The services are used in conjunction with TR-x69 discovery mechanisms to achieve Z**ero Touch Provisioning** flows. The CPE is added to the system beforehand, and the proper service is attached to it. When the field technician plugs the CPE into the network infrastructure, the CPE is provisioned with the parameters defined in the ACS specific to that customer.
{% embed url="" %}
## Service Definition
A service definition is a set of parameters, variables, and operations that dictate the communication structure with the CPE when applying the service to its configuration.
## Scripts
Scripts in the zero-touch-provisioning system are written in **Lua** and provide the provisioning logic for CPE (Customer Premises Equipment) devices. They define how services are applied to devices, including configuration changes, credential management, and parameter updates.
### Execution Flow
1. **Script Initialization**: A Lua script is loaded with the device context (device ID, tenant ID, and variables)
2. **Lua Environment Setup**: The script runs in a secure Lua sandbox with access to predefined global variables and functions
3. **Function Calls**: The script can call Go functions to interact with devices and services
4. **Status Return**: The script must set a `provisioning_status` global variable to indicate success or failure
#### Global Variables
These variables are automatically available to scripts:
| Variable | Type | Description |
| --------------------- | ------ | ----------------------------------------------------------------------------------------------------- |
| `device_id` | string | The device ID of the service instance being provisioned (see [Service Instances](#service-instances)) |
| `variables` | table | A table containing service-specific variables passed during provisioning |
| `provisioning_status` | string | Must be set to indicate the final status (see below) |
**Provisioning Status Values**
| Value | Meaning |
| --------------- | ---------------------------- |
| `"provisioned"` | Service successfully applied |
| `"failed"` | Service provisioning failed |
**Important**: Scripts must explicitly set `provisioning_status` before completion. If not set, the provisioning will fail.
#### Example Structure
```lua
-- Access device information
local device_sn = get_device_id()
print("Processing device: " .. device_sn)
-- Access variables
local username = get_variable_value("pppoe_username")
local password = get_variable_value("pppoe_password")
-- Perform operations
local result = send_cwmp_message_and_forget(device_sn, message_xml, timeout)
-- Check result and set status
if result == false or type(result) == "table" then
set_provisioning_status("failed")
else
set_provisioning_status("provisioned")
end
```
### Available Functions
#### Provisioning Functions
**`set_provisioning_status(status)`**
Sets the final provisioning status for the script execution.
**Parameters:**
* `status` (string): Either `"provisioned"` or `"failed"`
**Returns:** Nothing
**Example:**
```lua
if success then
set_provisioning_status("provisioned")
else
set_provisioning_status("failed")
end
```
***
**`get_device_id()`**
Retrieves the device ID of the service instance being provisioned: the serial number for a TR-069 (CWMP) definition, the USP Agent Endpoint ID for a TR-369 (USP) definition.
**Parameters:** None
**Returns:**
* (string) The device ID
**Example:**
```lua
local sn = get_device_id()
print("Device SN: " .. sn)
```
***
**`get_variable_value(variable_name)`**
Retrieves a variable value from the service instance configuration.
**Parameters:**
* `variable_name` (string): The name of the variable to retrieve
**Returns:**
* (string) The variable value, or nil if not found
**Example:**
```lua
local pppoe_username = get_variable_value("pppoe_username")
local pppoe_password = get_variable_value("pppoe_password")
```
***
#### CPE Interaction Functions
**`send_cwmp_message(device_id, message_body, method, block_queue)`**
Sends a CWMP message to the device and **blocks until the CPE answers** (or the request times out), unlike `send_cwmp_message_and_forget` below, which returns as soon as the message is handed off to the ACS adapter without waiting for — or confirming — the CPE actually applied it. Use this function when the script needs to read back a value or confirm a `Set` actually took effect.
**Parameters:**
* `device_id` (string): Serial number, `sn_v2` or USP Agent Endpoint ID of the target device; the RPC is sent to the ACS with the serial number it knows the CPE by
* `message_body` (string): XML-formatted CWMP message
* `method` (number): CWMP message type, used to decode the response:
* `0` = GetParameterValues
* `1` = SetParameterValues
* `2` = AddObject
* `3` = DeleteObject
* `4` = GetParameterNames
* `block_queue` (boolean, optional): whether to block the device's message queue until this request is answered
**Returns:**
* If the device isn't found, isn't online, or the request fails/times out: a *table* with `error_message` and `error_code`.
* If the CPE answers with a SOAP/CWMP `Fault` (regardless of `method`): a *table* with:
* `error_message` (string): the top-level `FaultString`
* `error_code` (string): the top-level `FaultCode` (e.g. `"9003"`)
* `raw_response` (string): the full raw XML response received from the CPE
* `parameter_faults` (table, optional): present for `SetParameterValues` faults — an array where each entry has `parameter_name`, `fault_code`, and `fault_string` for the specific parameter that was rejected
* Otherwise, the return shape depends on `method`:
* `0` (Get): a *table* mapping each requested parameter path to its value.
* `1` (Set): a *boolean* indicating success.
* `2` (Add): a *table* with `instance_number` and `status`.
* `3` (Delete): a *boolean* indicating success.
* `4` (GetParameterNames): a *table* of parameter names.
**Example:**
```lua
-- Set a parameter, then verify it was actually applied on the CPE
local set_msg = [[
InternetGatewayDevice.WANDevice.1.WANConnectionDevice.1.WANPPPConnection.1.Username]] .. get_variable_value("pppoe_username") .. [[
]]
local set_result = send_cwmp_message(get_device_id(), set_msg, 1)
if type(set_result) == "table" or set_result == false then
print("Failed to set PPPoE username")
set_provisioning_status("failed")
return
end
-- Give the CPE time to apply it, then read it back to confirm
sleep(10)
local get_msg = [[
InternetGatewayDevice.WANDevice.1.WANConnectionDevice.1.WANPPPConnection.1.Username
]]
local verification = send_cwmp_message(get_device_id(), get_msg, 0)
if verification["error_message"] ~= nil then
print("Failed to verify PPPoE username: " .. verification["error_message"])
set_provisioning_status("failed")
return
end
local param = "InternetGatewayDevice.WANDevice.1.WANConnectionDevice.1.WANPPPConnection.1.Username"
if verification[param] == get_variable_value("pppoe_username") then
print("PPPoE username verified successfully")
set_provisioning_status("provisioned")
else
print("PPPoE username verification failed, got: " .. tostring(verification[param]))
set_provisioning_status("failed")
end
```
***
**`send_cwmp_message_and_forget(device_id, message_body, timeout)`**
Enqueue a CWMP message to the device and does not wait for a response.
**Parameters:**
* `device_id` (string): Serial number, `sn_v2` or USP Agent Endpoint ID of the target device; the RPC is sent to the ACS with the serial number it knows the CPE by
* `message_body` (string): XML-formatted CWMP message
* `timeout` (number): Timeout in seconds (for the operation)
**Returns:**
* (boolean) `true` if the message was successfully sent
* (table) Error table with `error_message` and `error_code` fields if failed
**Example:**
```lua
local cwmp_msg = [[
]]
local result = send_cwmp_message_and_forget(get_device_id(), cwmp_msg, 2)
if result == false or type(result) == "table" then
print("Error: " .. result["error_message"] .. " (" .. result["error_code"] .. ")")
set_provisioning_status("failed")
else
print("Message sent successfully")
end
```
***
**`send_usp_message(device_id, message_body)`**
Sends a TR-369 (USP) message to the device and **blocks until the device answers** (or the request times out). The device must be online and connected to the controller through at least one USP MTP (MQTT or WebSocket).
**Parameters:**
* `device_id` (string): USP Agent Endpoint ID (e.g. `os::012345-ABC`), serial number or `sn_v2` of the target device; the message is sent to the CPE's Endpoint ID
* `message_body` (string): The USP message in JSON format (protojson). Supported requests: Get, Set, Add, Delete and Operate
**Returns:**
* If the device isn't found, isn't online, the request times out or the device answers with an error: a *table* with `error_message` and `error_code`.
* Otherwise, a *table* whose keys are the full parameter paths of the answer:
* Get: each returned parameter with its value, e.g. `result["Device.DeviceInfo.SerialNumber"]`
* Set: each updated parameter with its new value
* Add: the unique keys of the created instance
* Delete: each deleted path, with an empty value
* Operate: no keys when the command succeeds
**Example:**
```lua
-- Set the Wi-Fi SSID, then verify it was actually applied on the device
local set_msg = [[
{
"header": {"msgId": "set-ssid", "msgType": "SET"},
"body": {"request": {"set": {
"allowPartial": false,
"updateObjs": [{
"objPath": "Device.WiFi.SSID.1.",
"paramSettings": [{"param": "SSID", "value": "]] .. get_variable_value("ssid") .. [[", "required": true}]
}]
}}}
}
]]
local set_result = send_usp_message(get_device_id(), set_msg)
if set_result["error_message"] ~= nil then
print("Failed to set SSID: " .. set_result["error_message"])
set_provisioning_status("failed")
return
end
local get_msg = [[
{
"header": {"msgId": "get-ssid", "msgType": "GET"},
"body": {"request": {"get": {"paramPaths": ["Device.WiFi.SSID.1.SSID"]}}}
}
]]
local verification = send_usp_message(get_device_id(), get_msg)
if verification["Device.WiFi.SSID.1.SSID"] == get_variable_value("ssid") then
print("SSID verified successfully")
set_provisioning_status("provisioned")
else
print("SSID verification failed, got: " .. tostring(verification["Device.WiFi.SSID.1.SSID"]))
set_provisioning_status("failed")
end
```
***
#### Utility Functions
**`sleep(seconds)`**
Pauses script execution for the specified number of seconds.
**Parameters:**
* `seconds` (number): Number of seconds to sleep
**Returns:** Nothing
**Example:**
```lua
print("Waiting for device to process...")
sleep(5)
print("Continuing...")
```
***
**`generate_random_string(length)`**
Generates a random alphanumeric string of the specified length.
**Parameters:**
* `length` (number): Length of the random string to generate (must be > 0)
**Returns:**
* (string) Random string of the specified length, or empty string if length is invalid
**Example:**
```lua
local random_password = generate_random_string(12)
print("Generated password: " .. random_password)
```
***
**`create_or_update_device_credential(username, password)`**
Creates or updates device credentials for authentication.
**Parameters:**
* `username` (string): The username (cannot contain dots, cannot be empty)
* `password` (string): The password (cannot contain dots, cannot be empty)
**Returns:**
* (table) Result table with the following fields:
* `ok` (boolean): Success flag
* `username` (string): The full username (prefixed with organization ID)
* `password` (string): The password
* `error_msg` (string): Error message if failed, empty if successful
**Validation:**
* Username and password cannot be empty
* Username and password cannot contain dots
* Requires valid organization context
**Example:**
```lua
local result = create_or_update_device_credential("admin_user", "secure_pass_123")
if result["ok"] then
print("Credential created: " .. result["username"])
-- Now you can use result["username"] and result["password"] for device login
else
print("Failed to create credential: " .. result["error_msg"])
set_provisioning_status("failed")
end
```
***
**`refresh_device_parameters(device_id)`**
Triggers a parameter refresh on the device, forcing it to send an updated parameter list to the ACS.
**Parameters:**
* `device_id` (string): Serial number, `sn_v2` or USP Agent Endpoint ID of the device
**Returns:**
* (boolean) `true` if refresh was successfully triggered, `false` otherwise
**Example:**
```lua
if refresh_device_parameters(get_device_id()) then
print("Device parameters refresh initiated")
else
print("Failed to refresh device parameters")
set_provisioning_status("failed")
end
```
#### Best Practices
1. **Always Check Return Values**: Never assume a function succeeded
```lua
local result = send_cwmp_message_and_forget(device_id, msg, 2)
if result == false or type(result) == "table" then
-- Handle error
end
```
2. **Use Descriptive Logging**: Leverage the `print()` function
```lua
print("Step 1: Creating PPPoE WAN connection")
local result = send_cwmp_message_and_forget(device_id, msg, 2)
if result == false then
print("Failed to create PPPoE WAN")
set_provisioning_status("failed")
return
end
```
3. **Set Status Explicitly**: Always set provisioning status before script ends
```lua
-- Good
if success then
set_provisioning_status("provisioned")
else
set_provisioning_status("failed")
end
-- Avoid - status not set
if success then
print("Success")
end
```
4. **Handle Sequential Operations**: Use proper error handling for multi-step processes
```lua
-- Step 1
local step1 = send_cwmp_message_and_forget(device_id, msg1, 2)
if step1 == false then
set_provisioning_status("failed")
return
end
-- Step 2
sleep(1)
local step2 = send_cwmp_message_and_forget(device_id, msg2, 2)
if step2 == false then
set_provisioning_status("failed")
return
end
set_provisioning_status("provisioned")
```
### Limitations
* Scripts run in a restricted Lua sandbox for security
* File I/O is not available
* Network operations are only available through the provided functions
* Scripts must complete within reasonable timeout limits
### Real-World Example: PPPoE Service Configuration
1. Creates a PPPoE WAN connection on the device
2. Sets PPPoE credentials using variables
3. Changes the WAN type to PPPoE
4. Refreshes device parameters
5. Properly handles errors at each step
The example demonstrates:
* Using variables from the service instance
* Building XML CWMP messages
* Sequential provisioning steps
* Error handling
* Device parameter refresh
```lua
local function createCWMPAddPPPoEWANMsg(wanInstanceNumber)
return [[
InternetGatewayDevice.WANDevice.1.WANConnectionDevice.]] .. wanInstanceNumber ..[[.WANPPPConnection.
]]
end
local function createCWMPSetPPPoECredentialsMsg(wanInstanceNumber, pppoeInstanceNumber)
return [[
InternetGatewayDevice.WANDevice.1.WANConnectionDevice.]] .. wanInstanceNumber .. [[.WANPPPConnection.]].. pppoeInstanceNumber ..[[.Enable1InternetGatewayDevice.WANDevice.1.WANConnectionDevice.]] .. wanInstanceNumber .. [[.WANPPPConnection.]].. pppoeInstanceNumber ..[[.Username]] .. get_variable_value("pppoe_username") .. [[InternetGatewayDevice.WANDevice.1.WANConnectionDevice.]] .. wanInstanceNumber .. [[.WANPPPConnection.]].. pppoeInstanceNumber ..[[.Password]] .. get_variable_value("pppoe_password") .. [[InternetGatewayDevice.WANDevice.1.WANConnectionDevice.]] .. wanInstanceNumber .. [[.WANPPPConnection.]].. pppoeInstanceNumber ..[[.Nameinternet-pppoeLC1309946174
]]
end
local function createCWMPChangeWanToPPPoE()
return [[
InternetGatewayDevice.WANDevice.1.WANCommonInterfaceConfig.X_AVM-DE_InternetConnectionLinkTypePPPoELC1309986174
]]
end
print("Processing device SN: " .. get_device_id() .. ", adding PPPoE WAN connection")
--add PPPoE WAN Connection
local addPPPoEMsgResult = send_cwmp_message_and_forget(get_device_id(), createCWMPAddPPPoEWANMsg(1), 2)
if type(addPPPoEMsgResult) == "table" or addPPPoEMsgResult == false then
print("Failed to add PPPoE WAN, SN: " ..
get_device_id() ..
" | Error Message: " ..
addPPPoEMsgResult["error_message"] .. " | Code: " .. addPPPoEMsgResult["error_code"])
set_provisioning_status("failed")
else
print("Added PPPoE WAN successfully done, SN: " .. get_device_id() .. ", now setting credentials and changing WAN to PPPoE")
-- Set PPPoE credentials
local setPppoeCredentialsMsgResult = send_cwmp_message_and_forget(get_device_id(), createCWMPSetPPPoECredentialsMsg(1, 1), 1)
if type(setPppoeCredentialsMsgResult) == "table" or setPppoeCredentialsMsgResult == false then
print("Failed to set PPPoE credentials, SN: " .. get_device_id() .. " | Error Message: " .. setPppoeCredentialsMsgResult["error_message"] .. " | Code: " .. setPppoeCredentialsMsgResult["error_code"])
set_provisioning_status("failed")
else
print("Set PPPoE credentials successfully done, SN: " .. get_device_id() .. ", now changing WAN to PPPoE")
-- Change WAN from IPoE to PPPoE
local changeWanToPPPoEMsgResult = send_cwmp_message_and_forget(get_device_id(), createCWMPChangeWanToPPPoE(), 1)
if type(changeWanToPPPoEMsgResult) == "table" or changeWanToPPPoEMsgResult == false then
print("Failed to change WAN to PPPoE, SN: " .. get_device_id() .. " | Error Message: " .. changeWanToPPPoEMsgResult["error_message"] .. " | Code: " .. changeWanToPPPoEMsgResult["error_code"])
set_provisioning_status("failed")
else
print("Changed WAN to PPPoE successfully done")
if refresh_device_parameters(get_device_id()) == false then
print("Failed to refresh device parameters")
set_provisioning_status("failed")
else
print("Finished processing device SN: " .. get_device_id() .. ", messages queued")
set_provisioning_status("provisioned")
end
end
end
end
```
## Service Instances
The service instance is the attachment of a service to a CPE, defining the specific variable values for that equipment. It's applied automatically whenever the CPE sends one of the events configured on its service definition — for example, on first connection or after a factory reset — or on demand at any time, see [Manual Execution](#manual-execution) below.
The instance's device ID must be the identifier the events of the definition's protocol carry: the serial number the ACS knows the CPE by for a TR-069 (CWMP) definition, and the USP Agent Endpoint ID (e.g. `os::012345-ABC`) for a TR-369 (USP) definition. A CPE connected over both protocols is a single device in Oktopus, but each instance is matched with that protocol's identifier; the functions called by the script accept any identifier of the CPE.
### Trigger Events
Each service definition picks a **protocol**, TR-069 (CWMP) or TR-369 (USP), and the events of that protocol that cause Oktopus to automatically apply it to the CPEs attached to it. A definition uses one protocol only: it can't be triggered by both CWMP and USP events.
#### TR-069 (CWMP)
Set through the `events` field, which lists one or more of the standard TR-069 event codes:
| Code | Event |
| ---- | ---------------------------- |
| 0 | BOOTSTRAP |
| 1 | BOOT |
| 2 | PERIODIC |
| 3 | SCHEDULED |
| 4 | VALUE CHANGE |
| 5 | KICKED |
| 6 | CONNECTION REQUEST |
| 7 | TRANSFER COMPLETE |
| 8 | DIAGNOSTICS COMPLETE |
| 9 | REQUEST DOWNLOAD |
| 10 | AUTONOMOUS TRANSFER COMPLETE |
The most common choice is `0 - BOOTSTRAP`, which fires on the CPE's first connection or after a factory reset — this is what makes zero-touch provisioning "zero touch." A definition isn't limited to one event: for example, listing both `0` and `2` re-applies the service both on first contact and whenever the CPE issues a Periodic Inform.
#### TR-369 (USP)
Set through the `usp_events` field, which lists one or both of these USP notifications:
| Value | Notification | When the device sends it |
| ------------- | ---------------- | ------------------------------------------------------------------- |
| `onboard` | `OnBoardRequest` | On its first connection to the controller, or after a factory reset |
| `event.Boot!` | `Boot!` Event | Every time the device boots |
`onboard` is the USP equivalent of `0 - BOOTSTRAP`. A device only sends `Boot!` if it has a subscription for it: an entry in `Device.LocalAgent.Subscription.` with `NotifType` set to `Event` and `ReferenceList` set to `Device.Boot!`. Scripts talk to USP devices with [`send_usp_message`](#cpe-interaction-functions).
Example of a service definition triggered when a USP device onboards:
```json
{
"name": "usp-onboarding",
"script": "...",
"variables": [],
"usp_events": ["onboard"]
}
```
#### Manual Apply
A service definition marked as **Manual Apply** has no trigger events, so it never runs automatically — it only executes when explicitly triggered, see [Manual Execution](#manual-execution) below. In the service definition form, checking **Manual Apply** disables the protocol and event choices. Through the API, it is a definition with both `events` and `usp_events` empty.
### Manual Execution
Independent of its configured trigger events (if any), a service instance can always be executed on demand, immediately, without waiting for its trigger event to fire. This is the **only** way a Manual Apply service definition is ever executed.
### Status
The service attached to the CPE has a few statuses:
* Pending = It's waiting for a trigger event (or a manual execution) to start running and being applied to the equipment.
* Running = The instance was triggered — by an event or manually — and the script is being executed.
* Provisioned = Execution was a success, the CPE received all the messages.
* Failed = An issue happened during the execution of the script.
## In Practice
After learning the concepts, let's understand how it works in a real use case.
### Configure the CPE to connect to the ACS or USP Controller
The CPE must have a way to connect to the Controller system. For TR-069, you can use one of these options:
* Firmware with ACS pre-configured
* DHCP with option 43
* PPPoE reply with ACS server URL
For TR-369, the agent must be configured to reach the USP Controller through one of its MTPs (MQTT or WebSocket), for example with the firmware pre-configured.
{% stepper %}
{% step %}
### Add a CPE
Manually insert a new device with its unique identifier (e.g, serial number, agent endpoint id).
{% endstep %}
{% step %}
### Create a service definition
Write the Lua scripts and necessary variables to apply that service to the CPE, and choose the protocol and the events that trigger it, or mark it as Manual Apply.
{% endstep %}
{% step %}
### Attach the service to the CPE
Associate the CPE with a service, with its specific variable values for that device.
{% endstep %}
{% step %}
### Plug the CPE into the network
As the CPE already has the ACS or USP Controller configured and a connection to it, all services will be provisioned when it establishes communication with the controller system, and the device will come online with the customer's specific configuration.
{% endstep %}
{% endstepper %}
# Scripts
Automate your workflow with tasks based on events, jobs, schedules, and more. Limitless capabilities with custom resources to fit your needs.
## Introduction
Code is wrritten in **Lua**, which is a lightweight, high-level programming language designed for embedded use, known for its simplicity and efficiency. Created in Brazil in 1993, it features dynamic typing, first-class functions, and a powerful table data structure, making it versatile for various applications. Lua is widely used in game development for scripting game logic, as well as in embedded systems and applications due to its **extensibility and small footprint**, allowing developers to easily integrate it with other languages and platforms.
[LUA 5.1 Manual](https://www.lua.org/manual/5.1/)
### How It Works
To extend Oktopus capabilities and adress the most diverse possible use cases we opted to use a scripting language on top of the actual code, so the [gopher-lua](https://github.com/yuin/gopher-lua) library provides Go APIs that allows to easily embed LUA scripts to Go programs.
The Go software can interact to the LUA script and vice-versa. That way, it's possible to pass functions, parameters and events through both USP Controller/ACS and the user created automations.
### Core Concepts
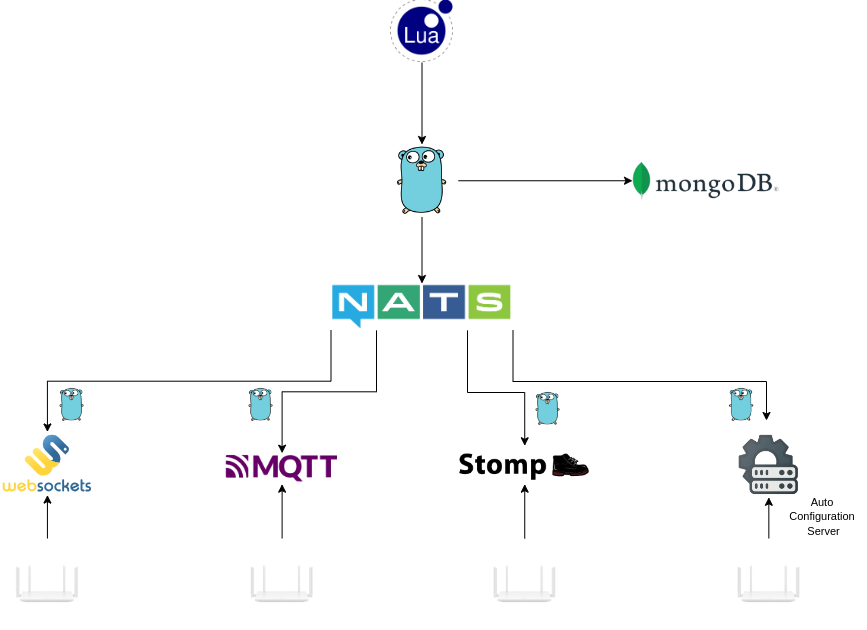
A "custom function", is as a function called from LUA which translates to a Go function that can interact with NATS, MongoDB, USP Controller, TR-069 ACS and all the other components of the software stack.
Diagram of Lua Scripts
The "custom functions" will be detailed above in the next topics as just "functions" and separated into domain areas. We hope to provide usefull examples, and the limitation is on each person creativity.
### Event listener concurrency
[listen\_to\_cwmp\_event()](#listen_to_cwmp_event), [listen\_to\_usp\_event()](#listen_to_usp_event) and [listen\_to\_new\_device()](#listen_to_new_device) are *listeners*: they subscribe to a stream of events and run your callback once per event. How a listener processes events concurrently matters when you write the script.
Each unit of parallelism is a **fully isolated Lua VM** running its own copy of the script. When a listener asks for parallelism `N`, Oktopus starts `N` independent VMs and load-balances incoming events across them — every event is handled by exactly one VM, and each VM handles one event at a time. The VMs never share Lua state with each other.
What that means for your script:
* **Top-level code runs once per VM.** Keep the top level to declaring constants and functions and the `listen_to_*` call itself. Real work done at the top level (an `http_request()`, a `print`, initialising a counter) happens `N` times.
* **Callbacks cannot share mutable Lua state.** A table or variable that a callback updates is local to one VM, not shared across the pool. Persist anything that must be shared through an external system ([http\_request()](#http_request) to your own API, the device database, a [service instance](/getting-started/enterprise-edition/services#service-instances)).
* **Parallelism is a hard resource limit.** Each VM is a real interpreter with its own memory. The requested value is capped by the `MAX_LISTENER_PARALLELISM` setting (default `64`); larger requests are clamped and a warning is logged.
* Running more than one instance of the scripts service is safe — the instances share one pool per listener and balance events between them.
### Devices on TR-069 and TR-369
A CPE is **one device** in Oktopus, whether it connects over TR-069 (CWMP), TR-369 (USP) or both at the same time (*dual-stack*). Each device has three identifiers:
| Field | What it is |
| ----------------- | ------------------------------------------------------------------------------------------------------------------------ |
| `sn` | The device key: the serial number the ACS knows the CPE by, or the serial number reported over USP for a TR-369-only CPE |
| `sn_v2` | The serial number the CPE reports (over USP, or the same as `sn`) |
| `usp_endpoint_id` | The USP Agent Endpoint ID (e.g. `os::012345-ABC`); empty for a TR-069-only CPE |
**Every function that takes a device identifier accepts any of the three.** Each protocol is still addressed with its own identifier behind the scenes: [send\_cwmp\_message()](#send_cwmp_message) talks to the ACS with the serial number and [send\_usp\_message()](#send_usp_message) talks to the agent with the Endpoint ID, whatever identifier the script passes.
{% hint style="warning" %}
Don't use `sn` where the protocol needs the Endpoint ID. Values written to the CPE that carry the Endpoint ID — such as the MQTT topics `oktopus/usp/v1/agent/`, `oktopus/usp/v1/notify/` and `oktopus/usp/v1/bulkdata/` — must use `usp_endpoint_id`. Before the dual-stack release `sn` held the Endpoint ID for TR-369 devices; it now holds the serial number.
{% endhint %}
Every device table returned by the functions also tells which protocols the CPE has and which ones are online:
| Field | Type | Meaning |
| -------------------- | ------- | ------------------------------------------------------------------------------------------------------------------------------------- |
| `status` | integer | The device as a whole: `2` (online) when at least one of its connections is online |
| `protocol` | string | `"tr069"`, `"tr369"` or `"dual-stack"` |
| `cwmp` | boolean | The CPE is known to the ACS (TR-069), even if that connection is down right now |
| `usp` | boolean | The CPE is known over TR-369, even if that connection is down right now |
| `cwmp_online` | boolean | The TR-069 connection is online |
| `usp_online` | boolean | The TR-369 connection is online |
| `preferred_protocol` | string | The protocol to talk to the CPE with: `"usp"` when TR-369 is online, otherwise `"cwmp"` when the ACS knows the CPE, otherwise `"usp"` |
To check whether a message can reach the CPE right now, use `usp_online` / `cwmp_online`, not `usp` / `cwmp`:
```lua
local device = get_device("S240Y00000002")
if type(device) ~= "table" then
print("device not found")
elseif device.usp_online then
-- TR-369 is up: talk USP; topics carry the Endpoint ID
print("notify topic: oktopus/usp/v1/notify/" .. device.usp_endpoint_id)
elseif device.cwmp_online then
-- TR-369 is down (or the CPE is TR-069 only): use send_cwmp_message()
print("using TR-069 for " .. device.sn)
elseif device.cwmp then
-- no connection is up: send_cwmp_async_message() delivers on the next Inform
print("queueing for the next TR-069 session of " .. device.sn)
end
```
## Functions
### send\_usp\_message()
#### Params:
1. Device identifier \[string]
Serial number, `sn_v2` or USP Agent Endpoint ID of the CPE (see [Devices on TR-069 and TR-369](#devices-on-tr-069-and-tr-369)). The message is sent to the CPE's Endpoint ID; the TR-369 connection must be online (`usp_online`).
2. JSON payload \[string]
Request body to be sent to the CPE.\
Current supported bodies are :\
\- Get\
\- Set\
\- Add\
\- Delete\
\- Operate
Return:
* If the usp message generates an error:
```json
{
"error_message": "error to set param test.software",
"error_code: "500"
}
```
* In the case of a successful transaction each key of the *table* will correspond to one of the parameters requested in the payload.
Example:
{% tabs %}
{% tab title="Get" %}
```lua
local uspMsg = [[
{
"header": {
"msg_id": "b7dc38ea-aefb-4761-aa55-edaa97adb2f0",
"msg_type": 1
},
"body": {
"request": {
"get": {
"paramPaths": [
"Device.STOMP."
],
"maxDepth": 2
}
}
}
}
]]
local serial_number = "oktopus-0-stomp"
local uspMessageResult = send_usp_message(serial_number, uspMsg)
if uspMessageResult["error_message"] ~= nil then
print("SN: " .. serial_number .. " | Error Message: " .. uspMessageResult["error_message"] .. " | Code: " .. uspMessageResult["error_code"])
else
for key, value in pairs(uspMessageResult) do
print(key .. ": " .. value)
end
end
```
{% endtab %}
{% tab title="Set" %}
```lua
local uspMsg = [[
{
"header": {
"msg_id": "b7dc38ea-aefb-4761-aa55-edaa97adb2f0",
"msg_type": 4
},
"body": {
"request": {
"set": {
"allow_partial":true,
"update_objs":[
{
"obj_path":"Device.LocalAgent.",
"param_settings":[
{
"param":"X_VANTIVA-COM_PreConnectTimeout",
"value": "55",
"required":true
}
]
}
]
}
}
}
}
]]
local serial_number = "oktopus-0-stomp"
local uspMessageResult = send_usp_message(serial_number, uspMsg)
if uspMessageResult["error_message"] ~= nil then
print("SN: " .. serial_number .. " | Error Message: " .. uspMessageResult["error_message"] .. " | Code: " .. uspMessageResult["error_code"])
else
for key, value in pairs(uspMessageResult) do
print(key .. ": " .. value)
end
end
```
{% endtab %}
{% tab title="Delete" %}
```lua
local uspMsg = [[
{
"header": {
"msg_id": "b7dc38ea-aefb-4761-aa55-edaa97adb2f0",
"msg_type": 10
},
"body": {
"request": {
"delete": {
"allow_partial": true,
"obj_paths": [
"Device.LocalAgent.Subscription.*."
]
}
}
}
}
]]
local serial_number = "oktopus-0-mqtt"
local uspMessageResult = send_usp_message(serial_number, uspMsg)
if uspMessageResult["error_message"] ~= nil then
print("SN: " .. serial_number .. " | Error Message: " .. uspMessageResult["error_message"] .. " | Code: " .. uspMessageResult["error_code"])
else
for key, _ in pairs(uspMessageResult) do
print(key)
end
end
```
{% endtab %}
{% tab title="Add" %}
```lua
local uspMsg =[[
{
"header": {
"msg_id": "b7dc38ea-aefb-4761-aa55-edaa97adb2f0",
"msg_type": 8
},
"body": {
"request": {
"add": {
"allow_partial": true,
"create_objs": [
{
"obj_path": "Device.LocalAgent.Subscription.",
"param_settings": [
{
"param": "NotifType",
"value": "OperationComplete",
"required": true
},
{
"param": "Persistent",
"value": "1",
"required": true
},
{
"param": "ReferenceList",
"value": "Device.IP.Diagnostics.DownloadDiagnostics(),Device.IP.Diagnostics.UploadDiagnostics()",
"required": true
},
{
"param": "NotifRetry",
"value": "0",
"required": true
},
{
"param": "Enable",
"value": "1",
"required": true
},
{
"param": "Recipient",
"value": "Device.LocalAgent.Controller.1",
"required": true
}
]
}
]
}
}
}
}
]]
local serial_number = "oktopus-0-mqtt"
local uspMessageResult = send_usp_message(serial_number, uspMsg)
if uspMessageResult["error_message"] ~= nil then
print("SN: " .. serial_number .. " | Error Message: " .. uspMessageResult["error_message"] .. " | Code: " .. uspMessageResult["error_code"])
else
for key, _ in pairs(uspMessageResult) do
print(key)
end
end
```
{% endtab %}
{% endtabs %}
### send\_cwmp\_message()
#### Params:
1. Device identifier \[string]
Serial number, `sn_v2` or USP Agent Endpoint ID of the CPE (see [Devices on TR-069 and TR-369](#devices-on-tr-069-and-tr-369)). The RPC is sent to the ACS with the serial number the ACS knows the CPE by, so a dual-stack CPE can be addressed by its Endpoint ID too.
2. XML payload \[string]
Request body to be sent to the CPE.
3. Message Type \[integer]
CWMP message type.\
0 = getParameterValues\
1 = setParameterValues\
2 = addObject\
3 = deleteObject\
4 = getParameterNames
Return:
The data returned depends on the TR-069 message type:
* If the CWMP message generates an error:
```json
{
"error_message": "error to set param test.software",
"error_code: "500"
}
```
* If it is a read or add operation the function will return a *table*.
* If it is a delete or set operation the data returned will be a *boolean* indicating if the result was a success or failure.
Example:
{% tabs %}
{% tab title="GetParameterValues" %}
local getParameterValuesType = 0

local xmlContentGet = [[
<?xml version="1.0" encoding="UTF-8"?>
<soap:Envelope xmlns:soapenc="http://schemas.xmlsoap.org/soap/encoding/" xmlns:xsd="http://www.w3.org/2001/XMLSchema" xmlns:cwmp="urn:dslforum-org:cwmp-1-0" xmlns:soap="http://schemas.xmlsoap.org/soap/envelope/" xmlns:schemaLocation="urn:dslforum-org:cwmp-1-0 ..\schemas\wt121.xsd" xmlns:xsi="http://www.w3.org/2001/XMLSchema-instance">
  <soap:Header/>
  <soap:Body soap:encodingStyle="http://schemas.xmlsoap.org/soap/encoding/">
    <cwmp:GetParameterValues>
      <ParameterNames>
        <string>InternetGatewayDevice.LANDevice.1.WLANConfiguration.1.</string>
       </ParameterNames>
    </cwmp:GetParameterValues>
  </soap:Body>
</soap:Envelope>
]]
local serial_number = "HUAWNFYC-35454645"

local getTest = send_cwmp_message(serial_number, xmlContentGet, getParameterValuesType)
if getTest["error_message"] ~= nil then
   print("SN: " .. serial_number .. " | Error Message: " .. getTest["error_message"] .. " | Code: " .. getTest["error_code"])
else
  for key, value in pairs(getTest) do
    print(key .. ": " .. value)
  end
end
{% endtab %}
{% tab title="SetParameterValues" %}
```lua
local setParameterValuesType = 1
local xmlContentSet = [[
InternetGatewayDevice.LANDevice.1.WLANConfiguration.1.Enable1
]]
local serial_number = "HUAWNFYC-35454645"
local setTest = send_cwmp_message(serial_number, xmlContentSet, setParameterValuesType)
if type(setTest) == "table" then
print("SN: " .. serial_number .. " | Error Message: " .. setTest["error_message"] .. " | Code: " .. setTest["error_code"])
else
print("SetParameterValues worked")
end
```
{% endtab %}
{% tab title="DeleteObject" %}
```lua
local deleteObjectType = 3
local xmlContentDelete = [[
InternetGatewayDevice.LANDevice.1.WLANConfiguration.8.
]]
local serial_number = "HUAWNFYC-OPA123-0"
local deleteTest = send_cwmp_message(serial_number, xmlContentDelete, deleteObjectType)
if type(deleteTest) == "table" then
print("SN: " .. serial_number .. " | Error Message: " .. deleteTest["error_message"] .. " | Code: " .. deleteTest["error_code"])
else
print("DeleteObject worked")
end
```
{% endtab %}
{% tab title="GetParameterNames" %}
```lua
local getParameterNamesType = 4
local xmlContentGetParameterNames = [[
InternetGatewayDevice.LANDevice.1.WLANConfiguration.1
]]
local serial_number = "HUAWNFYC-OPA123-0"
local getParameternames = send_cwmp_message(serial_number, xmlContentGetParameterNames, getParameterNamesType)
if getParameternames["error_message"] ~= nil then
print("SN: " .. serial_number .. " | Error Message: " .. getParameternames["error_message"] .. " | Code: " .. getParameternames["error_code"])
else
for _, value in pairs(getParameternames) do
print("Parameter Name" .. value)
end
end
```
{% endtab %}
{% endtabs %}
### send\_cwmp\_async\_message()
Works the same way as the[ send\_cwmp\_message()](#send_cwmp_message) function, but does not use the CWMP Connection Request mechanism, which means this RPC will only reach the CPE in the next Inform event of it. This allows to reach CPEs behind NAT, although it takes longer for the RPC to reach and be processed by the device.
### listen\_to\_cwmp\_event()
Listen to TR-069 events as defined in the standard.
#### Params:
1. Event \[string] (optional)\
Possible events:
```
"0"- BOOTSTRAP
"1"- BOOT
"2"- PERIODIC
"3"- SCHEDULED
"4"- VALUE CHANGE
"5"- KICKED
"6"- CONNECTION REQUEST
"7"- TRANSFER COMPLETE
"8"- DIAGNOSTICS COMPLETE
"9"- REQUEST DOWNLOAD
"10"- AUTONOMOUS TRANSFER COMPLETE
"11"- DU STATE CHANGE COMPLETE
"12"- AUTONOMOUS DU STATE CHANGE COMPLETE
```
If no value is set or the value is "\*", than it listens to all events.
2. Device identifier \[string] (optional)\
Serial number, `sn_v2` or USP Agent Endpoint ID of the CPE. If it's not set or the value is "\*", then it listens to all CPEs event(s).
3. Callback function (required)
4. Parallelism \[integer] (optional)\
Number of isolated Lua VMs the listener runs to process events concurrently. Defaults to `1` (one event at a time). Capped by the `MAX_LISTENER_PARALLELISM` setting (default `64`). See [Event listener concurrency](#event-listener-concurrency).
5. Discard if processing \[boolean] (optional)\
When `true`, an incoming event for a device that already has an event being processed (i.e. still running the callback, on any VM) is discarded instead of being handled. Useful to avoid piling up stale events for a slow or unresponsive device. Defaults to `false`.
Return:
```json
{
"serial_number": "HUAWNFYC-35454645",
"event": "0"
}
```
`serial_number` is the serial number the ACS knows the CPE by (the device `sn`).
Example:
```lua
function listen_to_cwmp_event_callback(cwmp_event)
for key, value in pairs(cwmp_event) do
print(key .. ": " .. tostring(value))
end
end
listen_to_cwmp_event("*", "*", listen_to_cwmp_event_callback)
```
To process up to 10 events concurrently, and discard new events arriving for a device that's still being processed:
```lua
function listen_to_cwmp_event_callback(cwmp_event)
for key, value in pairs(cwmp_event) do
print(key .. ": " .. tostring(value))
end
end
listen_to_cwmp_event("*", "*", listen_to_cwmp_event_callback, 10, true)
```
### listen\_to\_usp\_event()
Listen to TR-369 (USP) notifications sent by the devices: `OnBoardRequest` and `Event` notifications.
A device sends `OnBoardRequest` on its own, but it only sends an `Event` it has a subscription for. For example, to receive `Boot!`, the device needs an entry in `Device.LocalAgent.Subscription.` with `NotifType` set to `Event` and `ReferenceList` set to `Device.Boot!`, which a script can create with [send\_usp\_message()](#send_usp_message).
#### Params:
1. Event \[string] (optional)\
Possible events:
```
"onboard" - OnBoardRequest
"event." - Event with that name, e.g. "event.Boot!", "event.Periodic!"
"event.*" - Any Event
```
If no value is set or the value is "\*", than it listens to all events.
2. Device identifier \[string] (optional)\
USP Agent Endpoint ID, serial number or `sn_v2` of the CPE. If it's not set or the value is "\*", then it listens to all devices event(s).
3. Callback function (required)
4. Parallelism \[integer] (optional)\
Number of isolated Lua VMs the listener runs to process events concurrently, as for [listen\_to\_cwmp\_event()](#listen_to_cwmp_event). Defaults to `1`. See [Event listener concurrency](#event-listener-concurrency).
5. Discard if processing \[boolean] (optional)\
When `true`, an incoming event for a device that already has an event being processed is discarded instead of being handled. Defaults to `false`.
Return:
`notify` is the USP Notify message as sent by the device, in JSON (protojson) format. `serial_number` is the USP Agent Endpoint ID of the device that sent it (its `usp_endpoint_id`).
```json
{
"serial_number": "os::012345-ABC",
"event": "event.Boot!",
"notify": {
"subscriptionId": "boot",
"event": {
"objPath": "Device.",
"eventName": "Boot!",
"params": {
"Cause": "LocalReboot",
"FirmwareUpdated": "false"
}
}
}
}
```
Example:
```lua
function listen_to_usp_event_callback(usp_event)
if usp_event.event == "onboard" then
print("Device onboarded: " .. usp_event.serial_number)
else
print("Device " .. usp_event.serial_number .. " sent " .. usp_event.notify.event.eventName)
end
end
listen_to_usp_event("*", "*", listen_to_usp_event_callback)
```
### get\_device()
Get device attributes from any of its identifiers.
#### Params:
1. Device identifier \[string]
Serial number, `sn_v2` or USP Agent Endpoint ID of the CPE. All of them return the same device (see [Devices on TR-069 and TR-369](#devices-on-tr-069-and-tr-369)).
Return:
If the CPE was not found in the database the function returns a boolean with false value. In case the CPE is found it returns a table with all attributes:
{% tabs %}
{% tab title="TR-069" %}
```json
{
"sn": "HUAWNFYC-35454645",
"sn_v2": "HUAWNFYC-35454645",
"usp_endpoint_id": "",
"model": "WS7001-40",
"vendor": "Huawei Technologies Co., Ltd.",
"version": "",
"product_class": "Huawei",
"alias": "",
"status": 2,
"protocol": "tr069",
"cwmp": true,
"usp": false,
"cwmp_online": true,
"usp_online": false,
"preferred_protocol": "cwmp",
"data_model": "TR-098"
}
```
{% endtab %}
{% tab title="Dual-stack" %}
```json
{
"sn": "S240Y00000001",
"sn_v2": "S240Y00000001",
"usp_endpoint_id": "os::AABBCC-S240Y00000001",
"model": "EX5601-T0",
"vendor": "Zyxel",
"version": "V5.70(ACDZ.6.2)C0",
"product_class": "EX5601-T0",
"alias": "",
"status": 2,
"protocol": "dual-stack",
"cwmp": true,
"usp": true,
"cwmp_online": false,
"usp_online": true,
"preferred_protocol": "usp",
"data_model": "TR-181"
}
```
{% endtab %}
{% endtabs %}
See [Devices on TR-069 and TR-369](#devices-on-tr-069-and-tr-369) for the meaning of the identifier and protocol fields.
`data_model` reflects the CWMP root data model reported by the CPE, either `"TR-098"` (`InternetGatewayDevice.`) or `"TR-181"` (`Device.`); it is empty for USP-only devices.
Example:
```lua
SERIAL_NUMBER = "HUAWNFYC-35454645"
local deviceAttributes = get_device(SERIAL_NUMBER)
if type(deviceAttributes) == "boolean" then
print("device " .. SERIAL_NUMBER .. " not found")
else
for key, value in pairs(deviceAttributes) do
print(key .. ": " .. tostring(value))
end
end
```
### listen\_to\_new\_device()
Receive all new device attributes that connect to Oktopus, independent of the protocol.
#### Params:
1. Callback function with new device data (required)
```json
{
"sn": "HUAWNFYC-35454645",
"sn_v2": "HUAWNFYC-35454645",
"usp_endpoint_id": "",
"model": "WS7001-40",
"vendor": "Huawei Technologies Co., Ltd.",
"version": "",
"product_class": "Huawei",
"alias": "",
"status": 2,
"protocol": "tr069",
"cwmp": true,
"usp": false,
"cwmp_online": true,
"usp_online": false,
"preferred_protocol": "cwmp"
}
```
A CPE already known on one protocol that connects over the other one is the same device, not a new one.
2. Parallelism \[integer] (optional)
Number of isolated Lua VMs the listener runs to process events concurrently, as for [listen\_to\_cwmp\_event()](#listen_to_cwmp_event). Defaults to `1`. See [Event listener concurrency](#event-listener-concurrency).
Example:
```lua
function listen_to_new_device_callback(new_device)
for key, value in pairs(new_device) do
print(key .. ": " .. tostring(value))
end
end
listen_to_new_device(listen_to_new_device_callback)
```
### sleep()
Blocks the code execution for certain time.
#### Params:
1. Time duration \[integer]\
Seconds of blocking the code execution.
Example:
```lua
while true do
print("I'm going to appear again after 20 seconds")
sleep(20)
end
```
### cron()
Run a callback on a schedule, e.g. every day at 03:00 or every Monday at 08:30. Unlike a `while true` loop with [sleep()](#sleep), runs happen at fixed times of the day and don't drift.
`cron()` never returns while the script is running, the same way the listeners don't. It must be the last statement of the script, a script can have only one `cron()` call, and it can't be combined with [listen\_to\_cwmp\_event()](#listen_to_cwmp_event), [listen\_to\_usp\_event()](#listen_to_usp_event) or [listen\_to\_new\_device()](#listen_to_new_device): whichever comes first blocks the other.
#### Params:
1. Expression \[string]
Standard 5-field cron expression: `minute hour day-of-month month day-of-week`. The shortcuts `@hourly`, `@daily`, `@weekly`, `@monthly` and `@every ` (e.g. `@every 30m`) are also accepted.
```
"0 3 * * *" every day at 03:00
"30 8 * * 1" every Monday at 08:30
"*/15 * * * *" every 15 minutes
"0 0 1 * *" on the first day of each month at 00:00
```
2. Callback function (required)
Receives a table describing the current run (see Return).
3. Options \[table] (optional)
* `timezone` \[string]: IANA time zone the expression is evaluated in, e.g. `"America/Sao_Paulo"`. Defaults to `"UTC"`. Don't use a `CRON_TZ=` prefix inside the expression, use this option instead.
* `duration` \[integer or string]: length of the run window, in seconds like [sleep()](#sleep) (`7200`) or as a duration string (`"2h"`, `"90m"`). See [Run window](#run-window).
* `run_on_start` \[boolean]: also run once as soon as the script starts, instead of waiting for the first scheduled time. Defaults to `false`.
Return:
The callback receives a table:
```json
{
"unix": 1791439200,
"iso": "2026-10-08T03:00:00-03:00",
"ends_at": 1791446400
}
```
* `unix` and `iso` are the time the run was scheduled to start, `iso` in the configured `timezone`.
* `ends_at` is the end of the run window as a unix timestamp. It's only present when `duration` is set.
* `window_open()` is a function that returns `false` once `ends_at` has passed. Without `duration` it always returns `true`.
#### Run window
A cron expression only sets when a run starts; the callback then runs until it returns. To limit work to a time window, e.g. from 03:00 to 05:00, set `duration` and call `window_open()` between units of work. The callback is never interrupted, so a device is never left half-processed, but a run can end a little after `ends_at`.
If the script starts inside a window — it was edited, reactivated or the service restarted at 04:00 for a 03:00–05:00 window — the run resumes right away and still ends at 05:00. `@every` schedules have no fixed start time, so they don't resume.
{% hint style="info" %}
The Lua `os` library isn't available to scripts, so use `window_open()` rather than `os.time()` to check the window.
{% endhint %}
#### Behaviour
* Runs never overlap: if a run is still going when the next one is due, that run is skipped, not delayed.
* An error inside the callback is written to the script log and the schedule continues.
* An invalid expression, timezone or duration makes the script fail at startup, with the error in the script log.
* Every instance of the scripts service runs every active script, so with more than one instance the job runs once per instance.
Example:
{% tabs %}
{% tab title="Daily" %}
```lua
cron("0 3 * * *", function(run)
print("Daily job started at " .. run.iso)
local devices = get_all_devices()
for i = 1, #devices do
refresh_device_parameters(devices[i].sn)
end
end, { timezone = "America/Sao_Paulo" })
```
{% endtab %}
{% tab title="Time window" %}
```lua
-- every day from 03:00 to (at most) 05:00, São Paulo time
cron("0 3 * * *", function(run)
local devices = get_all_devices()
for i = 1, #devices do
if not run.window_open() then
print("Window closed, stopping until tomorrow")
break
end
refresh_device_parameters(devices[i].sn)
end
end, { timezone = "America/Sao_Paulo", duration = "2h" })
```
{% endtab %}
{% tab title="Run on start" %}
```lua
-- run once when the script starts, then every 6 hours
cron("0 */6 * * *", function(run)
print("Running at " .. run.iso)
end, { run_on_start = true })
```
{% endtab %}
{% endtabs %}
### create\_or\_update\_device\_credential()
#### Params:
1. Username \[string]
2. Password \[string]
Return:
*Bool* value indicating *true* if the operation was successfull or *false* if there was an error.
Example:
```lua
local username = "test"
local password = "test"
if create_or_update_device_credential(username, password) then
print("success")
else
print("error")
end
```
### generate\_random\_string()
#### Params:
1. Length \[int]\
Size of the string to be generated
Example:
```lua
local username = "deviceX"
local password = generate_random_string(10)
if create_or_update_device_credential(username, password) then
print("success")
else
print("error")
end
```
### delete\_device()
Remove the device from the database, **with all its connections**: a dual-stack CPE loses both its TR-069 and its TR-369 side, and the ACS forgets it. The device shows up again only when it reconnects, without its alias, labels or map location.
To drop only one protocol of a CPE — e.g. its TR-069 side after migrating it to TR-369 — use [remove\_device\_protocol()](#remove_device_protocol) instead.
#### Params:
1. Device identifier \[string]
Serial number, `sn_v2` or USP Agent Endpoint ID of the CPE to be removed.
Return:
*Bool* value indicating *true* if the operation was successfull and the device was removed from database or *false* if there was an error.
Example:
```lua
local sn = "mqtt_client_92"
if delete_device(sn) then
print("device " .. sn .. " successfully deleted")
else
print("error to delete device ".. sn)
end
```
### remove\_device\_protocol()
Remove one protocol from a device and keep the other one. Use it after migrating a CPE from TR-069 to TR-369 (or the other way round), so the device keeps its TR-369 side, alias, labels and map location while its old connection is dropped.
* `"cwmp"` removes the TR-069 side: the ACS forgets the CPE and the device is no longer `cwmp`. If the CPE calls the ACS again, it is registered back on the same device.
* `"usp"` removes the TR-369 side: its connections and its Endpoint ID.
The device status is recalculated from the connection left. If the CPE had no other protocol, the device is removed, as with [delete\_device()](#delete_device).
#### Params:
1. Device identifier \[string]
Serial number, `sn_v2` or USP Agent Endpoint ID of the CPE.
2. Protocol \[string]
`"cwmp"` or `"usp"`.
Return:
* `true` when the protocol was removed.
* `false` and an error message otherwise, e.g. `"Device not found (code 404)"`, `"device is not linked on that protocol (code 400)"` or a usage error for an invalid protocol.
Example:
```lua
-- after the CPE is connected over TR-369 and CWMP was disabled on it
local serial_number = "S240Y00000001"
local ok, err = remove_device_protocol(serial_number, "cwmp")
if ok then
print(serial_number .. " | TR-069 side removed, device kept on TR-369")
else
print(serial_number .. " | failed to remove the TR-069 side: " .. err)
end
```
### set\_device\_model()
Update the model attribute of a device in the database.
#### Params:
1. Serial Number \[string]
The CPE unique identifier.
2. Model \[string]
The new model value to set.
Return:
*Bool* value indicating *true* if the operation was successfull or *false* if there was an error.
Example:
```lua
local sn = "HUAWNFYC-35454645"
local model = "WS7001-40"
if set_device_model(sn, model) then
print("device " .. sn .. " model updated to " .. model)
else
print("error to update device " .. sn .. " model")
end
```
### get\_device\_labels()
Get the labels of a device.
Labels are `name`:`value` pairs, and a label can have labels of its own in `children`, forming a tree (e.g. `condominium:residencial > block:A > floor:331`). Labels named `connection` are added and removed by Oktopus from the results of the Connection Requests sent to the device (`connection:timeout`, `connection:cpe busy`, ...).
#### Params:
1. Serial Number \[string]
The CPE unique identifier.
Return:
A table with `ok` \[boolean], `error_message` \[string], `error_code` \[number] and, when `ok` is true, `labels` \[table]: a list of labels, each one with `name` \[string], `value` \[string] and, when it has labels of its own, `children` \[table] in the same format. A device without labels returns an empty list. An unknown device returns `error_code` 404.
[get\_device()](#get_device) also returns the labels, in its `label` field, as JSON text.
Example:
```lua
local function print_labels(labels, indent)
indent = indent or ""
for _, label in ipairs(labels) do
print(indent .. label.name .. ":" .. label.value)
if label.children then
print_labels(label.children, indent .. " ")
end
end
end
local result = get_device_labels("HUAWNFYC-35454645")
if result.ok then
print_labels(result.labels)
else
print("Failed to get labels: " .. result.error_message)
end
```
### change\_device\_labels()
Add, remove and move labels of a device, leaving its other labels as they are.
The changes are applied to the labels stored when the call is handled, so a `connection` label Oktopus adds or removes at the same time is kept. Prefer it to [set\_device\_labels()](#set_device_labels) when the script only cares about some labels.
#### Params:
1. Serial Number \[string]
The CPE unique identifier.
2. Changes \[table]
* `add` \[table, optional]: labels to add, each one a table with `name` and `value` and, to nest it, `parent`: a table with the `name` and `value` of a label the device has or that is added in the same call. Adding a label the device already has moves it, with its children, under `parent`, or to the top level without `parent`.
* `remove` \[table, optional]: labels to remove, each one a table with `name` and `value`. Their children move to the removed label's parent. Removing a label the device doesn't have changes nothing.
Names and values are strings of up to 100 characters; numbers are taken as text (`value = 331` is `"331"`). A `name`:`value` pair appears once per device, a label can't be nested under itself or one of its children, `connection` labels stay at the top level, and a device has at most 50 labels.
Return:
A table with `ok` \[boolean], `error_message` \[string] and `error_code` \[number]. When a change breaks a rule, `error_code` is 400, `error_message` says why and no label is changed.
Example:
```lua
local result = change_device_labels("HUAWNFYC-35454645", {
add = {
{ name = "condominium", value = "residencial" },
{ name = "block", value = "A", parent = { name = "condominium", value = "residencial" } },
{ name = "floor", value = "331", parent = { name = "block", value = "A" } },
},
remove = {
{ name = "plan", value = "300 mega" },
},
})
if not result.ok then
print("Failed to change labels: " .. result.error_message)
end
```
### set\_device\_labels()
Replace all the labels of a device, the `connection` ones included, with a list of labels.
#### Params:
1. Serial Number \[string]
The CPE unique identifier.
2. Labels \[table]
A list of labels in the format [get\_device\_labels()](#get_device_labels) returns: each one a table with `name`, `value` and, optionally, `children`. An empty list removes all the labels.
The same rules as [change\_device\_labels()](#change_device_labels) apply.
Return:
A table with `ok` \[boolean], `error_message` \[string] and `error_code` \[number].
Example:
```lua
local result = set_device_labels("HUAWNFYC-35454645", {
{ name = "condominium", value = "residencial", children = {
{ name = "block", value = "A" },
} },
{ name = "plan", value = "500 mega" },
})
if not result.ok then
print("Failed to set labels: " .. result.error_message)
end
```
### get\_all\_devices()
Retrieve all devices saved on the database.
Return:
List of device objects.
```json
[
{
"sn": "HUAWNFYC-35454645",
"sn_v2": "HUAWNFYC-35454645",
"usp_endpoint_id": "",
"model": "WS7001-40",
"vendor": "Huawei Technologies Co., Ltd.",
"version": "",
"product_class": "Huawei",
"alias": "",
"status": 2,
"protocol": "tr069",
"cwmp": true,
"usp": false,
"cwmp_online": true,
"usp_online": false,
"preferred_protocol": "cwmp"
},
{
"sn": "S240Y00000002",
"sn_v2": "S240Y00000002",
"usp_endpoint_id": "os::AABBCC-S240Y00000002",
"model": "EX5601-T0",
"vendor": "Zyxel",
"version": "V5.70(ACDZ.6.2)C0",
"product_class": "EX5601-T0",
"alias": "",
"status": 2,
"protocol": "tr369",
"cwmp": false,
"usp": true,
"cwmp_online": false,
"usp_online": true,
"preferred_protocol": "usp"
},
...
]
```
A dual-stack CPE is listed once.
Example:
```lua
local devices = get_all_devices()
for i = 1, #devices do
local device = devices[i]
print(" SN: " .. device.sn)
end
```
### list\_devices()
List the devices that match a set of filters, one page at a time. It accepts the same filters as the device list in the Oktopus API and UI. Only devices of the script's own organization are returned.
#### Params:
1. Filters \[table] (optional)
All filters are optional and combined with AND. Empty strings are ignored.
| Filter | Type | Matches |
| --------------- | ------- | --------------------------------------------------------------------------------- |
| `sn` | string | Exact serial number or USP Agent Endpoint ID |
| `sn_v2` | string | Exact device serial number |
| `vendor` | string | Exact vendor |
| `model` | string | Exact model |
| `version` | string | Exact software version |
| `type` | string | Exact product class |
| `alias` | string | Alias containing the text, case insensitive |
| `status` | integer | `0` offline, `1` associating, `2` online, `3` unknown |
| `protocol` | string | `"tr069"` (known to the ACS), `"tr369"` (known over USP) or `"dual-stack"` (both) |
| `datamodel` | string | `"TR-181"` or `"TR-098"` |
| `ip` | string | Exact public IP |
| `connection_ip` | string | Connection IP starting with the text |
| `pppoe_user` | string | Exact PPPoE username |
| `wan_mac` | string | Exact WAN MAC address |
| `label` | table | Devices with all the labels listed, e.g. `{ { name = "City", value = "SP" } }` |
`sn` and `sn_v2` look up a single device, so they can't be combined with other filters.
With `protocol`, `status` is the status of that protocol's connection: `{ protocol = "tr369", status = 2 }` lists the CPEs whose TR-369 connection is online, including dual-stack CPEs whose TR-069 side is offline. Without `protocol`, `status` is the status of the device as a whole.
Sorting and pagination options:
* `status_order`, `last_seen_order` or `uptime_order` \[string]: `"asc"` or `"desc"`. Only one sort can be used at a time. Defaults to `status_order = "asc"`.
* `page_number` \[integer]: page to return, starting at `0`. Defaults to `0`.
* `page_size` \[integer]: devices per page, from `1` to `100`. Defaults to `20`.
An unknown filter name or a value of the wrong type returns an error instead of listing devices.
Return:
A *table* is always returned:
```json
{
"ok": true,
"error_message": "",
"error_code": 200,
"total": 45,
"page": 0,
"size": 20,
"pages": 3,
"devices": [
{
"sn": "HUAWNFYC-35454645",
"sn_v2": "35454645",
"usp_endpoint_id": "",
"model": "WS7001-40",
"vendor": "Huawei Technologies Co., Ltd.",
"version": "",
"product_class": "Huawei",
"alias": "",
"status": 2,
"protocol": "tr069",
"cwmp": true,
"usp": false,
"cwmp_online": true,
"usp_online": false,
"preferred_protocol": "cwmp",
"data_model": "TR-181",
"pppoe_user": "customer123",
"public_ip": "200.10.20.30",
"ipv6": "",
"connection_ip": "200.10.20.30",
"wan_mac": "AA:BB:CC:DD:EE:FF",
"label": "[{\"name\":\"City\",\"value\":\"SP\"}]",
"uptime": 3600,
"last_seen": "2026-10-08T12:00:00Z",
"created_at": "2025-03-14T09:30:00Z"
}
]
}
```
* `total` is the number of devices matching the filters, across all pages; `pages` is the number of pages for the chosen `page_size`.
* When no device matches, or `page_number` is past the last page, `ok` is `true` and `devices` is empty.
* When `ok` is `false`, `error_message` and `error_code` explain why: `400` for invalid filters, `503` when the device service isn't available.
* `last_seen` and `created_at` are RFC 3339 dates in UTC, and are absent when unknown.
Example:
{% tabs %}
{% tab title="Single page" %}
```lua
local result = list_devices({ vendor = "Zyxel", status = 2, protocol = "tr069" })
if not result.ok then
print("Failed to list devices: " .. result.error_message)
return
end
print(result.total .. " devices found")
for _, device in ipairs(result.devices) do
print(device.sn .. " | " .. device.model .. " | " .. device.version)
end
```
{% endtab %}
{% tab title="All pages" %}
```lua
local page = 0
while true do
local result = list_devices({
model = "EX5601-T0",
label = { { name = "City", value = "SP" } },
page_number = page,
page_size = 100,
})
if not result.ok then
print("Failed to list devices: " .. result.error_message)
break
end
if #result.devices == 0 then
break
end
for _, device in ipairs(result.devices) do
refresh_device_parameters(device.sn)
end
page = page + 1
end
```
{% endtab %}
{% endtabs %}
{% hint style="info" %}
Pages are read one at a time, so devices that change while the script runs can move between pages. If the changes your script makes remove devices from the filter (e.g. filtering by `version` and upgrading the firmware), always request `page_number = 0` until no devices are left, otherwise part of the devices are skipped. In that case, stop once a page only returns devices the script already tried, so devices that fail don't keep the loop running forever.
{% endhint %}
### refresh\_device\_parameters()
Sync device saved parameters, as PPPoE user, IP address and WAN MAC.
Params:
1. Serial number / USP agent endpoint id \[string]\
The unique identifier of the CPE to be removed.
Return: *Bool* value indicating f the operation was successfully executed ot not.
Example:
```lua
if refresh_device_parameters("sn-test-1") == false then
print("Failed to refresh device parameters")
else
print("Device parameters refreshed successfully")
end
```
### http\_request()
Make an HTTP call to a third-party REST API to gather or send data. Useful for integrating scripts with external systems (billing, ticketing, monitoring, etc).
Only `http`/`https` URLs are accepted; URLs with embedded credentials (e.g. `http://user:pass@host/`) are rejected; this function can only reach external/public hosts.
#### Params:
1. Method \[string]
HTTP method, e.g. `"GET"`, `"POST"`, `"PUT"`, `"PATCH"`, `"DELETE"`. Defaults to `"GET"` if empty.
2. URL \[string]
Full request URL. Must start with `http://` or `https://`.
3. Headers \[table] (optional)
Table of header name/value pairs to send with the request.
4. Body \[string] (optional)
Request body. Commonly used with `POST`/`PUT`/`PATCH`. Use [json\_encode()](#json_encode) to build a JSON body.
Return:
A *table* is always returned:
```json
{
"ok": true,
"status_code": 200,
"body": "{\"plan\": \"gold\"}",
"headers": {
"Content-Type": "application/json"
},
"error_message": ""
}
```
* `ok` is `true` when the request completed with a `2xx` status code.
* `error_message` is populated when the request could not be completed at all (invalid URL, blocked target, timeout, connection error) — it does not mean the remote API returned an HTTP error.
* Use `body` together with [json\_decode()](#json_decode) to parse JSON responses.
Example:
{% tabs %}
{% tab title="GET" %}
```lua
local response = http_request("GET", "https://api.example.com/customers/12345", {
["Authorization"] = "Bearer some-api-token",
["Accept"] = "application/json",
}, "")
if response.ok == false then
print("HTTP request failed | status: " .. tostring(response.status_code) .. " | error: " .. tostring(response.error_message))
return
end
local data, err = json_decode(response.body)
if err ~= nil then
print("Failed to decode JSON response: " .. err)
return
end
print("Customer plan: " .. tostring(data["plan"]))
```
{% endtab %}
{% tab title="POST" %}
```lua
local payload, encErr = json_encode({ status = "active", updated_by = "lua-script" })
if encErr ~= nil then
print("Failed to encode JSON payload: " .. encErr)
return
end
local response = http_request("POST", "https://api.example.com/customers/12345", {
["Authorization"] = "Bearer some-api-token",
["Content-Type"] = "application/json",
}, payload)
if response.ok then
print("Customer updated successfully")
else
print("Failed to update customer | status: " .. tostring(response.status_code))
end
```
{% endtab %}
{% endtabs %}
### json\_decode()
Parse a JSON string into a Lua table (or scalar value). Commonly used to read the `body` returned by [http\_request()](#http_request).
#### Params:
1. JSON string \[string]
Return:
Two values are returned: the decoded value (table, string, number, boolean or `nil`), and an error message \[string] that is `nil` when decoding succeeds.
Example:
```lua
local data, err = json_decode('{"sn": "HUAWNFYC-35454645", "online": true}')
if err ~= nil then
print("Failed to decode JSON: " .. err)
else
print("sn: " .. data.sn)
end
```
### json\_encode()
Convert a Lua table (or scalar value) into a JSON string. Commonly used to build the `body` sent through [http\_request()](#http_request).
#### Params:
1. Value \[table, string, number or boolean]
Return:
Two values are returned: the encoded JSON \[string], and an error message \[string] that is `nil` when encoding succeeds.
Example:
```lua
local json, err = json_encode({ sn = "HUAWNFYC-35454645", online = true })
if err ~= nil then
print("Failed to encode JSON: " .. err)
else
print(json)
end
```
### get\_service\_instances()
List the [service instances](/getting-started/enterprise-edition/services#service-instances) attached to a device.
#### Params:
1. Serial Number \[string]
The CPE unique identifier.
Return:
A table with `ok` \[boolean], `error_message` \[string], `error_code` \[number] and, on success, `instances` \[table] — an array of tables, each with `id`, `device_id`, `service_id`, `status` and `variables`:
```json
{
"ok": true,
"error_message": "",
"error_code": 200,
"instances": [
{
"id": "665f1b2e8c2a4a1b2c3d4e5f",
"device_id": "HUAWNFYC-35454645",
"service_id": "665f1a1e8c2a4a1b2c3d4e5e",
"status": "provisioned",
"variables": { "pppoe_username": "customer123" }
}
]
}
```
Example:
```lua
local result = get_service_instances("HUAWNFYC-35454645")
if not result.ok then
print("Failed to list service instances: " .. result.error_message)
else
for _, instance in ipairs(result.instances) do
print(instance.id .. " -> " .. instance.status)
end
end
```
### create\_service\_instance()
Attach a service definition to a device, creating a new service instance.
#### Params:
1. Serial Number \[string] — the CPE unique identifier.
2. Service Definition ID \[string].
3. Variables \[table, optional] — the service-specific variable values for this device.
Return:
A table with `ok` \[boolean], `error_message` \[string] and `error_code` \[number]. The created instance's id is not returned — call [get\_service\_instances()](#get_service_instances) to look it up.
Example:
```lua
local result = create_service_instance("HUAWNFYC-35454645", "665f1a1e8c2a4a1b2c3d4e5e", {
pppoe_username = "customer123",
pppoe_password = "s3cr3t",
})
if not result.ok then
print("Failed to create service instance: " .. result.error_message)
end
```
### edit\_service\_instance()
Replace an existing service instance's device and variables. The service definition id cannot be changed.
#### Params:
1. Service Instance ID \[string].
2. Serial Number \[string] — the CPE unique identifier.
3. Service Definition ID \[string] — must match the instance's current service definition.
4. Variables \[table, optional] — the new service-specific variable values.
Return:
A table with `ok` \[boolean], `error_message` \[string] and `error_code` \[number].
Example:
```lua
local result = edit_service_instance(
"665f1b2e8c2a4a1b2c3d4e5f",
"HUAWNFYC-35454645",
"665f1a1e8c2a4a1b2c3d4e5e",
{ pppoe_username = "customer123", pppoe_password = "new-password" }
)
if not result.ok then
print("Failed to edit service instance: " .. result.error_message)
end
```
### delete\_service\_instance()
Delete a service instance.
#### Params:
1. Service Instance ID \[string].
Return:
A table with `ok` \[boolean], `error_message` \[string] and `error_code` \[number].
Example:
```lua
local result = delete_service_instance("665f1b2e8c2a4a1b2c3d4e5f")
if not result.ok then
print("Failed to delete service instance: " .. result.error_message)
end
```
### apply\_service\_instance()
Run a service instance's provisioning script against its device right away, instead of waiting for its trigger event (see [Manual Execution](/getting-started/enterprise-edition/services#manual-execution)).
#### Params:
1. Service Instance ID \[string].
Return:
A table with `ok` \[boolean], `error_message` \[string], `error_code` \[number] and, on success, `status` \[string] (`"provisioned"` or `"failed"`). `ok` reflects whether the request itself succeeded; `status` is the actual provisioning outcome — a script can legitimately fail provisioning even though the request succeeded (`ok = true`, `status = "failed"`).
Example:
```lua
local result = apply_service_instance("665f1b2e8c2a4a1b2c3d4e5f")
if not result.ok then
print("Failed to apply service instance: " .. result.error_message)
elseif result.status ~= "provisioned" then
print("Service instance provisioning failed")
else
print("Service instance provisioned")
end
```
### apply\_service\_instance\_and\_forget()
Trigger a service instance's provisioning script the same way [apply\_service\_instance()](#apply_service_instance) does, but don't wait for it to run to completion — the request is enqueued and the function returns immediately. Because it doesn't wait for a response, it can't report the final `status`, and `ok` only reflects whether the message was enqueued locally, not whether the zero-touch-provisioning service actually received or ran it.
Use this when applying a service instance whose script may run long (e.g. it calls [sleep()](#sleep) or does several sequential CPE round trips) and the caller doesn't need to wait for the outcome.
#### Params:
1. Service Instance ID \[string].
Return:
A table with `ok` \[boolean], `error_message` \[string] and `error_code` \[number]. There is no `status` field.
Example:
```lua
local result = apply_service_instance_and_forget("665f1b2e8c2a4a1b2c3d4e5f")
if not result.ok then
print("Failed to enqueue service instance apply: " .. result.error_message)
end
```
## Examples
The scripts below are adapted from real-world scenario automations built by Oktopus.
### Migrate CWMP (TR-069) CPE to USP (TR-369)
Some CPE vendors ship devices with a proprietary, disabled-by-default USP agent running alongside the TR-069 agent (e.g. Zyxel's `X_ZYXEL_Enable` parameter). This is a common pattern to migrate such a fleet from CWMP to USP without a firmware upgrade: listen for CWMP events, bootstrap the on-board USP agent entirely through CWMP `SetParameterValues`/`AddObject` calls, confirm the device shows up connected over USP, then disable CWMP so the device is fully USP-managed going forward.
While the migration runs the CPE is one dual-stack device: when the USP agent connects, its TR-369 side joins the device the ACS already knows. The script therefore checks `usp_online` (not `usp`, which is already `true` for a CPE known over TR-369 whose agent is down) and ends with [remove\_device\_protocol()](#remove_device_protocol), which drops only the TR-069 side — [delete\_device()](#delete_device) would remove the whole CPE, TR-369 side included.
```lua
-- ---- Fill in with your own environment settings ----
local PASSWORD_LENGTH = 30
local MAX_ATTEMPTS_TO_GET_DEVICE = 3
local TIME_TO_WAIT_FOR_USP_DEVICE_CONNECTION = 10
local CONTROLLER_ENDPOINT_ID = "" -- e.g. "proto::oktopus"
local CONTROLLER_ALIAS = "oktopus"
local MQTT_BROKER_ADDRESS = "" -- your MQTT broker hostname
local MQTT_BROKER_PORT = 1883
local MQTT_BROKER_TLS_PORT = 8883
local TRANSPORT_PROTOCOL = "TCP/IP"
local TRANSPORT_PROTOCOL_ENCRYPTED = "TLS"
local CA_CERTIFICATE_URL = "" -- CA cert the CPE should trust to reach your broker over TLS
-- ------------------------------------------------------
local function build_get_usp_endpoint_id_xml()
return [[
]] .. generate_random_string(8) .. [[Device.LocalAgent.EndpointID]]
end
local function build_add_object_xml(object_name)
return [[
]] .. generate_random_string(8) .. [[]] .. object_name .. [[]]
end
local function build_set_zyxel_usp_enable_xml(enabled)
return [[
]] .. generate_random_string(8) .. [[Device.LocalAgent.X_ZYXEL_Enable]] .. (enabled and "1" or "0") .. [[]]
end
-- Builds a SetParameterValues envelope from a list of { name, value, type } entries
local function build_set_parameter_values_xml(params)
local structs = {}
for _, p in ipairs(params) do
table.insert(structs, [[
]] .. p.name .. [[]] .. p.value .. [[]])
end
return [[
]] .. generate_random_string(8) .. [[]] .. table.concat(structs) .. [[
]]
end
-- Polls get_device() until the CPE's TR-369 connection is online, or gives up
local function is_device_connected_to_usp(usp_agent_endpoint_id)
for attempt = 1, MAX_ATTEMPTS_TO_GET_DEVICE do
sleep(TIME_TO_WAIT_FOR_USP_DEVICE_CONNECTION * attempt)
local device = get_device(usp_agent_endpoint_id)
if type(device) == "table" and device.usp_online then
return true
end
end
return false
end
-- Drops the TR-069 side of the CPE and keeps its TR-369 side
local function remove_cwmp_side(serial_number)
local ok, err = remove_device_protocol(serial_number, "cwmp")
if not ok then
print("SN: " .. serial_number .. " | failed to remove the TR-069 side | " .. tostring(err))
end
return ok
end
local function migrate_cpe_to_usp(serial_number)
local get_id_result = send_cwmp_message(serial_number, build_get_usp_endpoint_id_xml(), 0, true)
if get_id_result["error_message"] ~= nil then
print("SN: " .. serial_number .. " | failed to read USP endpoint id | " .. get_id_result["error_message"])
return
end
local usp_agent_endpoint_id = get_id_result["Device.LocalAgent.EndpointID"]
if usp_agent_endpoint_id == nil or usp_agent_endpoint_id == "" then
print("SN: " .. serial_number .. " | USP endpoint id is empty, device may not support USP")
return
end
local existing_device = get_device(usp_agent_endpoint_id)
if type(existing_device) == "table" and existing_device.usp_online then
print("SN: " .. serial_number .. " | already connected over USP, removing the TR-069 side")
remove_cwmp_side(serial_number)
return
end
local password = generate_random_string(PASSWORD_LENGTH)
local credential_result = create_or_update_device_credential(usp_agent_endpoint_id, password)
if credential_result["ok"] == false then
print("SN: " .. serial_number .. " | failed to create device credential | " .. credential_result["error_msg"])
return
end
-- 1. Add Local Agent MTP
local mtp_result = send_cwmp_message(serial_number, build_add_object_xml("Device.LocalAgent.MTP."), 2, true)
if mtp_result["error_message"] ~= nil then
print("SN: " .. serial_number .. " | failed to add MTP | " .. mtp_result["error_message"])
return
end
local mtp_instance = mtp_result.instance_number
-- 2. Add MQTT Client (plain MQTT for now, upgraded to TLS once USP is confirmed)
local mqtt_result = send_cwmp_message(serial_number, build_add_object_xml("Device.MQTT.Client."), 2, true)
if mqtt_result["error_message"] ~= nil or mqtt_result.instance_number == 0 then
print("SN: " .. serial_number .. " | failed to add MQTT client | " .. mqtt_result["error_message"])
return
end
local mqtt_instance = mqtt_result.instance_number
-- 3. Add Local Agent Controller
local controller_result = send_cwmp_message(serial_number, build_add_object_xml("Device.LocalAgent.Controller."), 2, true)
if controller_result["error_message"] ~= nil then
print("SN: " .. serial_number .. " | failed to add controller | " .. controller_result["error_message"])
return
end
local controller_instance = controller_result.instance_number
-- 4. Add Local Agent Controller MTP
local controller_mtp_result = send_cwmp_message(
serial_number,
build_add_object_xml("Device.LocalAgent.Controller." .. controller_instance .. ".MTP."),
2, true
)
if controller_mtp_result["error_message"] ~= nil or controller_mtp_result.instance_number == 0 then
print("SN: " .. serial_number .. " | failed to add controller MTP | " .. controller_mtp_result["error_message"])
return
end
local controller_mtp_instance = controller_mtp_result.instance_number
-- 5. Bootstrap USP over plain MQTT and point it at this controller
local bootstrap_result = send_cwmp_message(serial_number, build_set_parameter_values_xml({
{ name = "Device.LocalAgent.MTP." .. mtp_instance .. ".Enable", value = "1", type = "xsd:boolean" },
{ name = "Device.LocalAgent.MTP." .. mtp_instance .. ".Alias", value = CONTROLLER_ALIAS, type = "xsd:string" },
{ name = "Device.LocalAgent.MTP." .. mtp_instance .. ".Protocol", value = "MQTT", type = "xsd:string" },
{ name = "Device.LocalAgent.MTP." .. mtp_instance .. ".MQTT.Reference", value = "Device.MQTT.Client." .. mqtt_instance, type = "xsd:string" },
{ name = "Device.LocalAgent.MTP." .. mtp_instance .. ".MQTT.ResponseTopicConfigured", value = "oktopus/usp/v1/agent/" .. usp_agent_endpoint_id, type = "xsd:string" },
{ name = "Device.LocalAgent.Controller." .. controller_instance .. ".Enable", value = "1", type = "xsd:boolean" },
{ name = "Device.LocalAgent.Controller." .. controller_instance .. ".Alias", value = CONTROLLER_ALIAS, type = "xsd:string" },
{ name = "Device.LocalAgent.Controller." .. controller_instance .. ".EndpointID", value = CONTROLLER_ENDPOINT_ID, type = "xsd:string" },
{ name = "Device.LocalAgent.Controller." .. controller_instance .. ".AssignedRole", value = "Device.LocalAgent.ControllerTrust.Role.1", type = "xsd:string" },
{ name = "Device.LocalAgent.Controller." .. controller_instance .. ".MTP." .. controller_mtp_instance .. ".Enable", value = "1", type = "xsd:boolean" },
{ name = "Device.LocalAgent.Controller." .. controller_instance .. ".MTP." .. controller_mtp_instance .. ".Alias", value = CONTROLLER_ALIAS, type = "xsd:string" },
{ name = "Device.LocalAgent.Controller." .. controller_instance .. ".MTP." .. controller_mtp_instance .. ".Protocol", value = "MQTT", type = "xsd:string" },
{ name = "Device.LocalAgent.Controller." .. controller_instance .. ".MTP." .. controller_mtp_instance .. ".MQTT.Reference", value = "Device.MQTT.Client." .. mqtt_instance, type = "xsd:string" },
{ name = "Device.LocalAgent.Controller." .. controller_instance .. ".MTP." .. controller_mtp_instance .. ".MQTT.Topic", value = "oktopus/usp/v1/notify/" .. usp_agent_endpoint_id, type = "xsd:string" },
{ name = "Device.MQTT.Client." .. mqtt_instance .. ".Enable", value = "1", type = "xsd:boolean" },
{ name = "Device.MQTT.Client." .. mqtt_instance .. ".Alias", value = CONTROLLER_ALIAS, type = "xsd:string" },
{ name = "Device.MQTT.Client." .. mqtt_instance .. ".BrokerAddress", value = MQTT_BROKER_ADDRESS, type = "xsd:string" },
{ name = "Device.MQTT.Client." .. mqtt_instance .. ".BrokerPort", value = tostring(MQTT_BROKER_PORT), type = "xsd:unsignedInt" },
{ name = "Device.MQTT.Client." .. mqtt_instance .. ".Username", value = credential_result["username"], type = "xsd:string" },
{ name = "Device.MQTT.Client." .. mqtt_instance .. ".Password", value = credential_result["password"], type = "xsd:string" },
{ name = "Device.MQTT.Client." .. mqtt_instance .. ".TransportProtocol", value = TRANSPORT_PROTOCOL, type = "xsd:string" },
{ name = "Device.MQTT.Client." .. mqtt_instance .. ".ProtocolVersion", value = "5.0", type = "xsd:string" },
{ name = "Device.LocalAgent.X_ZYXEL_Enable", value = "1", type = "xsd:boolean" },
}), 1, true)
if type(bootstrap_result) == "table" or bootstrap_result == false then
print("SN: " .. serial_number .. " | failed to set USP bootstrap parameters | " .. bootstrap_result["error_message"])
return
end
-- 6. Wait for the CPE to show up connected over USP before going further
if not is_device_connected_to_usp(usp_agent_endpoint_id) then
print("SN: " .. serial_number .. " | device did not connect over USP, aborting")
return
end
print("SN: " .. serial_number .. " | connected over USP (plain MQTT)")
-- 7. Trust the broker's CA certificate before switching to TLS
local cert_result = send_usp_message(usp_agent_endpoint_id, [[{
"header": { "msg_id": "]] .. generate_random_string(8) .. [[", "msg_type": 6 },
"body": {
"request": {
"operate": {
"command": "Device.DeviceInfo.X_ZYXEL_SSLCAFile.Download()",
"input_args": { "URL": "]] .. CA_CERTIFICATE_URL .. [[" },
"send_resp": true
}
}
}
}]])
if cert_result["error_message"] ~= nil then
print("SN: " .. serial_number .. " | failed to add CA certificate | " .. cert_result["error_message"])
return
end
-- 8. Point the MQTT client at the TLS port and briefly flip X_ZYXEL_Enable to reload the config
local tls_result = send_cwmp_message(serial_number, build_set_parameter_values_xml({
{ name = "Device.MQTT.Client." .. mqtt_instance .. ".BrokerPort", value = tostring(MQTT_BROKER_TLS_PORT), type = "xsd:unsignedInt" },
{ name = "Device.MQTT.Client." .. mqtt_instance .. ".TransportProtocol", value = TRANSPORT_PROTOCOL_ENCRYPTED, type = "xsd:string" },
{ name = "Device.LocalAgent.X_ZYXEL_Enable", value = "0", type = "xsd:boolean" },
}), 1, true)
if type(tls_result) == "table" or tls_result == false then
print("SN: " .. serial_number .. " | failed to switch MQTT client to TLS | " .. tls_result["error_message"])
return
end
local reenable_result = send_cwmp_message(serial_number, build_set_zyxel_usp_enable_xml(true), 1, true)
if type(reenable_result) == "table" or reenable_result == false then
print("SN: " .. serial_number .. " | failed to re-enable USP | " .. reenable_result["error_message"])
return
end
print("SN: " .. serial_number .. " | migrated to USP over TLS")
-- 9. Once USP over TLS is confirmed, disable CWMP and persist the config to survive a reboot
sleep(5)
local disable_cwmp_result = send_usp_message(usp_agent_endpoint_id, [[{
"header": { "msg_id": "]] .. generate_random_string(8) .. [[", "msg_type": 4 },
"body": {
"request": {
"set": {
"allow_partial": true,
"update_objs": [
{ "obj_path": "Device.ManagementServer.", "param_settings": [
{ "param": "EnableCWMP", "value": "false", "required": true }
]}
]
}
}
}
}]])
if disable_cwmp_result["error_message"] ~= nil then
print("SN: " .. serial_number .. " | failed to disable CWMP | " .. disable_cwmp_result["error_message"])
return
end
send_usp_message(usp_agent_endpoint_id, [[{
"header": { "msg_id": "]] .. generate_random_string(8) .. [[", "msg_type": 4 },
"body": {
"request": {
"set": {
"allow_partial": true,
"update_objs": [
{ "obj_path": "Device.ManagementServer.", "param_settings": [
{ "param": "X_ZYXEL_ROMD_Action", "value": "1", "required": true }
]}
]
}
}
}
}]]) -- Zyxel-specific: persist the current config to ROM-D so it survives a reboot
if remove_cwmp_side(serial_number) then
print("SN: " .. serial_number .. " | migration complete, TR-069 side removed")
end
end
-- Runs the migration for every CPE the next time it sends a CWMP event (e.g. Inform)
listen_to_cwmp_event("*", "*", function(cwmp_event)
migrate_cpe_to_usp(cwmp_event.serial_number)
end, 10, true)
```
{% hint style="info" %}
This flow is vendor-specific in a few places — namely the `X_ZYXEL_Enable` and `X_ZYXEL_ROMD_Action` parameters, and the CA certificate download command. Other CPE vendors with an on-board USP agent typically expose an equivalent enable flag and a way to download/trust a CA certificate; adjust those parameter paths to match your CPE's data model.
{% endhint %}
### Provision USP settings across an existing fleet
Once devices are on USP, a common pattern is a script that walks every device with [get\_all\_devices()](#get_all_devices) and applies a USP configuration if it isn't already present — useful for periodically rolling out a new setting to a whole fleet.
Both examples write MQTT topics that must carry the USP Agent Endpoint ID, so they use `device.usp_endpoint_id` — `device.sn` is the serial number — and only touch devices whose TR-369 connection is online (`usp_online`).
{% tabs %}
{% tab title="Bulk Data Collection" %}
Creates (idempotently) a `Device.BulkData.Profile.` that periodically publishes device data over MQTT, then enables it.
```lua
-- ---- Fill in with your own environment settings ----
local BULK_DATA_PROFILE_NAME = "USP MQTT Profile 1"
local MQTT_CLIENT_REFERENCE = "Device.MQTT.Client.1"
local REPORTING_INTERVAL_SECONDS = "300"
-- ------------------------------------------------------
local function build_get_bulk_data_profile_msg()
return [[{
"header": { "msg_id": "]] .. generate_random_string(8) .. [[", "msg_type": 1 },
"body": { "request": { "get": {
"paramPaths": ["Device.BulkData.Profile.[Name==]] .. BULK_DATA_PROFILE_NAME .. [[]."]
}}}
}]]
end
local function build_add_bulk_data_profile_msg(usp_agent_endpoint_id)
return [[{
"header": { "msg_id": "]] .. generate_random_string(8) .. [[", "msg_type": 8 },
"body": {
"request": {
"add": {
"allow_partial": true,
"create_objs": [
{
"obj_path": "Device.BulkData.Profile.",
"param_settings": [
{ "param": "EncodingType", "value": "JSON", "required": true },
{ "param": "Name", "value": "]] .. BULK_DATA_PROFILE_NAME .. [[", "required": true },
{ "param": "ReportingInterval", "value": "]] .. REPORTING_INTERVAL_SECONDS .. [[", "required": true },
{ "param": "Protocol", "value": "MQTT", "required": true },
{ "param": "MQTT.PublishTopic", "value": "oktopus/usp/v1/bulkdata/]] .. usp_agent_endpoint_id .. [[", "required": true },
{ "param": "MQTT.Reference", "value": "]] .. MQTT_CLIENT_REFERENCE .. [[", "required": true },
{ "param": "MQTT.PublishQoS", "value": "0", "required": true }
]
},
{
"obj_path": "Device.BulkData.Profile.[Name==]] .. BULK_DATA_PROFILE_NAME .. [[].Parameter.",
"param_settings": [
{ "param": "Name", "value": "Hosts", "required": true },
{ "param": "Reference", "value": "Device.Hosts.Host.*.", "required": true }
]
}
]
}
}
}
}]]
end
local uspEnableBulkDataCollection = [[{
"header": { "msg_id": "]] .. generate_random_string(8) .. [[", "msg_type": 4 },
"body": {
"request": {
"set": {
"allow_partial": true,
"update_objs": [
{ "obj_path": "Device.BulkData.", "param_settings": [
{ "param": "Enable", "value": "true", "required": true }
]},
{ "obj_path": "Device.BulkData.Profile.[Name==]] .. BULK_DATA_PROFILE_NAME .. [[].", "param_settings": [
{ "param": "Enable", "value": "true", "required": true }
]}
]
}
}
}
}]]
local devices = get_all_devices()
for i = 1, #devices do
local device = devices[i]
if device.usp_online then -- TR-369 connection online
-- topics carry the Endpoint ID, not the serial number in device.sn
local usp_agent_endpoint_id = device.usp_endpoint_id
local profile = send_usp_message(usp_agent_endpoint_id, build_get_bulk_data_profile_msg())
local already_provisioned = profile["error_message"] == nil and next(profile) ~= nil
if already_provisioned then
print("SN: " .. usp_agent_endpoint_id .. " | bulk data profile already present")
else
local add_result = send_usp_message(usp_agent_endpoint_id, build_add_bulk_data_profile_msg(usp_agent_endpoint_id))
if add_result["error_message"] ~= nil then
print("SN: " .. usp_agent_endpoint_id .. " | failed to add bulk data profile | " .. add_result["error_message"])
else
local enable_result = send_usp_message(usp_agent_endpoint_id, uspEnableBulkDataCollection)
if enable_result["error_message"] ~= nil then
print("SN: " .. usp_agent_endpoint_id .. " | failed to enable bulk data collection | " .. enable_result["error_message"])
else
print("SN: " .. usp_agent_endpoint_id .. " | bulk data collection enabled")
end
end
end
end
end
```
{% endtab %}
{% tab title="Notification Subscriptions" %}
Replaces any existing subscriptions with a standard set — one for operation-complete notifications on diagnostics, and one for transfer-complete events — and points them at this controller's MQTT notify topic.
```lua
local uspDeleteMsg = [[{
"header": { "msg_id": "]] .. generate_random_string(8) .. [[", "msg_type": 10 },
"body": { "request": { "delete": {
"allow_partial": true,
"obj_paths": ["Device.LocalAgent.Subscription.*."]
}}}
}]]
local uspAddMsg = [[{
"header": { "msg_id": "]] .. generate_random_string(8) .. [[", "msg_type": 8 },
"body": {
"request": {
"add": {
"allow_partial": true,
"create_objs": [
{
"obj_path": "Device.LocalAgent.Subscription.",
"param_settings": [
{ "param": "NotifType", "value": "OperationComplete", "required": true },
{ "param": "Persistent", "value": "1", "required": true },
{ "param": "ReferenceList", "value": "Device.IP.Diagnostics.DownloadDiagnostics(),Device.IP.Diagnostics.UploadDiagnostics()", "required": true },
{ "param": "NotifRetry", "value": "0", "required": true },
{ "param": "Enable", "value": "1", "required": true }
]
},
{
"obj_path": "Device.LocalAgent.Subscription.",
"param_settings": [
{ "param": "NotifType", "value": "Event", "required": true },
{ "param": "Persistent", "value": "1", "required": true },
{ "param": "ReferenceList", "value": "Device.LocalAgent.TransferComplete!", "required": true },
{ "param": "NotifRetry", "value": "0", "required": true },
{ "param": "Enable", "value": "1", "required": true }
]
}
]
}
}
}
}]]
local function build_set_mqtt_notify_topic_msg(usp_agent_endpoint_id)
return [[{
"header": { "msg_id": "]] .. generate_random_string(8) .. [[", "msg_type": 4 },
"body": {
"request": {
"set": {
"allow_partial": true,
"update_objs": [
{ "obj_path": "Device.LocalAgent.Controller.1.MTP.1.MQTT.", "param_settings": [
{ "param": "Topic", "value": "oktopus/usp/v1/notify/]] .. usp_agent_endpoint_id .. [[", "required": true }
]}
]
}
}
}
}]]
end
local devices = get_all_devices()
for i = 1, #devices do
local device = devices[i]
if device.usp_online then -- TR-369 connection online
-- topics carry the Endpoint ID, not the serial number in device.sn
local usp_agent_endpoint_id = device.usp_endpoint_id
local topic_result = send_usp_message(usp_agent_endpoint_id, build_set_mqtt_notify_topic_msg(usp_agent_endpoint_id))
if topic_result["error_message"] ~= nil then
print("SN: " .. usp_agent_endpoint_id .. " | failed to set MQTT notify topic | " .. topic_result["error_message"])
goto continue
end
local delete_result = send_usp_message(usp_agent_endpoint_id, uspDeleteMsg)
if delete_result["error_message"] ~= nil then
print("SN: " .. usp_agent_endpoint_id .. " | failed to delete old subscriptions | " .. delete_result["error_message"])
end
local add_result = send_usp_message(usp_agent_endpoint_id, uspAddMsg)
if add_result["error_message"] ~= nil then
print("SN: " .. usp_agent_endpoint_id .. " | failed to add subscriptions | " .. add_result["error_message"])
else
print("SN: " .. usp_agent_endpoint_id .. " | subscriptions provisioned")
end
::continue::
end
end
```
{% endtab %}
{% endtabs %}
# Profiles
Vendor Lua hooks for devices manager (TR-069 and USP CPEs).
How Lua scripts are executed by Oktopus: [Scripts](/getting-started/enterprise-edition/scripts)
Profiles define the mapping between device-specific data models (TR-069/USP) and the Oktopus common API, enabling QoE analysis and dynamic UI generation.
## Function Contract
All Lua hooks should return two values:
```lua
-- success
return value, nil
-- failure
return nil, "error message"
```
Notes:
* For `get_*` payload builders, return CWMP XML as `string`.
* For `parse_*`, return a Lua table compatible with expected Go resource structs.
* For metadata/capabilities, return string/boolean/table depending on function.
## Shared Helper (optional)
```lua
local function response_to_map(response)
local out = {}
for _, param in ipairs(response.list or {}) do
out[param.name] = param.value
end
return out
end
```
## Functions
### get\_vendor()
Returns the vendor label used by the API.
#### Protocol:
CWMP and USP
#### Params:
None.
Return:
* `value`: `string`
* `err`: `nil` or `string`
Example:
```lua
function get_vendor()
return "Huawei", nil
end
```
### get\_data\_model()
Returns the data model handled by the script.
#### Protocol:
CWMP
#### Params:
None.
Return:
* `value`: `string` (for example: `TR-098`, `TR-181`)
* `err`: `nil` or `string`
Example:
```lua
function get_data_model()
return "TR-098", nil
end
```
### get\_device\_capabilities()
Defines which resources/features are enabled for this model.
#### Protocol:
CWMP and USP
#### Params:
None.
Return:
* `value`: `table` with capability keys
* `err`: `nil` or `string`
Example:
```lua
function get_device_capabilities()
return {
Radio = true,
Ssid = true,
ConnectedDevices = true,
Ping = true,
Traceroute = true,
Interfaces = true,
Ports = true,
Stats = true,
Hwinfo = true,
Pon = true,
Voice = false,
Cellular = false,
XDSL = false,
}, nil
end
```
### get\_device\_specs()
Defines device behavior details (for example traceroute wait time).
#### Protocol:
CWMP and USP
#### Params:
None.
Return:
* `value`: `table`
* `err`: `nil` or `string`
Example:
```lua
function get_device_specs()
return {
TimeTraceRoute = 3,
DirectResult = false,
}, nil
end
```
### is\_real\_time()
Indicates whether this model should be treated as real-time for operations.
#### Protocol:
CWMP
#### Params:
None.
Return:
* `value`: `boolean`
* `err`: `nil` or `string`
Example:
```lua
function is_real_time()
return false, nil
end
```
### get\_radio()
Builds CWMP payload to fetch radio data.
#### Protocol:
CWMP and USP
#### Params:
None.
Return:
* `value`: `string` (CWMP XML)
* `err`: `nil` or `string`
Example:
```lua
function get_radio()
return cwmp_get_params({
"InternetGatewayDevice.LANDevice.1.WLANConfiguration.",
}), nil
end
```
### parse\_radio(response)
Parses CWMP response into radio resource list.
#### Protocol:
CWMP and USP
#### Params:
1. `response` `[table]` CWMP response (`response.list`)
Return:
* `value`: `table` (`[]Radio`)
* `err`: `nil` or `string`
Example:
```lua
function parse_radio(response)
local m = response_to_map(response)
local radios = {
{
path = "InternetGatewayDevice.LANDevice.1.WLANConfiguration.1.",
enable = { writable = true, value = m["InternetGatewayDevice.LANDevice.1.WLANConfiguration.1.RadioEnabled"] == "1" },
channel = { writable = true, value = tonumber(m["InternetGatewayDevice.LANDevice.1.WLANConfiguration.1.Channel"]) or 0 },
}
}
return radios, nil
end
```
### set\_radio(radios)
Builds CWMP payload to update radio configuration.
#### Protocol:
CWMP and USP
#### Params:
1. `radios` `[table]` radio list
Return:
* `value`: `string` (CWMP XML)
* `err`: `nil` or `string`
Example:
```lua
function set_radio(radios)
-- Return nil to use Go fallback while you implement custom payload.
return nil, nil
end
```
### get\_ssid()
Builds CWMP payload to fetch SSID data.
#### Protocol:
CWMP and USP
#### Params:
None.
Return:
* `value`: `string` (CWMP XML)
* `err`: `nil` or `string`
Example:
```lua
function get_ssid()
return cwmp_get_params({
"InternetGatewayDevice.LANDevice.1.WLANConfiguration.",
}), nil
end
```
### parse\_ssid(response)
Parses CWMP response into SSID resource list.
#### Protocol:
CWMP and USP
#### Params:
1. `response` `[table]`
Return:
* `value`: `table` (`[]Ssid`)
* `err`: `nil` or `string`
Example:
```lua
function parse_ssid(response)
local ssids = {
{
path = "InternetGatewayDevice.LANDevice.1.WLANConfiguration.1.",
ssid = { writable = true, value = "MyWiFi" },
enable = { writable = true, value = true },
}
}
return ssids, nil
end
```
### set\_ssid(ssids)
Builds CWMP payload to update SSID configuration.
#### Protocol:
CWMP and USP
#### Params:
1. `ssids` `[table]`
Return:
* `value`: `string` (CWMP XML)
* `err`: `nil` or `string`
Example:
```lua
function set_ssid(ssids)
return nil, nil
end
```
### get\_site\_survey\_diagnostic\_state()
Returns site survey diagnostic state.
#### Protocol:
CWMP and USP
#### Params:
None.
Return:
* `value`: `string`
* `err`: `nil` or `string`
Example:
```lua
function get_site_survey_diagnostic_state()
return "None", nil
end
```
### set\_site\_survey\_diagnostic\_state()
Sets site survey diagnostic state to Requested.
#### Protocol:
USP
#### Params:
None.
Return:
* `value`: `string`
* `err`: `nil` or `string`
Example:
```lua
function set_site_survey_diagnostic_state()
return {
update_objs = {
{
obj_path = "Device.WiFi.NeighboringWiFiDiagnostic.",
param_settings = {
{ param = "DiagnosticsState", value = "Requested", required = true }
}
}
}
}, nil
end
```
### get\_site\_survey\_results()
Builds payload to fetch site survey results.
#### Protocol:
CWMP and USP
#### Params:
None.
Return:
* `value`: `string` (XML)
* `err`: `nil` or `string`
Example:
```lua
function get_site_survey_results()
return cwmp_get_params({
"InternetGatewayDevice.LANDevice.1.WiFi.NeighboringWiFiDiagnostic.",
}), nil
end
```
### parse\_get\_site\_survey(response)
Parses site survey result set.
#### Protocol:
CWMP e USP
#### Params:
1. `response` `[table]`
Return:
* `value`: `table` (`map[string][]NeighborSites`)
* `err`: `nil` or `string`
Example:
```lua
function parse_get_site_survey(response)
return {
["2.4GHz"] = {
{ ssid = "AP-1", channel = 1, signal_strength = -45 },
}
}, nil
end
```
### get\_connected\_devices()
Builds payload to fetch connected devices.
#### Protocol:
CWMP and USP
#### Params:
None.
Return:
* `value`: `string` (XML)
* `err`: `nil` or `string`
Example:
```lua
function get_connected_devices()
return cwmp_get_params({
"InternetGatewayDevice.LANDevice.1.Hosts.Host.",
}), nil
end
```
### parse\_get\_connected\_devices(response)
Parses connected devices response.
#### Protocol:
CWMP and USP
#### Params:
1. `response` `[table]`
Return:
* `value`: `table` (`ConnectedDevices`)
* `err`: `nil` or `string`
Example:
```lua
function parse_get_connected_devices(response)
return {
ethernet = {
{ host_name = "desktop", ip = "192.168.1.10", mac = "AA:BB:CC:DD:EE:FF" }
},
wifi = {}
}, nil
end
```
### set\_speed\_test(test)
Builds payload to configure speed test.
#### Protocol:
CWMP and USP
#### Params:
1. `test` `[table]`
Return:
* `value`: `string` (XML)
* `err`: `nil` or `string`
Example:
```lua
function set_speed_test(test)
return nil, nil
end
```
### get\_speed\_test\_result(speed\_test\_type)
Builds payload to fetch speed test result.
#### Protocol:
CWMP and USP
#### Params:
1. `speed_test_type` `[string]` (`download` or `upload`)
Return:
* `value`: `string` (XML)
* `err`: `nil` or `string`
Example:
```lua
function get_speed_test_result(speed_test_type)
if speed_test_type == "download" then
return cwmp_get_params({"InternetGatewayDevice.DownloadDiagnostics."}), nil
end
return cwmp_get_params({"InternetGatewayDevice.UploadDiagnostics."}), nil
end
```
### parse\_get\_speed\_test\_result(speed\_test\_type, response)
Parses speed test result.
#### Protocol:
CWMP and USP
#### Params:
1. `speed_test_type` `[string]`
2. `response` `[table]`
Return:
* `value`: `table` (`Speedtest`)
* `err`: `nil` or `string`
Example:
```lua
function parse_get_speed_test_result(speed_test_type, response)
return {
diagnostic_state = "Completed",
type = speed_test_type,
download_speed = "900 Mbps",
upload_speed = "450 Mbps",
}, nil
end
```
### get\_download\_diagnostic\_state()
Returns download diagnostic state path or state marker for the model.
#### Protocol:
CWMP
#### Params:
None.
Return:
* `value`: `string`
* `err`: `nil` or `string`
Example:
```lua
function get_download_diagnostic_state()
return "InternetGatewayDevice.DownloadDiagnostics.DiagnosticsState", nil
end
```
### get\_upload\_diagnostic\_state()
Returns upload diagnostic state path or state marker for the model.
#### Protocol:
CWMP
#### Params:
None.
Return:
* `value`: `string`
* `err`: `nil` or `string`
Example:
```lua
function get_upload_diagnostic_state()
return "InternetGatewayDevice.UploadDiagnostics.DiagnosticsState", nil
end
```
### get\_statistics()
Builds payload to fetch statistics.
#### Protocol:
CWMP
#### Params:
None.
Return:
* `value`: `string` (XML)
* `err`: `nil` or `string`
Example:
```lua
function get_statistics()
return cwmp_get_params({
"InternetGatewayDevice.WANDevice.",
"InternetGatewayDevice.LANDevice.",
}), nil
end
```
### parse\_get\_statistics(response)
Parses statistics response.
#### Protocol:
CWMP
#### Params:
1. `response` `[table]`
Return:
* `value`: `table` (`map[string][]Stats`)
* `err`: `nil` or `string`
Example:
```lua
function parse_get_statistics(response)
return {
wan = {
{ label = "BytesSent", value = "123456" },
{ label = "BytesReceived", value = "987654" },
},
lan = {}
}, nil
end
```
### get\_interface\_wan()
Builds payload to fetch WAN interfaces.
#### Protocol:
CWMP
#### Params:
None.
Return:
* `value`: `string` (XML)
* `err`: `nil` or `string`
Example:
```lua
function get_interface_wan()
return cwmp_get_params({"InternetGatewayDevice.WANDevice."}), nil
end
```
### get\_interface\_lan()
Builds payload to fetch LAN interfaces.
#### Protocol:
CWMP
#### Params:
None.
Return:
* `value`: `string` (XML)
* `err`: `nil` or `string`
Example:
```lua
function get_interface_lan()
return cwmp_get_params({"InternetGatewayDevice.LANDevice."}), nil
end
```
### parse\_get\_interface\_wan(response)
Parses WAN interfaces response.
#### Params:
1. `response` `[table]`
Return:
* `value`: `table` (`map[string]Port`)
* `err`: `nil` or `string`
Example:
```lua
function parse_get_interface_wan(response)
return {
["InternetGatewayDevice.WANDevice.1.WANConnectionDevice.1.WANPPPConnection.1."] = {
alias = "WAN",
up = true,
type = "pppoe",
}
}, nil
end
```
### parse\_get\_interface\_lan(response)
Parses LAN interfaces response.
#### Protocol:
CWMP
#### Params:
1. `response` `[table]`
Return:
* `value`: `table` (`map[string]Port`)
* `err`: `nil` or `string`
Example:
```lua
function parse_get_interface_lan(response)
return {
["InternetGatewayDevice.LANDevice.1.LANEthernetInterfaceConfig.1."] = {
alias = "LAN1",
up = true,
type = "ethernet",
}
}, nil
end
```
### get\_wan\_options()
Returns WAN configuration options supported by the model.
#### Protocol:
CWMP
#### Params:
None.
Return:
* `value`: `table` (`[]WanOptions`)
* `err`: `nil` or `string`
Example:
```lua
function get_wan_options()
return {
{ protocol = "DHCP", vlan = true },
{ protocol = "PPPoE", vlan = true },
}, nil
end
```
### get\_port()
Builds payload to fetch TR-098/TR-181 ports.
#### Protocol:
CWMP and USP
#### Params:
None.
Return:
* `value`: `string` (XML)
* `err`: `nil` or `string`
Example:
```lua
function get_port()
return cwmp_get_params({"Device.Ethernet.Interface."}), nil
end
```
### parse\_get\_port(response)
Parses TR-098/TR-181 ports response.
#### Protocol:
CWMP and USP
#### Params:
1. `response` `[table]`
Return:
* `value`: `table` (`map[string]Port`)
* `err`: `nil` or `string`
Example:
```lua
function parse_get_port(response)
return {
["Device.Ethernet.Interface.1."] = {
alias = "LAN1",
up = true,
type = "ethernet",
}
}, nil
end
```
### set\_port(ports)
Builds payload to update port configuration.
#### Protocol:
CWMP and USP
#### Params:
1. `ports` `[table]`
Return:
* `value`: `string` (XML)
* `err`: `nil` or `string`
Example:
```lua
function set_port(ports)
return nil, nil
end
```
### add\_port(port)
Builds payload to add a new port/object.
#### Protocol:
CWMP
#### Params:
1. `port` `[table]`
Return:
* `value`: `string` (XML)
* `err`: `nil` or `string`
Example:
```lua
function add_port(port)
return nil, nil
end
```
### get\_bridge()
Builds payload to fetch bridge data.
#### Protocol:
CWMP and USP
#### Params:
None.
Return:
* `value`: `string` (XML)
* `err`: `nil` or `string`
Example:
```lua
function get_bridge()
return cwmp_get_params({"Device.Bridging.Bridge."}), nil
end
```
### parse\_get\_bridge(response)
Parses bridge response.
#### Protocol:
CWMP and USP
#### Params:
1. `response` `[table]`
Return:
* `value`: `table` (`[]Bridge`)
* `err`: `nil` or `string`
Example:
```lua
function parse_get_bridge(response)
return {
{ path = "Device.Bridging.Bridge.1.", enable = { writable = true, value = true } }
}, nil
end
```
### set\_bridge(bridges)
Builds payload to update bridge configuration.
#### Protocol:
CWMP and USP
#### Params:
1. `bridges` `[table]`
Return:
* `value`: `string` (XML)
* `err`: `nil` or `string`
Example:
```lua
function set_bridge(bridges)
return nil, nil
end
```
### get\_ping()
Builds payload to fetch ping diagnostics config.
#### Protocol:
CWMP and USP
#### Params:
None.
Return:
* `value`: `string` (XML)
* `err`: `nil` or `string`
Example:
```lua
function get_ping()
return cwmp_get_params({"InternetGatewayDevice.IPPingDiagnostics."}), nil
end
```
### parse\_get\_ping(response)
Parses ping diagnostics config.
#### Protocol:
CWMP and USP
#### Params:
1. `response` `[table]`
Return:
* `value`: `table` (`Ping`)
* `err`: `nil` or `string`
Example:
```lua
function parse_get_ping(response)
return {
host = { writable = true, value = "8.8.8.8" },
repetitions = { writable = true, value = 4 },
timeout = { writable = true, value = 5 },
}, nil
end
```
### get\_ping\_diagnostic\_state()
Returns ping diagnostic state path/state.
#### Protocol:
CWMP and USP
#### Params:
None.
Return:
* `value`: `string`
* `err`: `nil` or `string`
Example:
```lua
function get_ping_diagnostic_state()
return "InternetGatewayDevice.IPPingDiagnostics.DiagnosticsState", nil
end
```
### set\_ping(ping)
Builds payload to execute/update ping diagnostics.
#### Protocol:
CWMP and USP
#### Params:
1. `ping` `[table]`
Return:
* `value`: `string` (XML)
* `err`: `nil` or `string`
Example:
```lua
function set_ping(ping)
return nil, nil
end
```
### get\_ping\_result()
Builds payload to fetch ping result.
#### Protocol:
CWMP and USP
#### Params:
None.
Return:
* `value`: `string` (XML)
* `err`: `nil` or `string`
Example:
```lua
function get_ping_result()
return cwmp_get_params({"InternetGatewayDevice.IPPingDiagnostics."}), nil
end
```
### parse\_get\_ping\_result(response)
Parses ping result response.
#### Protocol:
CWMP and USP
#### Params:
1. `response` `[table]`
Return:
* `value`: `table` (`PingResult`)
* `err`: `nil` or `string`
Example:
```lua
function parse_get_ping_result(response)
return {
diagnostic_state = "Complete",
success_count = 4,
failure_count = 0,
average_response_time = 12,
}, nil
end
```
### get\_traceroute()
Builds payload to fetch traceroute diagnostics config.
#### Protocol:
CWMP and USP
#### Params:
None.
Return:
* `value`: `string` (XML)
* `err`: `nil` or `string`
Example:
```lua
function get_traceroute()
return cwmp_get_params({"InternetGatewayDevice.TraceRouteDiagnostics."}), nil
end
```
### parse\_get\_traceroute(response)
Parses traceroute diagnostics config.
#### Protocol:
CWMP and USP
#### Params:
1. `response` `[table]`
Return:
* `value`: `table` (`Traceroute`)
* `err`: `nil` or `string`
Example:
```lua
function parse_get_traceroute(response)
return {
host = { writable = true, value = "8.8.8.8" },
max_hop_count = { writable = true, value = 30 },
timeout = { writable = true, value = 5 },
}, nil
end
```
### get\_traceroute\_diagnostic\_state()
Returns traceroute diagnostic state path/state.
#### Protocol:
CWMP and USP
#### Params:
None.
Return:
* `value`: `string`
* `err`: `nil` or `string`
Example:
```lua
function get_traceroute_diagnostic_state()
return "InternetGatewayDevice.TraceRouteDiagnostics.DiagnosticsState", nil
end
```
### set\_traceroute(traceroute)
Builds payload to execute/update traceroute diagnostics.
#### Protocol:
CWMP and USP
#### Params:
1. `traceroute` `[table]`
Return:
* `value`: `string` (XML)
* `err`: `nil` or `string`
Example:
```lua
function set_traceroute(traceroute)
return nil, nil
end
```
### get\_traceroute\_result\_number\_of\_hops()
Returns the parameter path/state used to read hop count.
#### Protocol:
CWMP
#### Params:
None.
Return:
* `value`: `string`
* `err`: `nil` or `string`
Example:
```lua
function get_traceroute_result_number_of_hops()
return "InternetGatewayDevice.TraceRouteDiagnostics.RouteHopsNumberOfEntries", nil
end
```
### get\_traceroute\_result(number\_of\_hops)
Builds payload to fetch traceroute hop details.
#### Protocol:
CWMP and USP
#### Params:
1. `number_of_hops` `[integer]`
Return:
* `value`: `string` (XML)
* `err`: `nil` or `string`
Example:
```lua
function get_traceroute_result(number_of_hops)
return cwmp_get_params({"InternetGatewayDevice.TraceRouteDiagnostics.RouteHops."}), nil
end
```
### parse\_get\_traceroute\_result(response)
Parses traceroute result response.
#### Protocol:
CWMP and USP
#### Params:
1. `response` `[table]`
Return:
* `value`: `table` (`TracerouteResult`)
* `err`: `nil` or `string`
Example:
```lua
function parse_get_traceroute_result(response)
return {
diagnostic_state = "Complete",
hops = {
{ hop_host = "192.168.1.1", hop_error_code = 0, hop_rtt_times = { 1, 1, 2 } },
{ hop_host = "8.8.8.8", hop_error_code = 0, hop_rtt_times = { 10, 11, 12 } },
}
}, nil
end
```
### get\_hwinfo()
Builds payload to fetch hardware information.
#### Protocol:
CWMP and USP
#### Params:
None.
Return:
* `value`: `string` (XML)
* `err`: `nil` or `string`
Example:
```lua
function get_hwinfo()
return cwmp_get_params({
"InternetGatewayDevice.DeviceInfo.",
}), nil
end
```
### parse\_get\_hwinfo(response)
Parses hardware information response.
#### Protocol:
CWMP
#### Params:
1. `response` `[table]`
Return:
* `value`: `table` (`Hwinfo`)
* `err`: `nil` or `string`
Example:
```lua
function parse_get_hwinfo(response)
return {
manufacturer = "Huawei",
model_name = "WS7001-40",
serial_number = sn,
software_version = "1.0.0",
}, nil
end
```
### get\_pon()
Builds payload to fetch PON information.
#### Protocol:
CWMP
#### Params:
None.
Return:
* `value`: `string` (XML)
* `err`: `nil` or `string`
Example:
```lua
function get_pon()
return cwmp_get_params({
"InternetGatewayDevice.WANDevice.1.X_GponInterafceConfig.",
}), nil
end
```
### parse\_get\_pon(response)
Parses PON information response.
#### Protocol:
CWMP
#### Params:
1. `response` `[table]`
Return:
* `value`: `table` (`Pon`)
* `err`: `nil` or `string`
Example:
```lua
function parse_get_pon(response)
return {
status = "Up",
rx_power = "-19.2 dBm",
tx_power = "2.1 dBm",
}, nil
end
```
### get\_voice()
Builds payload to fetch voice accounts/lines.
#### Protocol:
CWMP
#### Params:
None.
Return:
* `value`: `string` (XML)
* `err`: `nil` or `string`
Example:
```lua
function get_voice()
return cwmp_get_params({"InternetGatewayDevice.Services.VoiceService."}), nil
end
```
### parse\_get\_voice(response)
Parses voice data response.
#### Protocol:
CWMP
#### Params:
1. `response` `[table]`
Return:
* `value`: `table` (`[]Voice`)
* `err`: `nil` or `string`
Example:
```lua
function parse_get_voice(response)
return {
{
profile = "SIP",
lines = {
{ number = "1001", enabled = true }
}
}
}, nil
end
```
### set\_voice(voice)
Builds payload to update voice profile settings.
#### Protocol:
CWMP
#### Params:
1. `voice` `[table]`
Return:
* `value`: `string` (XML)
* `err`: `nil` or `string`
Example:
```lua
function set_voice(voice)
return nil, nil
end
```
### set\_line(line)
Builds payload to update voice line settings.
#### Protocol:
CWMP
#### Params:
1. `line` `[table]`
Return:
* `value`: `string` (XML)
* `err`: `nil` or `string`
Example:
```lua
function set_line(line)
return nil, nil
end
```
### get\_cellular()
Builds payload to fetch cellular information.
#### Protocol:
CWMP and USP
#### Params:
None.
Return:
* `value`: `string` (XML)
* `err`: `nil` or `string`
Example:
```lua
function get_cellular()
return cwmp_get_params({"Device.Cellular.Interface."}), nil
end
```
### parse\_get\_cellular(response)
Parses cellular information response.
#### Protocol:
CWMP and USP
#### Params:
1. `response` `[table]`
Return:
* `value`: `table` (`[]Cellular`)
* `err`: `nil` or `string`
Example:
```lua
function parse_get_cellular(response)
return {
{
interface = "wwan0",
status = "Up",
signal = "-75 dBm",
}
}, nil
end
```
### set\_cellular(cellular)
Builds payload to update cellular settings.
#### Protocol:
CWMP and USP
#### Params:
1. `cellular` `[table]`
Return:
* `value`: `string` (XML)
* `err`: `nil` or `string`
Example:
```lua
function set_cellular(cellular)
return nil, nil
end
```
### get\_xdsl()
Builds payload to fetch xDSL information.
#### Protocol:
CWMP
#### Params:
None.
Return:
* `value`: `string` (XML)
* `err`: `nil` or `string`
Example:
```lua
function get_xdsl()
return cwmp_get_params({"InternetGatewayDevice.WANDevice.1.WANDSLInterfaceConfig."}), nil
end
```
### parse\_xdsl(response)
Parses xDSL information response.
#### Protocol:
CWMP
#### Params:
1. `response` `[table]`
Return:
* `value`: `table` (`[]XDSL`)
* `err`: `nil` or `string`
Example:
```lua
function parse_xdsl(response)
return {
{
status = "Up",
downstream_rate = "90 Mbps",
upstream_rate = "18 Mbps",
}
}, nil
end
```
# Device Telemetry
How the Bulk Manager collects fleet telemetry: what it pulls from every CPE, how often, how it talks to devices, and how the volume and bandwidth numbers on the screen are worked out.
The **Device Telemetry** screen controls the **Bulk Manager**: the service that quietly walks your whole fleet and collects health data from every CPE. [QoE Analysis](/getting-started/enterprise-edition/qoe-analysis) turns that data into scores and alarms. This page explains what the collector does to your devices and your network, so you can size it well.
## The big picture
Bulk Manager runs as a group of pods. One of them is automatically the **scheduler**; the others are **workers**. If the scheduler pod dies, another takes over. Adding pods adds capacity and nothing else changes.
The work is organised into **cycles**, and there are two of them, on separate clocks:
| Cycle | What it does | Rough cost |
| --------------------------- | ---------------------------------------------------------------------------------------------------------------------------------------------------- | -------------------------------------------------------------------- |
| **General Data Collection** | Reads Wi-Fi, hardware, connected clients, interfaces, fiber, cellular, ping and site survey from every device. Stores one small document per device. | Kilobytes per device. Runs often. |
| **Speed Test Collection** | Asks the CPE to run a real download and/or upload against your servers. | Megabytes to hundreds of megabytes per device, per run. Runs rarely. |
They have separate intervals, separate parallel limits and separate on/off switches, because their network cost is thousands of times apart. Turning one off does nothing to the other.
Each organization has its own queue and its own schedule. A large fleet in one organization cannot slow down a small one in another.
## How one cycle runs
{% stepper %}
{% step %}
#### The scheduler opens a cycle
When the **Interval** has passed since the last cycle started, the scheduler pulls the full device list for the organization and creates **one job per device**, offline devices included. Jobs go onto the queue at a controlled rate.
{% endstep %}
{% step %}
#### Workers drain the queue
Any worker pod can pick up any job. Across the whole organization, at most **Devices in Parallel** devices are worked on at the same time. Each job runs the complete sequence for one device.
{% endstep %}
{% step %}
#### Offline devices are cheap
If the device is not online, the worker writes a minimal record and moves on. No device traffic is generated.
{% endstep %}
{% step %}
#### Results are written in batches
Finished documents are grouped and written to the database together. Stored telemetry is kept for 30 days by default, then expires automatically.
{% endstep %}
{% step %}
#### The cycle closes
When every job is done, the cycle closes. Its real duration and device count feed the **Cycle Duration** figure on screen. The next cycle cannot start until the current one is empty, so the Interval is a floor, not a promise.
{% endstep %}
{% endstepper %}
Bulk jobs are the lowest priority traffic to a CPE. A technician opening a device page, a Script or a Service is always served first.
## How it talks to devices
This is where the real infrastructure cost lives, and it depends on the protocol.
**USP (TR-369) devices** answer over their existing connection. Each read or test is one message.
**TR-069 devices** have to be woken with a Connection Request before every session. To keep that cost down, Bulk Manager uses a **grouped session**: all the plain parameter reads for one device (hardware, connected clients, fiber, cellular, interfaces, site survey) are sent together and answered in a **single session**, so the device is woken once, not once per element.
Diagnostics are the exception. Ping and speed tests are TR-143 diagnostics: the CPE runs one at a time and reports each result on its own later session. So for a TR-069 device with everything enabled:
* 1 session for all the grouped reads
* 1 session per ping server
* 1 session for the download test
* 1 session for the upload test
The collector does not poll the ACS queue. It sends the request and waits for the answer. If the ACS reports that the device is unreachable right now, that device is set aside and picked up again on a later pass, so one slow device never blocks the cycle. Per-pod concurrency, request rate and timeouts are all tunable at deployment time.
### Cost on the Oktopus side
This scales with your fleet, and it needs planning.
* **CPU and memory:** every device job parses and forwards JSON, and many run at once. A large fleet with high parallelism keeps many workers, connections and messages busy at the same time, so the Bulk Manager pods, the ACS and NATS all have to be sized for that peak. This is real capacity, not a rounding error, once you are past a few thousand CPEs.
* **Database:** storage grows with fleet size, how many elements you collect, and how often. The 30-day-by-default retention caps it.
* **Network:** the platform has to carry every device message and every speed test transfer. Parallelism decides how much of that happens at once.
## What General Data Collection pulls
Every element is one section of the same per-device document. A field only appears if the device's [profile](/getting-started/enterprise-edition/device-profile) supports it.
| Element | What it contains |
| ------------------------ | ------------------------------------------------------------------------------------------------------------------------------ |
| **Ping** | Per host: success and failure counts, min / average / max RTT |
| **Connected Clients** | Every client: MAC, IP, hostname, signal (RSSI), activity, per-client traffic, mesh layout |
| **Hardware Resources** | Uptime, CPU %, memory %, temperature |
| **Site Survey** | Neighbor networks (SSID, BSSID, channel, signal, standard, width), computed noise per channel, current and recommended channel |
| **Cellular** | Signal, bands, data counters (TR-069 only) |
| **Interface Statistics** | Bytes, packets, errors and discards, sent and received, per interface |
| **Fiber** | Link status, optical TX / RX power |
Two of these carry most of the weight. **Connected Clients** is usually the largest section, and a busy home with many clients makes the document bigger. **Site Survey** is intrusive: the radio scans the spectrum and the customer's Wi-Fi is briefly disturbed, so it is restricted to a maintenance window you set (start, end, timezone). **Ping** costs about 160 bytes per host in the stored document, plus one diagnostic session per host on TR-069.
Once per device per cycle the worker also reads the device's capability list (one extra message) to know which of the above to attempt.
## What Speed Test Collection pulls
* **Download:** the CPE downloads the file at **Download Server URL**. The data moved is the size of that file.
* **Upload:** the CPE uploads a generated payload of **Upload File Size (MB)** to **Upload Server URL**.
Only the throughput, RTT and response time are stored, a few hundred bytes. The cost is the transfer itself, and it lands on your speed test servers and your transit, not on Oktopus.
{% hint style="warning" %}
Name the download file with its size, for example `200MB.file` or `1GB.bin`. The estimate on the screen reads the size out of the URL. A URL with no size in its name is counted as zero.
{% endhint %}
## How the estimates are calculated
Both tabs show the same five figures, and they recalculate live as you change the fields. The device count is your **whole fleet**, the same total the dashboard shows, because a cycle creates a job for every device.
### General Data Collection
| Figure | How it is worked out |
| ------------------ | -------------------------------------------------------------------------------------------------------------------------------------------------------------------------------------------------- |
| **Per Cycle** | Fleet devices x average document size. The average is measured from the last 24 hours of stored data; a fresh fleet assumes 25 KB plus 160 bytes per ping server. Does not depend on the interval. |
| **Per Day** | Per Cycle x (24h / cycle time), where cycle time is the longer of the real last cycle and the interval. |
| **Per Month** | Per Day x 30. |
| **Cycle Duration** | The real duration of the last finished cycle. In practice this is set by how quickly CPEs answer and how many need a retry, not by raw parallelism. |
| **Bandwidth** | Average while the cycle runs (cycle bytes / cycle time). Small, because the documents are kilobytes. |
Document size is driven mostly by **Connected Clients** and **Site Survey**. Ping adds about 160 bytes per host.
### Speed Test Collection
| Figure | How it is worked out |
| ------------------ | ------------------------------------------------------------------------------------------------------------------------------------------------------------------------------------------------------------------ |
| **Per Cycle** | Fleet devices x (download file size + upload size), counting only the directions you enabled. |
| **Per Day** | Per Cycle x (24h / cycle time), where cycle time is the longer of `devices / parallel x median test duration` and the interval. Median test duration is measured (30s is assumed until there are samples). |
| **Per Month** | Per Day x 30. |
| **Cycle Duration** | `devices / parallel x median test duration`. |
| **Bandwidth** | `devices in parallel x median throughput per test` (100 Mbps assumed until measured). This is the **peak** traffic through your speed test servers at once, not an average. Size your network against this number. |
{% hint style="danger" %}
20 devices testing in parallel at 140 Mbps each is 2.8 Gbps flowing at the same time. Set **Devices Testing in Parallel** against the bandwidth you are willing to spend, not against how fast you want the cycle to finish.
{% endhint %}
## What each setting does to the numbers
| You change | Effect |
| ---------------------------------------------- | ------------------------------------------------------------------------------------------------------------------------------------------ |
| **Interval** shorter | More cycles per day, so proportionally more total data and more device sessions per day. Per-cycle cost and per-device load are unchanged. |
| **Devices in Parallel** higher | Shorter cycle, but more load on the ACS and more traffic on your access network at the same time. |
| **Devices Testing in Parallel** higher | Directly raises peak bandwidth. This is the main safety lever for the speed test pipeline. |
| **Enable more Telemetry Elements** | Larger documents and more reads per session. Site Survey also adds a radio scan and needs the maintenance window. |
| **More ping servers** | About 160 bytes per device per cycle each, plus one more diagnostic session per device on TR-069. |
| **Larger speed test file, or both directions** | Proportionally more data moved per device per run. This is the largest cost in the whole system. |
## Per CPE Model overrides
The **Collection per CPE Model** tab changes behavior for one device model: which elements are collected, which tests run, which servers they use. This is handy for turning off Site Survey on a model with a fragile radio, or turning off speed tests on 4G CPEs with metered links. Telemetry keeps flowing for everything you did not change.
Scheduling and capacity stay global: the interval, the parallel limits and the maintenance window are shared by the whole organization, so one model cannot redefine them.
# QoE Analysis
How Oktopus scores the Quality of Experience of every CPE: the grades, the metrics, how each score is calculated, the alarms, and what the CPE must report.
Quality of Experience (QoE) analysis is Oktopus's automated, always-on health monitoring for every CPE in your fleet. Instead of waiting for a customer to call in, Oktopus collects metrics straight from each device, compares them with the device's own recent history and with absolute health thresholds, and turns that into a score per metric, an **Overall** score, and specific alarms whenever something degrades.
This page explains how each CPE is evaluated individually. To see the scores of all CPEs together, ranked and trended over time, see [Network Quality](/getting-started/enterprise-edition/qoe-analysis/network-quality).
## How It Works
{% stepper %}
{% step %}
#### Collection
Oktopus collects measurements from each CPE on a regular cycle: ping, speed tests, connected Wi-Fi clients, hardware usage, site survey, fiber, cellular and interface counters. What is collected, and how often, is controlled in [Device Telemetry](/getting-started/enterprise-edition/bulk-device-manager).
{% endstep %}
{% step %}
#### Evaluation
On every evaluation, Oktopus looks at the last **7 days** of measurements of the CPE. Evaluations run on a schedule (every 30 minutes by default) and also whenever a technician triggers an **on-demand** collection.
{% endstep %}
{% step %}
#### Scoring
Each metric with data gets a score from 0 to 100, by comparing the **last day** with the **rest of the week** (the trend) and by checking **absolute thresholds** (the level). The lower of the two is kept.
{% endstep %}
{% step %}
#### Overall score and alarms
The metric scores are combined into the **Overall** score. Alarms are raised for the degradations found, so you know exactly what changed.
{% endstep %}
{% endstepper %}
## The Grading Scale
Every score goes from **0 to 100** and falls into one of five grades. This five-point scale follows the ITU-T P.800 (MOS) convention, which is widely used to rate how people experience a voice or data service.
| Grade | Score range | What it means for the subscriber |
| ------------- | ----------- | ------------------------------------------------------------ |
| **Excellent** | 80 – 100 | No noticeable problem |
| **Good** | 60 – 79.9 | Works well, with small issues or a value close to a limit |
| **Fair** | 40 – 59.9 | Noticeable degradation; the subscriber may start to complain |
| **Poor** | 20 – 39.9 | Clearly degraded service |
| **Bad** | 0 – 19.9 | Service severely affected or not working |
Colors are the same everywhere in the UI: dark green (Excellent), light green (Good), yellow (Fair), orange (Poor) and red (Bad). Grey means **No data**.
## The Metrics
A CPE only gets a score for the metrics it actually reports. For example, Fiber Signal only exists on ONTs, and Mobile Signal only on 4G/5G routers. A metric that is missing shows as **`-`**. It is never treated as 100 (a CPE that doesn't report fiber power doesn't have a "perfect" fiber) and never treated as 0 either. It just doesn't count.
| Metric (as shown in the UI) | What it measures |
| --------------------------- | ----------------------------------------------------------------------------- |
| **Latency** | Latency and packet loss to the test servers configured for your organization |
| **Speed** | Download and upload speed, and the latency measured during the speed tests |
| **Wi-Fi Coverage** | Signal strength (RSSI) of the Wi-Fi clients connected to the CPE and its mesh |
| **Wi-Fi Interference** | Noise on the Wi-Fi channel the CPE is using |
| **Hardware** | CPU and memory usage of the CPE |
| **Fiber Signal** | Optical power received by the ONT |
| **Mobile Signal** | 4G/5G signal of the serving cell (RSRP, SINR, RSRQ) |
| **Others** | Stability: how many times the CPE rebooted in the last 7 days |
| **WAN Errors** | Share of WAN packets lost to errors and discards |
## How a Metric Is Scored
Every metric is looked at in **two ways**, and the **lower** of the two results is kept.
### 1. Trend: is it worse than usual for this CPE?
The **last day** of measurements is compared with the **rest of the week** for the same CPE. Speed tests and WAN counters run less often, so they use the last **two** days, so that a single bad test doesn't decide alone. Comparing a CPE with its own recent past is what lets Oktopus catch a degradation even when the absolute values still look acceptable.
* If the recent value is within a **20% margin** of the usual one, the trend score is **100**.
* Beyond that, the score drops **in proportion** to how much worse it got:
* Latency twice as high as usual → **50**. Three times as high → **33**.
* Speed at half of the usual → **50**.
* Very small latency changes are ignored even when the percentage looks large. Going from 3 ms to 4 ms is +33%, but no subscriber notices it, so a rise has to be at least **5 ms** to count.
* When the subscriber's **contracted plan** (hired download/upload bandwidth) is registered for the CPE, Speed is compared with the plan instead of with the previous week.
* Signal and noise levels (in dB) are compared by **difference in dB**, not by percentage:
| Measurement | Counts as degraded when it changes by... |
| ------------------- | ---------------------------------------- |
| Fiber receive power | 3 dB weaker (half of the light lost) |
| Mobile RSRP | 6 dB weaker |
| Mobile SINR | 5 dB weaker |
| Mobile RSRQ | 3 dB weaker |
| Wi-Fi channel noise | 6 dB louder |
For these dB measurements, and for a rise in WAN errors, a degradation takes the score down by a fixed step, into the **Good** grade (60), rather than proportionally. For Mobile Signal, RSRP, SINR and RSRQ are checked separately, and the score is the share of them that didn't degrade.
### 2. Level: is it bad no matter what?
A CPE that has *always* been bad would look fine on the trend alone, because nothing changed. To prevent that, a set of **absolute thresholds** caps the score. Once a threshold is crossed, the score cannot be higher than the middle of the corresponding grade:
| Cap | Maximum score |
| --------- | ------------- |
| Attention | 75 (Good) |
| Fair | 55 (Fair) |
| Poor | 35 (Poor) |
| Bad | 15 (Bad) |
| Metric | Attention (max. Good) | Max. Fair | Max. Poor | Max. Bad |
| --------------- | --------------------- | ----------------------------------------------- | ---------- | --------- |
| Latency – loss | ≥ 2% | ≥ 5% | ≥ 15% | ≥ 50% |
| Latency – delay | ≥ 100 ms | ≥ 200 ms | | |
| Speed | < 80% of the plan | < 50% of the plan | | |
| Fiber Signal | ≤ -25 dBm | ≥ -7 dBm (receiver saturated by too much light) | | ≤ -27 dBm |
| Mobile – RSRP | ≤ -100 dBm | ≤ -110 dBm | ≤ -120 dBm | |
| Mobile – SINR | < 10 dB | < 5 dB | < 0 dB | |
| Mobile – RSRQ | | ≤ -15 dB | | |
| WAN Errors | ≥ 0.1% | | ≥ 1% | |
Notes:
* Latency uses the **best-responding** test server, so one far-away server doesn't penalize the CPE. A test server that never answered during the whole week, while others did, is treated as a problem of that server (wrong name, server blocking ping) and ignored. If **no** test server answered during the last day, Latency is **0**.
* The Speed caps only apply when the contracted plan is registered for the CPE.
* These thresholds were calibrated on real production fleets. For example, 99% of lines lose less than 2% of pings, so they only catch real problems.
### Metrics with their own rules
A few metrics count events rather than compare values:
* **Wi-Fi Coverage**: each client with a weak signal takes points off, and weaker clients take more off. The result is averaged over the last day, so phones coming and going don't make it jump.
| Client signal (RSSI) | Weight |
| -------------------- | ------ |
| Better than -70 dBm | 0 |
| -70 to -75 dBm | 0.5 |
| -75 to -80 dBm | 1 |
| Below -80 dBm | 1.5 |
Each full weight costs **15 points**: no weak client is 100, two weak clients at -78 dBm is 70, and the score never goes below 10. A Wi-Fi Coverage of **10** means many clients are connected with a poor signal. This usually points to a coverage problem in the home (CPE badly placed, missing mesh/extender) rather than a network fault.
* **Wi-Fi Interference**: the noise of the channel the CPE is **currently using** is compared with the rest of the week, per band (2.4 GHz, 5 GHz...). One band 6 dB louder is **60**; two or more is **20**. Noise on channels the CPE doesn't use doesn't lower the score.
* **Hardware**: uses the **median** CPU and memory usage of the last day, so short spikes don't matter. CPU or memory at or above the high-usage limit (90% by default) is **60**; both is **20**. A reading stuck at 100% for the whole week is treated as a reporting problem of the CPE and ignored.
* **Others (stability)**: counts the reboots of the last 7 days. A reboot is detected when the uptime reported by the CPE goes back to a smaller value, whatever the cause: power outage, crash, firmware upgrade or manual reboot.
| Reboots in 7 days | Score |
| ----------------- | ----- |
| 0 | 100 |
| 1 | 85 |
| 2 | 70 |
| 3 | 50 |
| 4 – 5 | 30 |
| 6 or more | 10 |
## The Overall Score
The **Overall** score combines the metrics of a CPE in two steps:
1. A **weighted average**. The metrics the subscriber feels directly weigh more than device internals:
| Metric | Weight |
| ----------------------------------------------------------- | ------ |
| Latency, Speed, Wi-Fi Coverage, Fiber Signal, Mobile Signal | 1.0 |
| Others (stability) | 0.8 |
| Hardware, Wi-Fi Interference, WAN Errors | 0.6 |
2. The result is **pulled toward the worst metric**: 70% weighted average + 30% worst metric.
The second step makes sure one serious problem can't hide behind several healthy metrics.
{% hint style="success" %}
**Example**: a CPE has Latency 100, Speed 100, Wi-Fi Coverage 100, and Fiber Signal 20 (failing fiber).
* Weighted average = (100 + 100 + 100 + 20) / 4 = 80. That alone would read as Excellent.
* Overall = 0.7 × 80 + 0.3 × 20 = **62 → Good**, which correctly flags the CPE instead of hiding the fiber problem.
{% endhint %}
If a CPE has only **one** metric with data, Overall is that metric's score. For example, a CPE whose only score is Wi-Fi Coverage = 10 has an Overall of **10 (Bad)**.
## Reading the Scores
| What you see | Likely meaning / where to look |
| -------------------------------- | ---------------------------------------------------------------------------------------------------------------------------------------- |
| **Wi-Fi Coverage** low | Many clients with a weak signal. In-home coverage problem: CPE placement, walls, missing mesh/extender. |
| **Wi-Fi Interference** low | The channel in use got noisier. Check neighboring networks and consider changing the channel. |
| **Latency** low | Latency or packet loss got worse. If many CPEs drop together, look upstream (congestion, routing, a test server issue). |
| **Speed** capped at Good or Fair | Speed tests reach less than 80% (Good) or 50% (Fair) of the registered plan. |
| **Fiber Signal** Good (75) | Receive power close to the receiver limit (≤ -25 dBm). It works, but there's little margin left. Check the drop, splices and connectors. |
| **Fiber Signal** around 60 | Receive power dropped 3 dB or more compared with the rest of the week: something changed on the fiber path recently. |
| **Fiber Signal** Fair (55) | Receiver saturated (≥ -7 dBm, too much light). Usually a missing or wrong attenuator, or a very short link. |
| **Fiber Signal** Bad | Receive power ≤ -27 dBm, at the receiver's sensitivity limit. Field inspection needed. |
| **Mobile Signal** low | Weak or degraded 4G/5G signal. Check the antenna position, or whether the CPE moved to a worse cell. |
| **Others** low | The CPE rebooted several times this week: power issues, crashes or repeated manual reboots. |
| **Hardware** low | CPU or memory near saturation most of the day. Check the firmware, the number of connected clients and the load. |
| **WAN Errors** low | Packet errors/discards on the WAN interface. Often a physical-layer issue (cabling, optics, line quality). |
## Alarms
Alarms are raised alongside the scores, so you know *what* changed and not only that the score went down. They are kept in a searchable history.
| Alarm | Trigger |
| --------------------------------------------------------------- | ------------------------------------------------------------------------------------------------------------------------- |
| `PingLatency` | Latency to a test server got worse than usual (beyond the 20% margin and by at least 5 ms) |
| `DownloadThroughputDegradation` / `UploadThroughputDegradation` | Download/upload speed dropped more than 20% below the usual speed, or below the plan when one is registered |
| `DownloadRttIncrease` / `UploadRttIncrease` | The latency measured during the speed tests got worse than usual |
| `PersistentBadSignal` | A Wi-Fi client was seen with a weak signal repeatedly over the week, not just once |
| `HighCPUUsage` / `HighMemoryUsage` | The median CPU or memory usage of the last day reached the high-usage limit (90% by default) |
| `OperatingChannelNoiseWorsened` | Noise rose by 6 dB or more on the **channel the CPE is using**. Noise on a channel the CPE isn't using doesn't trigger it |
Fiber Signal, Mobile Signal, Others and WAN Errors don't raise alarms of their own yet. Their problems show up in the scores.
## What the CPE Needs to Have in Place
QoE analysis doesn't require anything beyond what Oktopus already needs to manage the device. However, the metrics you get depend on which data the CPE's [device profile](/getting-started/enterprise-edition/device-profile) exposes and which elements are enabled in [Device Telemetry](/getting-started/enterprise-edition/bulk-device-manager):
| To get this metric... | ...the device profile must implement |
| --------------------- | ---------------------------------------------------------------------------------------------------------------------------------- |
| Latency | `get_ping_result` / `parse_get_ping_result`. The CPE must support ping diagnostics |
| Speed | `set_speed_test`, `get_speed_test_result` / `parse_get_speed_test_result` |
| Wi-Fi Coverage | `get_connected_devices` / `parse_get_connected_devices`, with each client reporting an RSSI value |
| Wi-Fi Interference | `get_site_survey_results` / `parse_get_site_survey`, reporting noise per channel, plus `get_radio` to know which channel is in use |
| Hardware | `get_hwinfo` / `parse_get_hwinfo`, reporting CPU and memory usage |
| Fiber Signal | `get_pon` / `parse_get_pon`, reporting the received optical power |
| Mobile Signal | `get_cellular` / `parse_get_cellular`, reporting RSRP, SINR and/or RSRQ |
| Others (stability) | `get_hwinfo` / `parse_get_hwinfo`, reporting the uptime |
| WAN Errors | `get_statistics` / `parse_get_statistics`, reporting packets, errors and discards of the WAN interface |
If a profile doesn't implement a given function, that metric is simply skipped for devices of that model. It doesn't block the other metrics or produce a "failed" score. **If the profile implements none of them, the CPE can't be evaluated.**
## How Long It Takes to Appear
* **First score**: the CPE is scored on the first evaluation after its first measurements are collected. At that point there's no history to compare with, so only the absolute thresholds (the level) can lower the score.
* **Trends**: the trend needs measurements older than one day to compare with (two days for speed tests and WAN counters). Trend scores and trend alarms become meaningful once the CPE has a few days of history, and fully reliable after a week.
* **Persistent alarms**: `PersistentBadSignal` needs the weak signal to be seen many times over the week, so it takes longer to show up than a one-off threshold breach.
* **Rolling window**: every evaluation looks at the last 7 days only, so scores follow the CPE's real, recent conditions. A problem that is fixed stops lowering the score once the last day is healthy again. A reboot keeps counting for 7 days.
* **No recent data**: a CPE that hasn't sent any measurement in the last 7 days is shown as **No data** in [Network Quality](/getting-started/enterprise-edition/qoe-analysis/network-quality).
* **Retention**: alarm history is kept for 7 days.
# Network Quality
The tenant-wide view of Quality of Experience: how every CPE is graded, what each card, chart and column of the Network Quality page means, and how to use it to find the CPEs that need action.
**Network Quality** is the global view of the per-CPE [QoE Analysis](/getting-started/enterprise-edition/qoe-analysis). Every CPE is still evaluated individually, as described on the QoE Analysis page. Network Quality adds no new measurement: it puts the latest score of every CPE together so you can answer three questions quickly:
1. **How good is my network right now?**
2. **Is it getting better or worse?**
3. **Which CPEs, and which problems, need action first?**
The page has two views, switched with the buttons in the top-right corner:
* **Dashboard**: KPIs and charts for the whole network.
* **CPEs**: a table of every CPE, ranked worst first, with filters.
{% hint style="info" %}
Network Quality is in **beta**. Scores, thresholds and charts may still be fine-tuned.
{% endhint %}
## How CPEs Are Graded
Every CPE is scored individually, from 0 to 100 on each metric and on an **Overall** score, and placed in one of five grades: **Excellent** (80–100), **Good** (60–79.9), **Fair** (40–59.9), **Poor** (20–39.9) and **Bad** (0–19.9). Grey means **No data**. How each metric and the Overall score are calculated is explained in [QoE Analysis](/getting-started/enterprise-edition/qoe-analysis).
The metrics shown in the charts, filters and table columns are the same as on the QoE Analysis page: Latency, Speed, Wi-Fi Coverage, Wi-Fi Interference, Hardware, Fiber Signal, Mobile Signal, Others (stability) and WAN Errors. Only the metrics that at least one CPE in your network was scored on appear. If your fleet has no 4G/5G routers, for example, **Mobile Signal** won't appear at all.
## When Scores Are Updated
* Each CPE is re-evaluated on every collection cycle and also whenever a technician runs an **on-demand** collection. The page always shows the **latest** evaluation of each CPE (see **Last evaluated** in the table).
* A CPE counts as **evaluated** when it has at least one measurement in the evaluation window (the last 7 days by default). CPEs that were never evaluated, or that have sent nothing in that window (for example, offline for over a week), are counted as **No data**.
* A new CPE gets its first score soon after its first measurements, but trends need a few days of history. See [How Long It Takes to Appear](/getting-started/enterprise-edition/qoe-analysis#how-long-it-takes-to-appear).
* Every hour, a **snapshot** of the network summary is recorded. The "Over Time" charts are drawn from these hourly snapshots, which are kept for 90 days by default.
## Dashboard View
### KPI cards
| Card | What it shows |
| -------------------------- | ---------------------------------------------------------------------------------------------------------------------------- |
| **Network QoE Score** | The average **Overall** score of all evaluated CPEs, with its grade. The gauge shows the same value from 0 to 100. |
| **CPEs Needing Attention** | Number of CPEs graded **Poor** or **Bad**, and their share of the evaluated CPEs. This is your action list. |
| **Excellent or Good** | Share (and number) of evaluated CPEs graded **Excellent** or **Good**: the healthy part of the network. |
| **Total CPEs** | Every CPE in your organization, how many of them were **evaluated**, and a line showing how the size of the network evolved. |
The difference between **Total CPEs** and **evaluated** is the **No data** group. A large No data group means a big part of the fleet isn't reporting measurements, for example because the devices are offline or their device profile doesn't expose the needed data. See [What the CPE Needs to Have in Place](/getting-started/enterprise-edition/qoe-analysis#what-the-cpe-needs-to-have-in-place).
{% hint style="info" %}
The Network QoE Score is an **average**, so a high score can coexist with a few very bad CPEs. Always look at **CPEs Needing Attention** too.
{% endhint %}
### QoE Distribution
A donut chart of **how many CPEs are in each grade right now**. The center shows the number of evaluated CPEs, and the legend lists the count and percentage of each grade, plus the CPEs with **No data**. Percentages are calculated over the evaluated CPEs only.
Use it to understand the *shape* of your network: a healthy network is mostly dark and light green with thin Fair/Poor/Bad slices.
### QoE Distribution Over Time
A stacked area chart of the **share of CPEs in each grade**, hour by hour, over the selected period (last 24 hours up to 90 days). Things to look for:
* **Red/orange areas growing**: more CPEs are degrading. Check whether it started at a specific time, such as a maintenance window, a firmware rollout or an outage in a region.
* **A sudden step that stays**: something changed permanently (new firmware, a configuration change, a new batch of CPEs).
* **Daily waves**: problems tied to the time of day, often evening congestion or Wi-Fi interference during peak hours.
### Average QoE Score Over Time
A line chart of the **network average** over the selected period:
* The solid line is the **Overall** average.
* Each dashed line is the average of one **metric** (Latency, Speed, Wi-Fi Coverage, etc.).
* The colored background bands show the grade each value falls in.
When the Overall line drops, the dashed line that drops with it shows which metric caused it.
{% hint style="info" %}
The averages on this chart are usually higher than the share of bad CPEs suggests. Most of the fleet is healthy, so a few hundred Bad CPEs barely move an average over tens of thousands. Use this chart for **trends** and the distribution charts for **how many** CPEs are affected.
{% endhint %}
### Quality by Metric
A horizontal bar per metric showing **how the CPEs are distributed across the grades on that metric alone**. This answers *"which metric is driving bad experience?"*
For example, if **Wi-Fi Coverage** shows 73% Excellent while every other metric is close to 100%, most of the bad experience in the network comes from in-home Wi-Fi, not from the access network. That points to actions like better CPE placement or mesh/extender offers, not field maintenance on the fiber.
Each bar only counts the CPEs that report that metric. Fiber Signal, for example, is calculated over ONTs only.
### Drilling down
Most dashboard elements are clickable and open the **CPEs** view already filtered:
* **CPEs Needing Attention** → CPEs graded Poor or Bad.
* A grade in **QoE Distribution** → CPEs in that grade.
* A segment of a bar in **Quality by Metric** → CPEs in that grade **for that metric**.
## CPEs View
A table with one row per evaluated CPE, **ranked by Overall score, worst first**, so the CPEs that need action are at the top.
| Column | Meaning |
| --------------------------------- | ------------------------------------------------------------------------------------------------- |
| **CPE ID**, **Model**, **Vendor** | Identification of the device |
| **Overall** | Grade of the Overall score |
| **Latency** … **WAN Errors** | Score of each metric (0–100, colored by grade). **`-`** means the CPE has no data for that metric |
| **Last evaluated** | When the CPE's scores were last calculated |
Use the column button above the table to show or hide columns.
### Filters
* **CPE ID**: find a specific device.
* **Vendor** / **Model**: narrow the list to one vendor or model. This is useful to tell whether a problem is specific to a hardware model or firmware.
* **Grade** and **Metric**: work together. **Grade** picks one or more grades, and **Metric** picks which score the grade applies to. With Metric = *Overall* you get CPEs by overall grade. With Metric = *Fiber Signal* and Grade = *Bad*, you get the CPEs with a failing fiber, whatever their overall grade is.
* The clear button resets all filters.
Click a CPE ID to open the device and see its detailed [QoE Analysis](/getting-started/enterprise-edition/qoe-analysis), including its alarms and score history, before deciding on an action.
## Reading the Network View
For what an individual metric score means, see [Reading the Scores](/getting-started/enterprise-edition/qoe-analysis#reading-the-scores). At the network level, also look for these patterns:
| What you see | Likely meaning / where to look |
| --------------------------------------------------------------- | ----------------------------------------------------------------------------------------------------------------- |
| One metric much worse than the others in **Quality by Metric** | That metric drives most of the bad experience. Focus the action there (e.g. in-home Wi-Fi vs. field maintenance). |
| **Latency** or **Speed** dropping on many CPEs at the same time | Likely an upstream problem (congestion, routing, a test server issue) rather than individual CPEs. |
| Bad CPEs concentrated on one **Vendor** / **Model** | A hardware or firmware problem of that model. Filter by model in the CPEs view to confirm. |
| A sudden step in **QoE Distribution Over Time** that stays | Something changed permanently: a firmware rollout, a configuration change, a new batch of CPEs. |
| Many CPEs in **No data** | Devices offline for over a week, or their model's device profile doesn't provide the measurements. |
# MCP Server
Provide AI assistants direct access to Oktopus's device management capabilities and data.
Instead of users manually checking dashboards or copying device information, an MCP server lets AI tools query device status, retrieve configurations, execute commands, diagnose/troubleshoot issues, and apply solutions, all within a natural conversation.
### Why is it so powerful?
Support teams can leverage AI to diagnose issues, gather logs, suggest fixes, and analyse the network to execute device commands — reboots, firmware updates, and configuration changes — on behalf of users, significantly reducing the technical barrier to issue resolution.
AI assistants can pull live device data, network diagnostics, and performance metrics, then provide immediate insights and recommendations based on your current system state. Rather than working with stale dashboards or historical reports, the AI responds to what's happening in your network right now, enabling faster decision-making and proactive problem-solving.
You can integrate Oktopus, CRM, billing, and other systems with the MCP servers to talk to the LLM in natural language, providing it with the full context of the ISP's operational stack. It's like talking to an employee who has full knowledge of the company's operation, including sales, engineering, marketing, finances, etc.
#### Practical Use Cases
* **Network Troubleshooting**: "Why is Device XYZ offline?" → AI queries device status, pulls diagnostics, retrieves logs, and suggests fixes in seconds.
* **Bulk Device Management**: "Update firmware on all devices in Building 5" → AI queries device list, checks compatibility, and executes updates autonomously.
* **Support Automation**: Support agents describe a problem → AI gathers device diagnostics, interface stats, and configuration details to pinpoint issues faster.
* **Performance Monitoring**: "Show me devices with connectivity issues" → AI retrieves live metrics and alerts, then recommends corrective actions.
* **Configuration Audits**: "Are all devices using NTP?" → AI queries device configurations across the fleet and reports non-compliance.
* **Incident Response**: When an alert fires, AI automatically pulls affected device data, checks related devices, and escalates with full context.
## Quick Start
How to interact with Oktopus components using an LLM like Claude, ChatGPT, Gemini, or Ollama.
The MCP server acts as a bridge between an LLM (Large Language Model) and your Oktopus infrastructure. When you ask the LLM a question about your devices, it recognizes that it needs information from Oktopus and uses MCP to request that data. The LLM then processes this real-time information and provides you with intelligent, context-aware responses and recommendations.
Popular LLM options that support MCP include OpenAI's ChatGPT, Claude (from Anthropic), Google's Gemini, and open-source models like Llama. The specific LLM you choose is up to you.
### Claude
{% stepper %}
{% step %}
#### Go to Customize Tab
{% endstep %}
{% step %}
#### Add Oktopus MCP Server URL
The server domain can vary based on your account and deployment type. As a rule, utilize "https\://\/mcp".
Authenticate to the MCP server with user and password
Authorize LLM access to your Oktopus account
{% endstep %}
{% endstepper %}
### ChatGPT
As of this writing, custom MCP servers are not available in the free plan.
### Local LLMs
Several open-source and self-hosted LLM options are available for organizations prioritizing data privacy and local control. Check [Local vs 3rd Party LLM](#local-vs-3rd-party-llm) for a comparison.
To integrate a local LLM with Oktopus MCP, you run the LLM on your infrastructure (either on-premises or in a private cloud environment) and connect it to the MCP server using either the stdio protocol for direct process-based communication or the HTTP protocol if you're running the LLM as a separate service. With stdio, the MCP server and LLM run as connected processes on the same machine, providing low-latency communication. With HTTP, you expose the LLM as a REST API endpoint (typically on localhost or an internal network) that the MCP server can call remotely.
## Deployment Options
The Oktopus MCP server can be deployed using two different communication protocols.
We recommend using the MCP communication with HTTP transport for convenience. The tutorial and documentation materials focus on this *modus operandi.*
### Stdio
The MCP server communicates via standard input/output streams. This is a direct, process-based connection ideal for local or tightly integrated environments. You can download the Oktopus MCP server binary at: .
### **HTTP**
The MCP server exposes a REST API endpoint that can be accessed over HTTP. This enables network-based communication and allows remote clients to connect to the server from anywhere.
### Local vs 3rd Party LLM
Running a local LLM keeps all processing and data within your infrastructure, providing maximum privacy and control, no data leaves your network, and you're not dependent on external service availability or pricing. However, local LLMs typically require significant computational resources to run efficiently + engineering overhead for deployment and maintenance, while very probably having lower accuracy or capabilities compared to state-of-the-art models.
Third-party LLMs (like OpenAI's GPT-4, Claude, or Google's Gemini) are hosted in the cloud and require sending your queries and device data to external servers, which raises privacy and compliance considerations depending on your regulations. The tradeoff is that third-party LLMs generally offer superior performance, more advanced capabilities, and require minimal infrastructure investment on your end.
Choose local LLMs if data residency and privacy are critical; choose third-party LLMs if you prioritize cutting-edge performance and ease of deployment.
# Single Sign-On (SSO)
Let your users sign in to Oktopus through your existing identity provider (Keycloak, Auth0, Okta, Azure AD, and other OIDC-compliant providers) instead of managing separate Oktopus passwords.
Single Sign-On lets every user on your Oktopus deployment authenticate through a single, external OpenID Connect (OIDC) identity provider — Keycloak, Auth0, Okta, Azure AD, or any other OIDC-compliant provider — instead of a separate Oktopus password. It's configured **once, platform-wide**: there's a single identity provider for the whole deployment, shared by every tenant, which fits an on-prem deployment where you already run one central identity provider for all your users. SAML is not supported — OIDC only.
## How It Works
{% stepper %}
{% step %}
#### Discovery
The login page asks Oktopus, on load, whether SSO is turned on and whether it's mandatory. This is what decides whether users see a "Continue with SSO" button, and whether the password fields are shown at all.
{% endstep %}
{% step %}
#### Redirect to Your Identity Provider
Clicking "Continue with SSO" sends the browser to your identity provider's login page. Oktopus generates a short-lived, signed request tying that specific browser session to the login attempt, so the flow can't be hijacked or replayed by another site.
{% endstep %}
{% step %}
#### Callback & Verification
After the user authenticates with your identity provider, it redirects back to Oktopus with an authorization code. Oktopus exchanges that code for tokens and cryptographically verifies the identity token — issuer, audience, signature, and replay protection — before trusting anything in it. A login is only accepted if the identity provider reports the user's email as **verified**.
{% endstep %}
{% step %}
#### Just-in-Time Provisioning
If the email already has an Oktopus account, that account signs in as-is. If it doesn't, Oktopus creates one automatically and adds it to the tenant and role you've configured as the SSO default — see [Configuring SSO](#configuring-sso) below.
{% endstep %}
{% step %}
#### Session Handoff
The user lands back in Oktopus fully signed in, with the exact same kind of session a password login produces — from this point on, an SSO session is indistinguishable from a password session anywhere else in the product.
{% endstep %}
{% step %}
#### Logout
Signing out of Oktopus also ends the session at your identity provider (RP-initiated logout), so a shared or public machine doesn't stay silently signed in after someone logs out — the next "Continue with SSO" click requires authenticating again, rather than silently reusing a lingering session.
{% endstep %}
{% endstepper %}
## Configuring the Environment
Three environment variables must be set on the controller for SSO to be available at all:
| Variable | Purpose |
| -------------------- | ------------------------------------------------------------------------------------------------------------------------------------------------------------------------------------------------------------------------------------------------------------------------------------------------------------------------------------------ |
| `PUBLIC_API_URL` | The externally reachable base URL of your Oktopus controller (e.g. `https://api.yourdomain.com`). Used to build the callback URL that must be registered as an allowed redirect URI on your identity provider's client. |
| `FRONTEND_URL` | The base URL of your Oktopus frontend (e.g. `https://app.yourdomain.com`). Used to build the post-login and post-logout redirects. |
| `SSO_ENCRYPTION_KEY` | A long, random secret used to encrypt your identity provider's client secret at rest. **Generate this once and keep it stable** — rotating it invalidates the stored client secret, requiring you to re-enter it in the SSO settings. Losing or changing it accidentally is the most common cause of SSO suddenly failing after a restart. |
{% hint style="warning" %}
`SSO_ENCRYPTION_KEY` must stay the same across restarts. Generate it once (e.g. `openssl rand -base64 32`) and store it in your deployment's environment configuration — don't regenerate it on every restart.
{% endhint %}
## Configuring SSO
Once the environment variables above are set, an admin of your platform's **Root tenant** configures SSO from **Settings → Single Sign-On** — this page is only visible to Root-tenant admins, since the setting applies platform-wide.
| Field | Notes |
| ------------------ | ------------------------------------------------------------------------------------------------------------------------------------------------------------------------------------------------------------------------------------------------------------------------------------- |
| **Enabled** | Turns on the "Continue with SSO" button for every user on the platform. |
| **Issuer URL** | Your identity provider's OIDC issuer, e.g. `https://keycloak.example.com/realms/your-realm`. It must serve a standard `/.well-known/openid-configuration` discovery document — this is probed on save, so a misconfigured URL fails immediately instead of at the next login attempt. |
| **Client ID** | The OIDC client/application ID registered on your identity provider. |
| **Client Secret** | Encrypted at rest with `SSO_ENCRYPTION_KEY`. Leave it blank on a later update to keep the currently stored secret. |
| **Default Tenant** | Required. Every brand-new SSO user is automatically added to this tenant — picked from a dropdown of every tenant on the platform. |
| **Default Role** | Required. The role assigned to every new SSO user within the Default Tenant, picked from that tenant's own roles. |
| **Enforced** | Hides the password login fields on the login page by default, nudging everyone toward SSO. |
{% hint style="info" %}
**Enforced** hides the password fields by default, but native Oktopus users created through the software itself, can still switch back to password login from the login page if needed.
{% endhint %}
# Integrations
Alright, you've just set up Oktopus to manage all your multi-vendor devices, hoping it to be a one platform, with one UI to solve all your problems, but then suddenly you realize that you have other systems and software for different purposes, but you wish all those solutions to converge into a cohesive ecosystem.
For this matter, Oktopus provides some alternatives:
### REST API
To integrate Oktopus into your ecosystem, you can rely on [Oktopus Controller REST API](https://api.oktopus.app.br). It's documented with Bruno, with many usage examples in different programming languages, and lots of possibilities.
{% embed url="" %}
#### API versions
The REST API is versioned per request: every route keeps its path, and the client says which version it wants in a header.
```
X-Api-Version: 2
Accept: application/json; version=2
Content-Type: application/json; version=2
```
* A request without a version is served as **version 1**, so integrations written before versioning keep working unchanged. To be safe from a future change of the default, send `X-Api-Version: 1` explicitly.
* `X-Api-Version` takes precedence over `Accept`, which takes precedence over `Content-Type`. Different versions in two of them return HTTP `400`; a version the server doesn't serve returns HTTP `406` with the list of `supported_versions`.
* Every response carries `X-Api-Version` with the version that served it, also as the `version` parameter of its `Content-Type`.
* The Oktopus web interface always uses the latest version.
| Version | Devices endpoints (`GET /api/device`, `GET /api/device?id=`) |
| ----------- | -------------------------------------------------------------------------------------------------------------------------------------------------------------------------------------------------------------------------------------------------------------------------------------------------------------------------------------------------------- |
| 1 (default) | One row per protocol, as before devices were unified: a TR-369 device has `SN` = its Agent Endpoint ID and `sn_v2` = its serial number; a device on both protocols is two rows. The `protocol` filter accepts `tr069` and `tr369`. |
| 2 | One row per device ([TR-069 + TR-369](/getting-started/enterprise-edition/scripts#devices-on-tr-069-and-tr-369)): `SN` is the serial number, the Agent Endpoint ID is in `usp_endpoint_id`, plus `protocol` (`tr069` \| `tr369` \| `dual-stack`) and `connections` (status and last seen per protocol). The `protocol` filter also accepts `dual-stack`. |
Everything else behaves the same on both versions:
* Device routes (`/api/device/{id}/...`) accept the serial number, `sn_v2` or the Agent Endpoint ID as `{id}`. With `any` as the protocol segment, TR-369 is used when it is online and TR-069 otherwise; each response carries `X-Oktopus-Protocol` (`tr069` | `tr369`) and, when TR-369 didn't answer and TR-069 did, `X-Oktopus-Protocol-Fallback`. Forcing a protocol the device doesn't have returns HTTP `400` `Device has no TR-069 connection` / `Device has no TR-369 connection`; no connection available returns HTTP `400` `Device is Offline`.
* With the `protocol` filter, `status` is the status of that protocol's connection (e.g. `protocol=tr369&status=2`).
* The CSV export (`GET /api/device?...&csv=true`) has one row per device, `SN` = serial number and `Agent Endpoint ID` = Endpoint ID.
### NATS
For advanced users who may need real-time information and have experience with PUB/SUB messaging concepts, it's also possible to use NATS.
### MCP Server
Available in the Commercial Edition, it is a standardized way to connect AI assistants to your application, allowing intelligent systems to interact seamlessly with your data and functionality. Unlike direct REST API calls or direct messaging connections, [Oktopus MCP server](/getting-started/enterprise-edition/mcp-server) acts as an intelligent intermediary that exposes your application's features as discoverable "tools" that AI models can understand and use naturally within conversations.
# Simulators
The device simulators are designed to replicate real-world scenarios of device configuration by adhering to the Broadband Forum (BBF) standards. Providing a virtual environment where users can simulate various settings and behaviors, allowing for comprehensive testing and validation of BBF- standards compliant ecosystem software. By mimicking real-world conditions, the simulators helps to ensure that the "controllers" meet industry standards, facilitating interoperability and enhancing overall network performance.
# (USP) Agent Simulator
Simulate an USP agent, based on OBUSPA.
Agent is a piece of software that runs on the CPE or IoT device and is responsible for connecting it to the Controller (Oktopus) through USP. To simulate the behavior of a real device, we can use [OBUSPA](/usp-tr-369/architecture#obuspa-open-broadband-user-services-platfrom-agent) encapsulated in a docker container for better portability.
OBUSPA-based agent simulator utility packaged by Oktopus depends on initial configuration files available in the[/agent](https://github.com/OktopUSP/oktopus/tree/main/agent) folder. You can edit those files to simulate more complex environments. Run the commands below inside[ ](https://github.com/OktopUSP/oktopus/tree/main/agent)[root folder](https://github.com/OktopUSP/oktopus/tree/main). Each tab shows how to connect to a different MTP:
{% tabs %}
{% tab title="MQTT" %}
```bash
docker run -d -v $(pwd)/agent/oktopus-mqtt-obuspa.txt:/obuspa/oktopus-mqtt-obuspa.txt --network host --name obuspa-mqtt oktopusp/obuspa:latest obuspa -r /obuspa/oktopus-mqtt-obuspa.txt -p -v4 -i lo
```
{% endtab %}
{% tab title="Websockets" %}
```bash
docker run -d -v $(pwd)/agent/oktopus-websockets-obuspa.txt:/obuspa/oktopus-websockets-obuspa.txt --network host --name obuspa-websockets oktopusp/obuspa:latest obuspa -r /obuspa/oktopus-websockets-obuspa.txt -p -v4 -i lo
```
{% endtab %}
{% tab title="STOMP" %}
```bash
docker run -d -v $(pwd)/agent/oktopus-stomp-obuspa.txt:/obuspa/oktopus-stomp-obuspa.txt --network host --name obuspa-stomp oktopusp/obuspa:latest obuspa -r /obuspa/oktopus-stomp-obuspa.txt -p -v4 -i lo
```
{% endtab %}
{% endtabs %}
### Flags:
```
--help (-h) Displays this help
--log (-l) Sets the destination for debug logging. Default is 'stdout'. Can also use 'syslog' or a filename
--dbfile (-f) Sets the path of the file to store the database in (default=/usr/local/var/obuspa/usp.db)
--verbose (-v) Sets the debug verbosity log level: 0=Off, 1=Error(default), 2=Warning, 3=Info
--prototrace (-p) Enables trace logging of the USP protocol messages
--cli (-s) Sets the path of the Unix domain socket file used for CLI communications
--authcert (-a) Sets the path of the PEM formatted file containing a client certificate and private key to authenticate this device with
--truststore (-t) Sets the path of the PEM formatted file containing trust store certificates
--resetfile (-r) Sets the path of the text file containing factory reset parameters
--interface (-i) Sets the name of the networking interface to use for USP communication
--meminfo (-m) Collects and prints information useful to debugging memory leaks
--register (-R) Sets the top-level data model objects to register when acting as a USP Service
--error (-e) Enables printing of the callstack whenever an error is detected
--command (-c) Sends a CLI command to the running USP Agent and prints the response
To get a list of all CLI commands use '-c help'
--plugin (-x) Specifies the path to a shared object vendor layer plug-in
```
# Open Source Platforms
With transparency, flexibility, and collaborative nature, open-source router platforms are the ideal choice for businesses aiming to deliver innovative, secure, and scalable networking solutions.
Adopting open-source platforms like RDK-B, PrplOS, and OpenWRT ensures future-proof solutions that can adapt to evolving technologies. These platforms empower businesses to maintain full control over software functionality, updates, and security while being built upon rock-solid standardized foundations.
By leveraging global standards and community support, you gain access to a vast pool of documentation and expertise, enabling quicker problem resolution and feature implementation. Open-source platforms provide the pillars for creating differentiated products, allowing companies to stand out in competitive markets.
## Benefits
Significant cost savings by removing the need for expensive licensing fees. They allow businesses to avoid being locked into proprietary ecosystems, which can lead to substantial long-term financial advantages.
### Flexibility
Solutions can be tailored to specific use cases, enabling developers to customize features, interfaces, and protocols to align with their goals. This level of adaptability ensures that the software remains highly relevant and functional, no matter the deployment scenario.
### Community-Driven
Open-source projects thrive on the contributions of a global developer community. This collaborative model leads to rapid development cycles, regular feature updates, and quick adoption of emerging technologies. As a result, users benefit from cutting-edge solutions that evolve continuously.
### Security
As the source code is accessible to anyone, vulnerabilities are quickly identified and addressed. This transparency fosters a more secure environment compared to closed systems, where vulnerabilities might remain hidden for extended periods.
### Interoperability
Adhere open standards, making it easier to integrate solutions with a wide range of devices and networks. This compatibility simplifies the deployment process and reduces troubleshooting efforts.
### Go-To-Market
The development and deployment process is also accelerated when using open-source platforms. Pre-existing, well-maintained components can be readily implemented, allowing developers to focus on building unique features rather than reinventing foundational aspects of the system.
# PrplOS
## Introduction
PrplOS is an open-source operating system designed specifically for embedded devices and networks within the home broadband ecosystem. It is part of the prpl Foundation's initiative to support an open, distributed architecture for service delivery across the digital home. To know more access:
{% hint style="info" %}
This tutorial was tested against [PrplOS release version 3.1.0](https://gitlab.com/prpl-foundation/prplos/prplos/-/releases/prplos-v3.1.0)
{% endhint %}
## Advantages
* **Interoperability**: PrplOS provides compatibility with a wide range of devices and platforms, fostering a multi-vendor environment.
* **Security**: Built with security as a priority, PrplOS offers features such as secure boot, firmware updates, and sandboxing to protect devices from potential threats.
* **Flexibility and Modularity**: Its modular architecture allows for customization, enabling developers to tailor the OS to specific device requirements and functionalities.
* **Efficiency**: Optimized for low-power and resource-constrained devices, PrplOS ensures efficient performance suited for various IoT applications.
* **Community-Driven**: As an open-source project, it benefits from community contributions, enhancing its features and ensuring rapid adaptation to new technologies.
## Installation
Can be installed on supported hardware platforms using standard interfaces like JTAG or UART. Prebuilt binaries are available for various development boards, allowing a straightforward flashing process with tools such as OpenOCD or manufacturer-specific utilities. This ensures quick deployment and reduces the need for extensive configuration.
For testing and debugging, simulation environments provide an alternative to physical devices. Using emulators like QEMU, developers can run the system in a virtual setup, enabling safe experimentation and troubleshooting. These options make installation adaptable to both hardware deployment and software development workflows.
### Quick Start
The easiest and fastest way to get everything running is to download a pre-built image from PrplOS repository releases and deploy it on your target platform. It's very straightforward to transform the image in a format to be used by your prefered hypervisor and launch a VM with Prpl as the operating system.
You get have some knowledge with linux networking and CLI, it's important for setting up the operating system network configuration to reach the outside world and to be able to access the guest host through SSH for convenience.\
\
Check more installation options and target platforms at: .
## Configuration
### TR-369 / USP
First, setup a command alias to facilitate the next steps.
```shell
alias usp="obuspa -f /etc/obuspa.db -c"
```
Setup new USP Controller Endpoint Id:
```shell
usp set Device.LocalAgent.Controller.1.EndpointID oktopusController
```
> "Essentially, *obuspa* waits for up to 10 minutes for the presence of the *Device.DeviceInfo* and *Device.Time.Status* data model entries, ensuring that *Device.Time.Status* is in a *Synchronized* state.
>
> This timeout is configurable via Device.LocalAgent.X\_VANTIVA-COM\_PreConnectTimeout (value in seconds, 0 = disable) and can be modified either in the default *obuspa* configuration file located at [/etc/config/obuspa\_param\_reset.txt](https://gitlab.com/prpl-foundation/prplos/feeds/feed_usp/-/blob/main/apps/obuspa/files/etc/config/obuspa_param_reset.txt?ref_type=heads#L59) or at runtime \[...]"
```sh
usp set Device.LocalAgent.X\_VANTIVA-COM\_PreConnectTimeout 60
```
```shell
service obuspa restart
```
In the below commands, exchange "\" for the corresponding value of your scenario.
{% tabs %}
{% tab title="MQTTv5" %}
Define the Controller MTP as MQTT:
```shell
usp set Device.LocalAgent.Controller.1.MTP.1.Protocol MQTT
```
```shell
usp set Device.LocalAgent.MTP.1.Protocol MQTT
```
Create new MQTT client:
```shell
usp add Device.MQTT.Client
```
Setup MQTT client broker address:
```shell
usp set Device.MQTT.Client.1.BrokerAddress
```
Associate Local Agent with MQTT Client:
usp set Device.LocalAgent.MTP.1.MQTT.Reference Device.MQTT.Client.1
Associate USP Controller with MQTT Client:
```shell
usp set Device.LocalAgent.Controller.1.MTP.1.MQTT.Reference Device.MQTT.Client.1
```
Configure MQTT topics:
```shell
usp set Device.LocalAgent.MTP.1.MQTT.ResponseTopicConfigured oktopus/usp/v1/controller
```
```shell
usp set Device.LocalAgent.Controller.1.MTP.1.MQTT.Topic oktopus/usp/v1/agent
```
Enable MQTT client connection:
```shell
usp set Device.MQTT.Client.1.Enable true
```
{% endtab %}
{% tab title="STOMP" %}
Define the Controller MTP as STOMP:
```shell
usp set Device.LocalAgent.Controller.1.MTP.1.Protocol STOMP
```
```shell
usp set Device.LocalAgent.Controller.1.MTP.1.Protocol STOMP
```
Setup the STOMP instance connection:
```shell
usp set Device.STOMP.Connection.1.Host
```
{% endtab %}
{% tab title="Websockets" %}
```shell
// Tutorial coming soon ...
```
{% endtab %}
{% endtabs %}
***
### Device Logs
```shell
logread -f
```
or
```shell
logread -f | grep -i obuspa
```
### Clean all
In case you get stuck with an issue or misconfiguration, clean up your environment.
{% hint style="info" %}
**CAUTION**: This action will factory reset all the TR-181 datamodel.
{% endhint %}
```shell
rm /etc/obuspa.db &&
service obuspa restart
```
# OpenWRT
The OpenWrt Project is a Linux operating system targeting embedded devices. Instead of trying to create a single, static firmware, OpenWrt provides a fully writable filesystem with package management. This frees you from the application selection and configuration provided by the vendor and allows you to customize the device through the use of packages to suit any application. For developers, OpenWrt is the framework to build an application without having to build a complete firmware around it; for users this means the ability for full customization, to use the device in ways never envisioned.
For more details go to the OpenWRT oficial Website at: [https://openwrt.org/](https://easycwmp.org/get/)
## Installation
TR069 client is not available by default in OpenWRT images. Most users use [EasyCwmp](https://easycwmp.org/) to have CWMP management capabilities. It's possible to build easycwmp package and install in your OpenWRT system or compile the entire system with EasyCwmp enabled.
### Build Package
Download the OpenWRT SDK. It's available in the same page as OpenWRT images. After that, download MicroXML and EasyCwmp and put them under the packages folder from the SDK:
* [EasyCwmp download](https://easycwmp.org/get/) :arrow\_down:
* [MicroXML download](https://easycwmp.org/download/libmicroxml.tar.gz) :arrow\_down:
```shell
cd openwrt-sdk-23.05.5-x86-64_gcc-12.3.0_musl.Linux-x86_64
┌[user@linux] [/dev/pts/2]
└[~/Documents/GitHub/openwrt-sdk-23.05.5-x86-64_gcc-12.3.0_musl.Linux-x86_64]> cd package
┌[user@linux] [/dev/pts/2]
└[~/Documents/GitHub/openwrt-sdk-23.05.5-x86-64_gcc-12.3.0_musl.Linux-x86_64/package]> ls
easycwmp kernel libmicroxml Makefile toolchain
┌[user@linux] [/dev/pts/2]
└[~/Documents/GitHub/openwrt-sdk-23.05.5-x86-64_gcc-12.3.0_musl.Linux-x86_64/package]>
```
Build both packages:
```shell
make menuconfig
```
Navigate to libmicroxml and easycwmp and check both of them.
```shell
make package/easycwmp/compile
```
After compilation is finished both packages will be available at the folder **bin/packages/x86\_64/base/**
Copy both files to inside the OpenWRT system and install them using the apk utility:
```shell
root@OpenWrt:~# apk add libmicroxml-1.0.0-r1.apk
fetch https://downloads.openwrt.org/snapshots/targets/x86/64/packages/packages.adb
fetch https://downloads.openwrt.org/snapshots/packages/x86_64/base/packages.adb
fetch https://downloads.openwrt.org/snapshots/packages/x86_64/luci/packages.adb
fetch https://downloads.openwrt.org/snapshots/packages/x86_64/packages/packages.adb
fetch https://downloads.openwrt.org/snapshots/packages/x86_64/routing/packages.adb
fetch https://downloads.openwrt.org/snapshots/packages/x86_64/telephony/packages.adb
fetch https://downloads.openwrt.org/snapshots/packages/x86_64/video/packages.adb
OK: 16 MiB in 131 packages
```
```shell
root@OpenWrt:~# apk add easycwmp-1.8.6.apk
OK: 16 MiB in 131 packages
```
Check if EasyCwmp is working:
```shell
root@OpenWrt:~# /etc/init.d/easycwmpd start
root@OpenWrt:~# /etc/init.d/easycwmpd status
running
root@OpenWrt:~# easycwmp get Device.DeviceInfo.Manufacturer
{ "parameter": "Device.DeviceInfo.Manufacturer", "value": "OpenWrt\nhttps___openwrt.org_" }
```
## Configuration
To configure EasyCwmp parameter edit the file **/etc/config/easycwmp**
You can set the bellow settings:
```
config local
option enable '1'
option interface 'eth0'
option port '7547'
option ubus_socket '/var/run/ubus.sock'
option date_format '%FT%T%z'
option username 'easycwmp'
option password 'easycwmp'
option authentication 'Digest'
option logging_level '3'
config acs
option url 'http://192.168.10.53:9292/acs'
option username 'easycwmp'
option password 'easycwmp'
option periodic_enable '1'
option periodic_interval '100'
option periodic_time '0001-01-01T00:00:00Z'
config device
option manufacturer 'OpenWrt
https___openwrt.org_'
option oui 'FFFFFF'
option product_class 'Generic'
option serial_number 'FFFFFF123456'
option hardware_version 'v0'
option software_version 'r28605-9decfc82dc'
```
Change the option **url** and point it to the Oktopus controller. Restart the EasyCwmp daemon and check if the device appears at the Oktopus Controller Devices tab:
```shell
vi /etc/config/easycwmp
/etc/init.d/easycwmpd restart
```
Controller View:
OpenWRT Device Online
Author: [Leonardo Henrique Meres](https://www.linkedin.com/in/leonardo-henrique-meres-silva-28241b2b/)
# Introduction
USP (TR-369) is the evolution of the TR-069 standard, providing superior network performance, security, virtualized applications, and device scaling in multi-vendor, IoT-ready connected home.
> USP (TR-369) is the evolution of the TR-069 standard, providing superior network performance, security, virtualized applications, and device scaling in multi-vendor, IoT-ready connected home environments.
The **User Services Platform** is a standardized **protocol for managing, monitoring, upgrading, and controlling connected devices**. USP allows service providers, consumer electronics manufacturers, and end users to:
* Create interoperable and vendor-independent **managed Wi-Fi systems**.
* Perform **lifecycle management** of consumer connected devices and containerized microservices.
* Support **independent applications** for application-enabled services gateways.
* Enable **IoT and consumer electronics upgradability** for critical security patches.
* Develop applications that gather the telemetry necessary to **mass data processing, AI, and machine learning**.
* **Bootstrap and configure** newly installed or purchased devices and applications.
* Let customer support **monitor and troubleshoot** connected devices, services, and home network links.
* Easily map the home network to **control service quality and monitor threats**.
* Securely **control IoT, smart home, and smart networking functions** locally or from the Cloud.
* **Enable multi-tenant** (i.e., multi-stakeholder) management and control.
USP represents the natural evolution of the Broadband Forum’s [CPE WAN Management Protocol (CWMP)](http://www.broadband-forum.org/cwmp), commonly known as TR-069. It uses an expanded version of the Device:2 Data Model to represent device operations (firmware upgrades, reboots, etc.), network interfaces, and service functions (IoT functions, VoIP, etc.).
## CWMP Evolution to USP
The advent of the Internet of Things brings countless opportunities and challenges for service providers, with over a billion devices across the globe today making use of [TR-069](https://www.broadband-forum.org/download%20/TR-069_Amendment-2.pdf), what is the future of the protocol and what can we expect ahead?
The CWMP (CPE Wan Management Protocol), better known as TR-069, opened many doors for the ecosystem of providers, through which it is possible to deliver services with agility, which meet or exceed customer expectations, with proactive management and secure network, also bearing in mind the lower cost and greater efficiency for service providers.
With the rise of what we now call the smart home, the Internet of Things and the demand for increasingly interconnected and cloud-based environments, new demands and obstacles have emerged, opening the door to the creation of a new form of communication that meets the needs of current market needs.
There is a fierce race to monetize the IoT devices that are now part of the connected home and other environments. As a result, many companies are creating their own proprietary solutions; this is understandable given such pressure generated by the promise of Smart Home monetization. Unfortunately, these applications contribute to a poor ecosystem, where a provider ends up dependent and limited to a vertical solution, from a single vendor. This generates a **low competition environment (which leads to greater risks), less innovation, and the potential for very high cost solutions.**
The technologies behind Wi-Fi, device-to-device connectivity, the Smart Home and IoTs are constantly evolving and improving. It is important that when service providers look for a solution, they look for something that is "future proof", always thinking ahead.
Seeking to solve the challenges mentioned above, providers and manufacturers together developed the USP (User Services Platform), defined by the Broadband Forum's TR-369 standard, which is the natural evolution of the TR-069. This new standard is designed to be **flexible, secure, scalable and standardized to meet the demands of a connected world today, and in the future.**
# Architecture
A brief explanation of the USP components and how it works.
## Controller
A USP controller manages a set of service elements represented in a USP agent’s data model. A USP controller database contains all agents within a deployment, capturing states and capabilities, and helps instantiate use case changes. The Controller is responsable to manage USP agents, interacting with the Agent Data Model executing CRUD operations and actions in the device.
## Agent
A USP Agent is responsible for exposing a set of "Service Elements" (essentially, a data model composed of objects and parameters that represent a specific set of functionality) for consumption by a Controller. While USP is capable of being used in many different environments, the home network is expected to be the most common environment, and in this environment a USP Agent would reside in a piece of Customer Premise Equipment (CPE), e.g. broadband home router, Wi-Fi access point, IoT gateway.
## Messages Encode
The messages exchanged betweeen a USP Agent and Controller might be encrypted with TLS. All the content is structured using [ProtoBuffers](https://protobuf.dev/), which is a spec from google that aims to encode messages with a small resource footprint usage along with other modern concepts, that helps to reduce the bandwidth consumed by the remote management protocol and have a faster parsing and decoding.
## Topology
Figure 1 – USP Agent and Controller Architecture


## Protocols
The [Message Transfer Protocol (MTP) ](/usp-tr-369/mtps)can be STOMP, Websockets or MQTTv5 and MQTTv3.1.1. The data is criptographed with TLS or DTLS and the messages are exchanged with [ProtoBuff](https://protobuf.dev/) encoding, having a USP Record that encapsulates a USP Message.

## Notifications and Data Collection
You can create notifications that fire on a value change, object creation and removal, complete operation, or an event. It's also possible to create bulk data instances to send data periodically from a device to a USP Controller.

## [OBUSPA](https://github.com/BroadbandForum/obuspa) **(Open Broadband User Services Platfrom Agent):**
Open Broadband-User Services Platform-Agent (OB-USP-Agent) is an open source project that is focused on creating a reference implementation of the User Services Platform (USP) [specification](https://usp.technology/) from an "Agent" perspective.
* Designed for embedded software (\~400kb on ARM)
* Encoded in C
* License [BSD 3-Clause](https://opensource.org/license/bsd-3-clause/)
* Made for Linux environments
## Data Analysis
The protocol has a mechanism called "Bulk Data", where it is possible to collect large volumes of data from the device, the data can be collected by HTTP, or another telemetry MTP defined in the TR standard, this data can be in JSON, CSV format or XML. This generates the opportunity to use AI on top of this data, obtaining relevant information that can be used for different purposes, from predicting events, KPIs, information for the commercial area, but also for the best configuration of a device.
## WiFi
It has over 130 Wi-Fi configuration and diagnostics metrics, many of these settings and parameters are a trade-off between signal coverage area, latency and throughput. When deploying Wi-Fi systems, there is a tendency to maintain the same configuration on all clients, causing the technology to perform below expectations. Machine Learning combined with the data analysis mentioned in the previous topic makes it possible to automate the management and optimization of Wireless networks, where a big data approach is able to find the ideal configuration for each device.

## Commands
It is possible to perform commands remotely on the product, such as: firmware update, reboot, reset, search for neighboring networks, backup, ping, network diagnostics and many others.
## IoT
Figure 34 – IoT proxied device model
Figure 33 – IoT individual device models
Figure 32 – IoT Data Model
## Software Modules
Currently, telecommunications giants and startups, publishing new software daily, slow delivery cycles and manual and time-consuming quality assurance processes make it difficult for integrators and service providers to compete. USP "Software Module Management" allows a containerized approach to the development of software for embedded devices, making it possible to drastically reduce the chance of error in software updates, it also facilitates the integration of third parties in a device, still keeping the firmware part isolated from Vendor.
Figure 28 – Possible Multi-Execution Environment Implementation
# Introduction
Technical Report 069
## What it is?
CWMP – CPE WAN Management Protocol – is an application layer protocol. It was defined by [Broadband Forum](https://www.broadband-forum.org/) in [TR-069 Technical Report](https://www.broadband-forum.org/pdfs/tr-069-1-6-1.pdf), for remote management of customer-premises equipment (CPE) connected to an Internet Protocol (IP) network. TR-069 report describes the CPE WAN Management Protocol, intended for communication between a CPE and Auto-Configuration Server (ACS).
### Whats is it capable to manage?
The protocol addresses telecom devices, such as modems, routers, gateways, as well as end-user devices that connect to the Internet, such as set-top boxes, and VoIP-phones.
### What is the impact in the telco industry?
CWMP was created 20 years ago in 2004, since then it had a lot of improvements and ammendts added to It. Nowadays there are more than one billion devices being managed through CWMP around the globe.
# Architecture
The CPE communicates to a HTTP server, also called Auto Configuration Server (ACS), because instead of a normal client-server relationship between the device and the HTTP server, what happens is that the connection can be initiated from the server to the device.
As you can see above, the ACS and the CPE are at the same time a HTTP client and server, it's needed to exchange messages according to the CWMP protocol and because they're both a client and a server, must not exist [NAT](https://en.wikipedia.org/wiki/Network_address_translation) between the CPE and the ACS, they need to be directly accessible to each other.
Although there are some workarounds for the NAT problem as to use [XMPP](https://oktopus-tr-369.gitbook.io/oktopus-documentation/) or [STUN](https://en.wikipedia.org/wiki/STUN), the best option is still to install the ACS with direct connection to the CPE, this simplifies your deployment and ensures a smooth solution.
## Messages
Here are the main messages you can send to a CPE and to interact with it. All of them are available in the [Oktopus REST API](https://api.oktopus.app.br)> Device > CWMP Native Messages.
* GetParameterNames
* GetParameterValues
* GetParameterAttributes
* SetParameterValues
* AddObject
* DeleteObject
## Data Model
The first Data Model created to be used with CWMP was the [TR-098](https://cwmp-data-models.broadband-forum.org/tr-098-1-8-0.html), after that came that the [TR-181](https://usp-data-models.broadband-forum.org/tr-181-2-16-0-usp.html) which has more capabilities and possibilities than it's predecessor.
## Encoding
The messages between the CPE and the ACS are exchanged using [SOAP](https://www.geeksforgeeks.org/basics-of-soap-simple-object-access-protocol/), that transfer messages in the format of [XML](https://en.wikipedia.org/wiki/XML), and contains structured data with [RPC](https://en.wikipedia.org/wiki/Remote_procedure_call) information.
# Bibliography
Thanks to the people how helped with extremely usefull content and guidance. Here are some of the sources we used to build this documentation:
\
\
\
\
\
\
\
\